

 |

|
|
|||||||
| FrankenBuggy Tech Unconventional and Home Built Buggy Tech Forum |

|
|
Thread Tools |
|
#1
|
|||
|
|||
|
Found what I think is a deal on a new buggy. (first buggy)
I made an offer of $700 and think I got a good deal. We'll see. So it starts with a SunL 250 buggy. The previous owner found a somewhat wrecked GSXR 750 motorcycle that he drove around for about a month before it was disassembled and donated to the cause. He took it apart and mounted the block into the chassis. It seems like it's mounted ok, but what do I know. He included the original wiring harness, shifter cable parts, gauges, and other motorcycle switches, etc. So, I'm asking, will this work? What can I do to the axle/Constant variable transmission to make it work with the 6 speed motorcycle transmission? Can I keep the reverse in the original setup? I see other setups with welded diffs, can I do that and something with the CVT so it will be a fixed gearing and just use the MC trans? I really want to keep the reverse if possible.    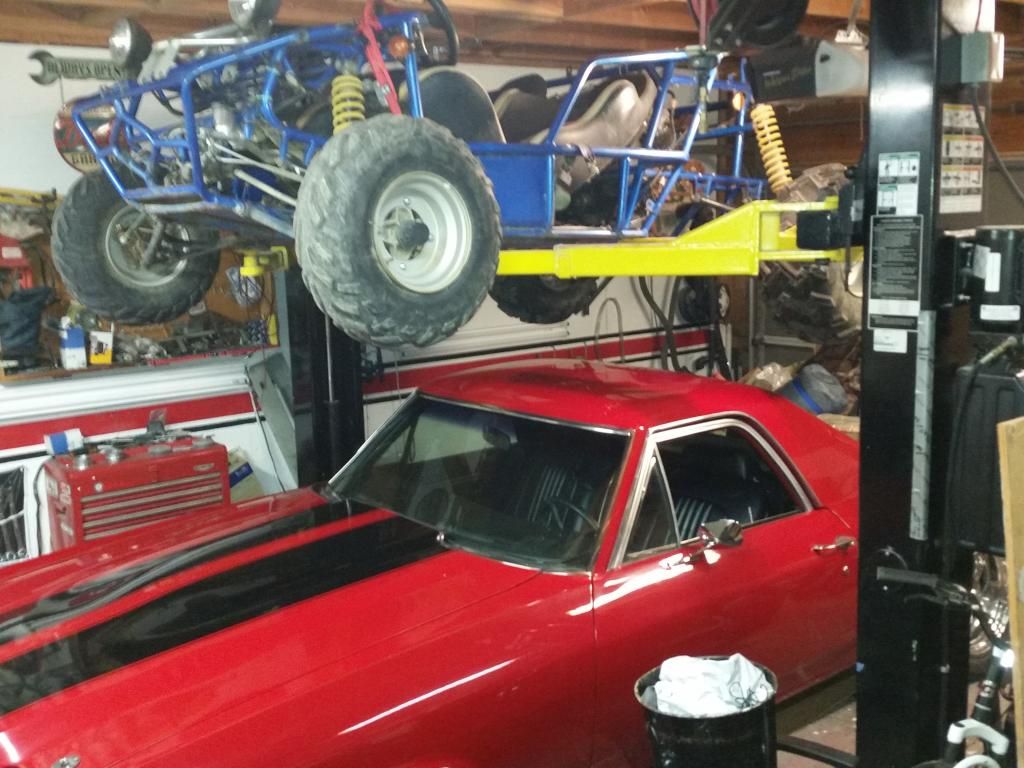 
Last edited by dan10101; 03-04-2015 at 03:36 PM. |
|
#2
|
|||
|
|||
|
I may be wrong but I don't see that Chinese FNR box lasting very long with direct drive and a 750cc motor. I'm doubtful of the CV axles too.
With that being said, I would probably try it and see..lol You can always eliminate the FNR box and use better CV axles later. |
|
#3
|
|||
|
|||
|
I tend to agree with you. I was hoping someone had hacked the FNR box and made it solid one to one instead of variable. Then maybe I could keep reverse.
I plan on reducing the throttle by about 1/2 until I get some time in the buggy and maybe I can keep it alive for a while. |
|
#4
|
|||
|
|||
|
They don't really make any power till around 7000 rpm. If you could behave in first gear, not really hit the gas till second or third, you might keep it from exploding right away.
That would be difficult though..lol |
|
#5
|
|||
|
|||
|
So is this trans/axle like any of the others out there? Do they make and kits to beef them up?
Something like this? I'm sure it's not even close to being correct, just trying to get an idea. http://gokartsusa.com/performanceclutchcvtgy6.aspx Or http://gokartsusa.com/CN250CVTUpgrade2.aspx |
|
#6
|
|||
|
|||
|
You're right about the engine not making low end power. I rode my sons 650 GSXR and it starts around 7000. It's just the wrong engine for my purposes. But it's in there and I want to see what it will do. I should start shopping for Axles now...
|
|
#7
|
|||
|
|||
|
There are heavy duty gearboxes that will handle that power but they are probably in the $2500.00 range. Search RPM FNR Gearboxes. As far as axles go there are people using 4x4 S-10 axles, Porsche axles, Ford axles.
|
|
#8
|
|||
|
|||
|
Well, that blows the budget out of the water. I guess I'll lose reverse first. I probably have Porsche axles off my 944, if not, they're pretty cheap.
|
|
#9
|
|||
|
|||
|
People have made reverse using a starter motor, most aren't too reliable though.
Most 4 wheelers nowadays come with reverse built into the tranny, and they make great low end torque. Maybe sell the 750 and pick up a nice 450? |
|
#10
|
||||
|
||||
|
like liduno notes. quad engien with reverse is the most compact and easiest drop in to get reverse with. CL san diego, rpm for sale for $1800--about as low price as you'll find one.
|
|
#11
|
|||
|
|||
|
I'll just get it running and if the rear breaks, then I'll deal with it. A starter motor should be doable. I have a high torque chevy starter in the garage.
There are just too many toys out there to put a lot of money into this one. If it's running I should be able to double my money and find something else. |
|
#12
|
|||
|
|||
|
For some reason I thought the CVT was inside the differential. So if I'm correct, the chain replaces that portion of the drive line. Not having seen the original setup, I didn't know.
I'm making progress, cleaning the carbs, starting on the wiring, trying to figure out where everything will go, how it will shift, and so on. I'll need to figure out something for the headers once I get it running.. 
|
|
#13
|
||||
|
||||
|
Quote:
Last edited by x-bird; 03-09-2015 at 09:02 AM. |
|
#14
|
|||
|
|||
|
It has F-N-R shifter.
Is there any gear reduction inside the gearbox? Or just forward and reverse? I'm trying to calculate gearing. The shorter tires should help a bit. |
|
#15
|
||||
|
||||
|
if it had hi and low, i'd say it was definitely chain driven. being just forward and reverse, it may have had cvt style pulleys/clutch and a cover and possibly a straight 1:1 ratio. Turn the input 1 rev with it in forward and see how much the output turns. that'll give you the ratio.
|
|
#16
|
|||
|
|||
|
Good idea, I was going to pull the chain off anyway to count teeth and do some derusting.
|
|
#17
|
|||
|
|||
|
Well, after doing the spin test, the diff is a 2.5 to 1. That's good, but still not great. The chain drive is 1.5 to 1 and the 1st gear ratio is 2.77 to one. It all works out to about 10.xx to 1 final drive for first gear. With a normal engine that might be ok, but with the 1300 rpm idle for the GSXR it would idle at about 10 mph in first and top out at around 70mph (still in first).
I can replace the 17 tooth gear on the tranny with a 13 and that would make the 1.5 turn into about 2.0 to 1. Better, but still not great. I might be able to find a bigger back gear for the chain, but I can only go so big without hitting the half shafts. I'm hoping to replace the 26 tooth with a 30 or larger tooth sprocket. 13/30 = 2.31 chain ratio (vs 1.5) 2.31*2.47*2.77 = 15.77 Those 2 changes would bring the final drive to 15.77 to 1. And allow a 5 mph crawl at 1100 rpm. Top speed in 1st would still be over 50 mph. I can see why people run direct with large rear sprockets. I may be changing some clutches before I finally get this figured out. |
|
#18
|
|||
|
|||
|
Maybe a jack shaft?
|
|
#19
|
|||
|
|||
|
I think you mean something like this for additional gear reduction.
http://www.wiseguyscustoms.com/image...IN%20PLACE.JPG That's a great idea, I'm going to have to give it some consideration how it could be incorporated once the gearbox gives out. Save me from having a wonking big gear on the axle shaft. |
|
#20
|
|||
|
|||
|
We made a little progress today. My Son came over and playing with all the fail safes we got the thing to crank over. Sounds healthy, now we have to figure out what's keeping it from adding spark.
Oh and the oil is pumping. In our case all over the ground from a loose connection to the oil cooler. I actually saw that as a good thing..  Oh and I found a 15 tooth sprocket in the box of parts. |
|
#21
|
|||
|
|||
|
Quote:
Quote:
As far as getting spark, check for a tip over/bank angle switch. It has to be in the upright position or the bike wont run, It'll have an arrow on it that faces up. Depending on the type you can usually put it in the upright position and fill it with rtv silicone, that will keep it from shutting off the engine. Neutral safety switch will keep it from turning over if it's in gear and the clutch switch isn't activated. Kickstand switch will also keep it from running if it's in gear and the clutch switch isn't activated. Bypassing the clutch switch and the kickstand switch is usually as simple as connecting the two clutch switch wires together. Some people will ground the neutral safety switch, but that makes the neutral light on your gauges stay on all the time. Last edited by liduno; 03-10-2015 at 08:10 AM. |
|
#22
|
||||
|
||||
|
on the jackshaft setup, you have to watch out with the short chain runs like shown, they get too hot. with my 250 and a short run on small sprockets to a jackshaft like that, the chain would be pretty near smoking after 15 minutes or so. With a bike motor turning higher revs, well ...
|
|
#23
|
|||
|
|||
|
Liduno, Thanks for the tips, this is what I'm looking at. Didn't know about the tip over switch. I'll be eliminating some of these.
x-bird, good to know. I'll have to give it some thought if I end up going that way. |
|
#24
|
|||
|
|||
|
Wow, I found a 11 tooth front sprocket. That will make a big difference.
I'm putting the link here so I don't loose it. (maybe someone else can use it). I may have the same problem with chain overheating with such a tight turn on the front, but I'll deal with it. http://sprocketspecialists.com/produ...90-92-sku-514/ Thanks again! |
|
#25
|
|||
|
|||
|
Quote:
Quote:
|
|
#26
|
|||
|
|||
|
The motor and wiring is from a 92 GSXR 750. I looked at the wiring diagram and it doesn't show a tip sensor. I looked at the clutch lever switch and decided it was hurting, I bypassed it by connecting the wires together. (looks like that is what the switch does when it's pulled). I don't want to hold the clutch lever when hitting the starter button, it won't be as easy as it was on a bike.
The starter solenoid was acting weird and sometimes arching. So I decided to replace the relay with a ford fender mount relay. I'll build a battery box tomorrow and add some new cables. I did a temporary mount for the fuel tank and we'll put some fuel line on it tomorrow, then give it another go. |
|
#27
|
|||
|
|||
|
Make sure you can start it while holding the clutch though. Finding neutral after stalling on a hill can be a pain in the butt..lol
|
|
#28
|
|||
|
|||
|
Yeah, that is one of my primary concerns. Being able to restart easily, but still keep some margin of safety. I may have to figure out how to cram a clutch pedal in the already tight floorboard.
|
|
#29
|
||||
|
||||
|
You can always use a clutch handle on the shifter. Squeeze lever when shifting.
|
|
#30
|
|||
|
|||
|
Quote:

|
|
#31
|
|||
|
|||
|
It's ALIVE!! insert Young Frankenstein quote here. We started the motor today. It needs a bit of carb cleaning, but it runs.
Actually we'll start with the hand clutch. Then if it becomes too cumbersome to teach new drivers, we'll look at a foot clutch. |
|
#32
|
|||
|
|||
|
Nice! Hearing it run helps with motivation..lol
|
|
#33
|
||||
|
||||
|
i have a clutch idea that's been in my head for about 3 years now given that sooner or later I will have one to deal with. Rather than foot or a lever on the shift handle, , I've been thinking about attaching it to the shift handle. It would take a cable run going in both directions and an override spring at the end where the two cables attach to a single cable to actuate the master cylinder or the linked cable (for cable clutch). The idea would be to have it set at the right point on the handle (above the shfit lever connection) so that you get clutch actuation before gear change and the override spring allows the shift handle to continue traveling to make the gear change without overdriving the master or overstressing the cable.
|
|
#34
|
|||
|
|||
|
Quote:
|
|
#35
|
|||
|
|||
|
I like the one lever idea for the clutch and shifter. I wonder how it would work for starting out. I'm thinking it would be fine, it would take some trial and error to get it right.
|
|
#36
|
||||
|
||||
|
It would work just like any 4 wheeler or cycle with manual tranny. Squeeze the lever shift to first let out and go. On a cycle or atv you squeeze the clutch handle and shift using the foot pedal. This setup you don't use the foot for it is all in the lever.
|
|
#37
|
|||
|
|||
|
I understand the hand clutch ideal. it's probably what I'll do since there will be minimal shifting where I'll be driving. 1st gear will be good to about 50 mph.
I was asking about the one lever idea that x-bird talked about. |
|
#38
|
|||
|
|||
|
A good strong detente on the shift part of the lever, so you can move the clutch without moving the shifter. Make it so you have to push harder to move the shifter.
|
|
#39
|
||||
|
||||
|
I know what you're wondering about dan. set up correctly you'd get full clutch withdraw to engage, then the rate of releasing the lever would control slip. if you need to feather the clutch while in gear, partial lever movement would do that. It's the way my semi-auto works off the lever right now, i can bump the lever to slip the clutch while giving it some throttle if i need to dump some revs on it.
The thing that needs worked around is that you've gotta move the clutch full travel, then the gear shift its final amount all with the same stroke. can't overdrive the clutch or clutch cable. A new idea to spring load the cable connection came to me the other day while scrapping an engine. Mentally i've been designeing this setup for a few years, so i've got lots of ideas on how to put it together. Latest i've been mulling over is the idea of using a valve spring and a valve. Seems the most effective. Cable ends need to have a bolt-through loop end on them. Thread the valve stem. Weld a washer on one end of a piece of tubing that's larger than the valve and spring. Drop the spring and valve in the tube with the threaded end protruding. Connect that to the cable with a slotted-hole thread-on clevis. drill a hole for a pivot stud through the other end of the tube. The setup needs two of these cable/spring rigs. One going forward with the cable then looping back and one going straight back. The slotted clevis is for when the shift is going the opposite direction --the slack cable won't move, the connector bolt going through the clevis will travel in the slot. The cables would join together at the other end to a single cable to active either a cable clutch setup or a pivot lever to drive the clutch hyd. cyl rod. The trick of it comes down to picking a spring that's strong enough to not compress much while it engages the clutch but then compresses enough without breaking the cable once full clutch travel is reached and the lever keeps applying force to make the gear shift Last edited by x-bird; 03-15-2015 at 05:38 PM. |
|
#40
|
|||
|
|||
|
A clutch lever on the shifter is simple and proven but I love the idea of making it different.
Another simple way to do it, push forward to pull the clutch, left to down shift, right to up shift. |
|
#41
|
||||
|
||||
|
Quote:
While that dual axis another good idea, it won't work with my setup because i don't have enough left and right throw room. However, flip that idea to putting a left/right pivot about a 3rd of the way up the shift lever with stops on it and a "push left to clutch in" cable run would and it would work. I have enough room for one sidewasy throw direction. A locked-in ball pivot like one sees on a hood or truck cap shock rod on the clutch cable end to prevent wearing out the cable end and i could keep my front and rear shift setup. Thanks liduno, that's even simpler than what i've been going at. may give it a shot when the time comes.  Sry that this turned into a sort of threadjack Dan,! Sry that this turned into a sort of threadjack Dan,!
Last edited by x-bird; 03-15-2015 at 08:29 PM. |
|
#42
|
|||
|
|||
|
No problem, I love new ideas. Actually they are all new to me.

|
|
#43
|
|||
|
|||
|
I made some progress.
I extended the wiring up front, arranged the switching, changed the motorcycle starting system to a automotive system. Had a problem killing the engine so I had to add a toggle switch to kill the ignition. As I change wiring I start it to make sure I don't break something. (like not being able to stop an out of control engine). I did notice that the first cylinder is smoking a bit. I may have to do some engine work on this after all. 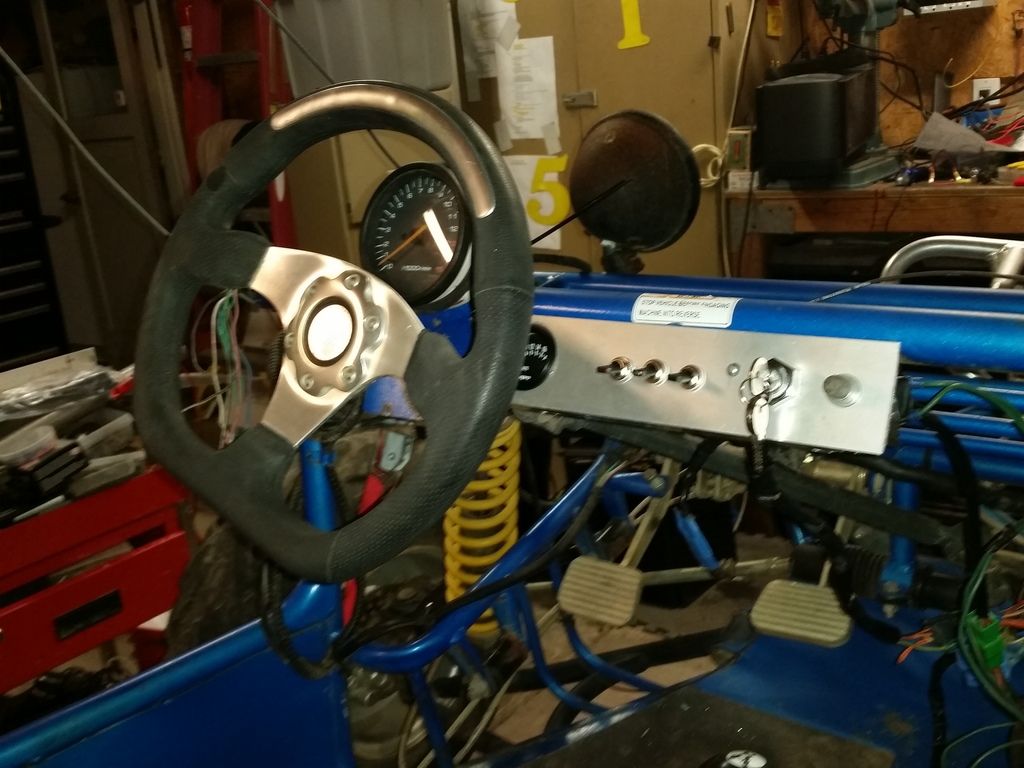 Then I worked on the controls a bit. I decided to use the non-working parking brake as a shifter for the 6 speed. I added the clutch lever to the gear shifter and managed to get it in the right spot that I think should work. 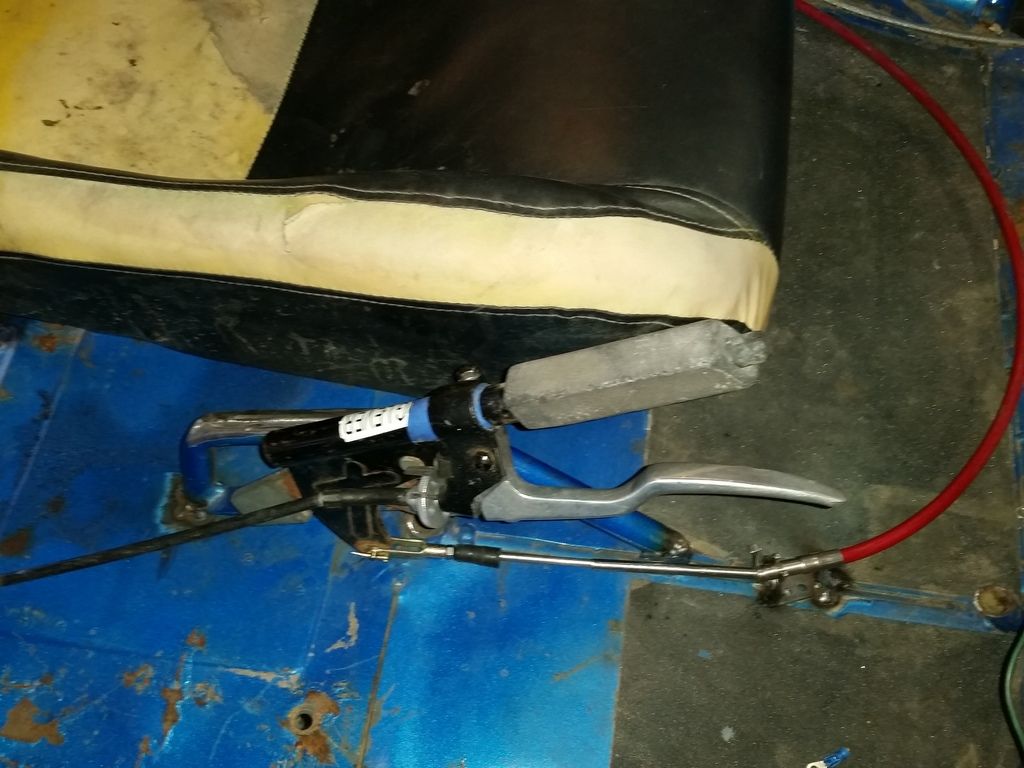 I changed the front gear on the chain drive. Went from 17 teeth to 11 teeth. I think that will get us in the ball park of a usable gear drive. Also found in one of the boxes a boatload of 530 chain. So I cut a new chain 1 link shorter and mounted it up. Plenty of chain adjustment to take up the slack. I have some work to do on the headers, but it may take a while to do that. |
|
#44
|
||||
|
||||
|
That's how I somewhat always pictured it but instead of using the break handle I would have designed a shifter with a more vertical approach with the handle. I have an old Ford PU I was going to use the Quick Silver shifter out of it mounting it at a more desirable height to ease shifting. What ever direction the shifter will be moving you will want the clutch handle mounted on the leading edge. If your handle will be moved upward to upshift than the handle is correct but if pushing the handle to upshift you will want the clutch lever mounted opposite.
|
|
#45
|
|||
|
|||
|
The smoke ''may'' go away. Sometimes when a motor sits for a long time you get sticky rings, just running it might fix it.
|
|
#46
|
|||
|
|||
|
I tried different locations for the shifter. But it's a small buggy and I'm a big guy. My leg gets in the way. I had my wife (1/2 my size) sit in the drivers seat and test this location. For her and most people it will just be starting in first and then hanging onto the steering wheel. But it's still comfortable for me. We'll see how it feels once it's rolling. I may rearrange things with a better shifter. For now it's a check mark on a long list.
 The best part of all this is that my wife actually cares how it works and can't wait to roll drive it.. It had some rust in a couple of the intake ports. Of course those cylinders are strong and don't smoke. Since the headers are still individual I can see easily which ones are hotter than the others and which are smoking. Hoping it will 'go away', but I think I'll check on some GSXR forums to see how to do a quick ring and valve lap on the engine. |
|
#47
|
|||
|
|||
|
This looks like an interesting site for frankenbuggy builds.
http://www.protodie.com/930-cv-live-...lete_p_47.html This is only $775. But I may be able to do it for a couple hundred in materials. I saw someone build a box to hold the center section of a rear end, (Suburu?). The price might be doable as long as the rest of the items left to do aren't crazy expensive, (like the engine). I'd love to spend 5k and get the whole rear end with reverse, but then I might as well build a sand rail. Last edited by dan10101; 03-25-2015 at 12:56 AM. |
|
#48
|
||||
|
||||
|
Quote:
this hobby can get stupid expensive if you let it no matter what level build the buggy is. For me Protodie's parts are wish list only. after all the years and mods and re-dos to my little thing, i had the thought yesterday, that at day 1, i could have started with an old VW woods rail for about $500 and have a pretty nice one by now. However, basic parts and consumable costs (suspension, wheels and brakes) are way higher and around here you're more limited with riding areas. A scratch build on a rail will likely set you back 7500-1500 depending on what level you go to with it and what equipment you're set up with fab-wise. |
|
#49
|
|||
|
|||
|
I agree, things can get out of hand quickly.
|
|
#50
|
|||
|
|||
|
The oil fill for the FNR box has me confused. The only plug I see is high on the front of the case. So do I use that or can I use the vent tube fitting on the top which would be a lot easier. Unless there is another plug that I'm missing, ( and I stared at it alot), I'll fill it with 3.5 oz of 75-90w gear fluid.
So, am I all messed up here or is this at least somewhat correct? 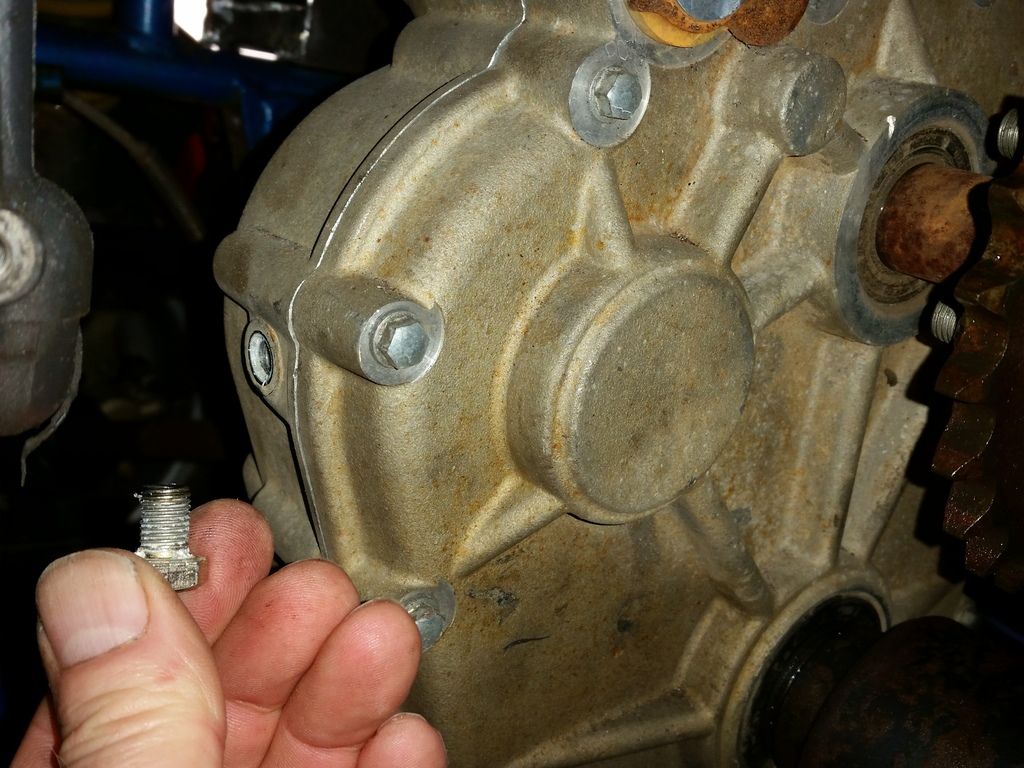 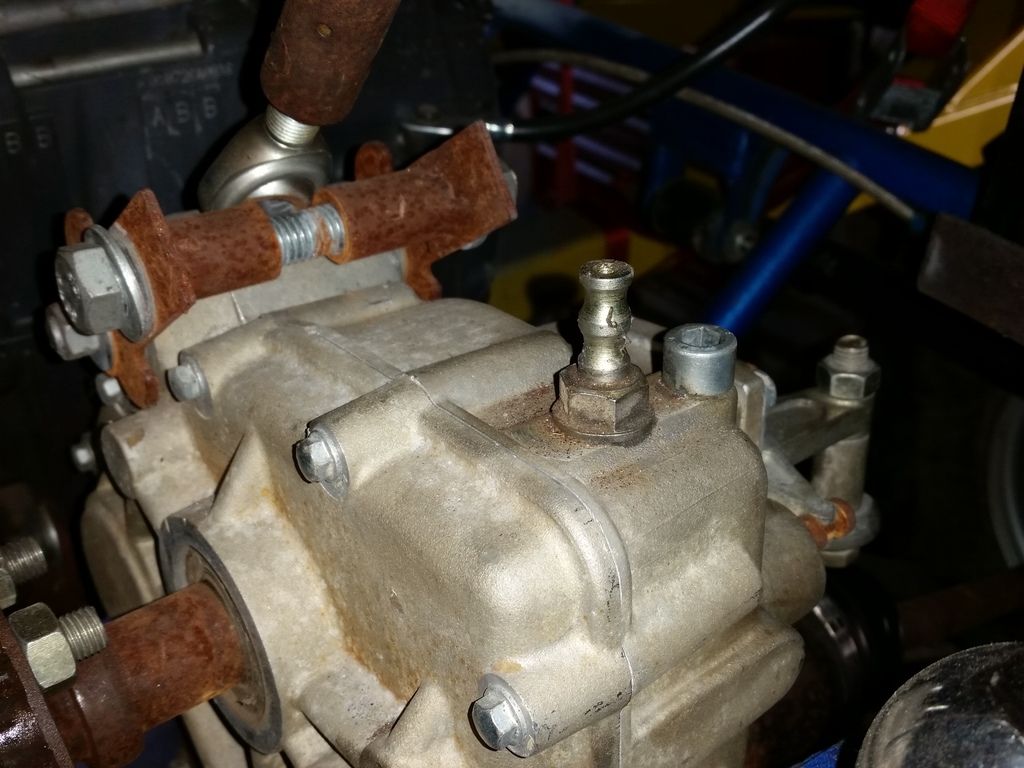 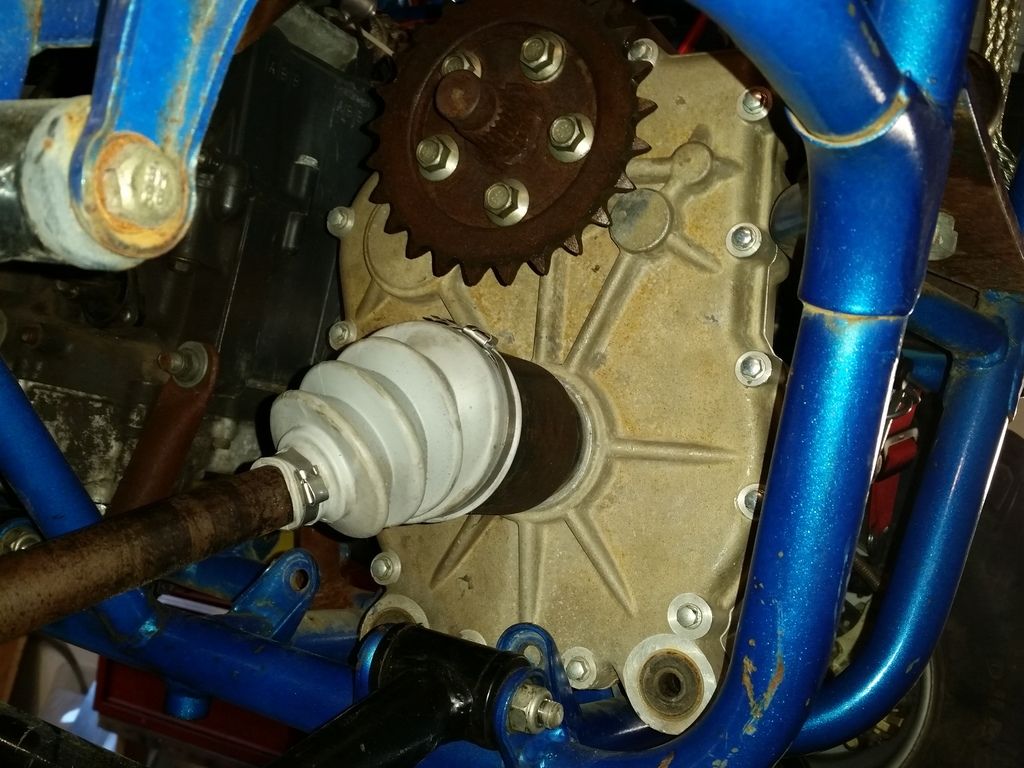
|
|
#51
|
|||
|
|||
|
If that is in fact the fill hole, then you can use the vent, but leave the fill hole open.
That way when you fill it the fluid will spill out if it's over filled. |
|
#52
|
|||
|
|||
|
I guess I'm due for an update.
I've pretty much decided that once it's on the road and seems to work ok, I'm going to move the clutch down to the floor where it should be. But, I kinda want to make sure this all will even work before I go that far. I rebuilt one half shaft. Everything looked good inside. The other side looks newer and for now I'll leave it alone. (budget is everything.) I took the front ball joints and tie rod ends apart. The rubber boots were all ripped. They were all good and tight so I cleaned and greased them and put on some new boots. I also built some crappy headers, not tuned, not paired with the right cylinders, but they should work, even if it does cost me some top end. I won't be spending much time at high rpm anyway so I do really care. I wrapped them in header wrap, and I'll be building a firewall to keep the heat off the seats which are still real close to the pipes. I tried out a couple old mufflers that my son had laying around. I'm thinking I want to keep it quiet so I can ride around the house more often. I need to build the roll cage so I can figure out where the gas tank will mount, and then where I can put the muffler. I installed 3" lap and shoulder belts from my sports car. They are out of date for track use and still like new so it's a good place for them. I changed the oil, it's still smoking a bit, I may have to dig into the engine after it's all sorted out. Still trying to figure out the FNR oiling. (see previous post) I realized that I didn't get brake lights with the buggy. It's off road only, but I think headlights and brake lights are minimum. 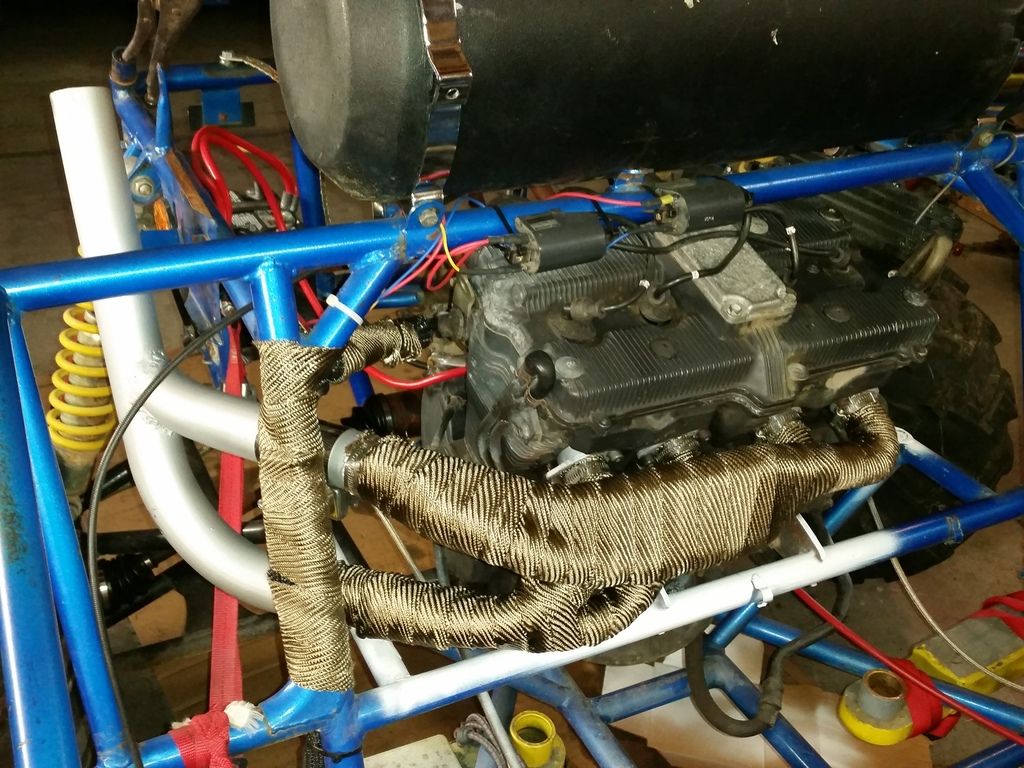 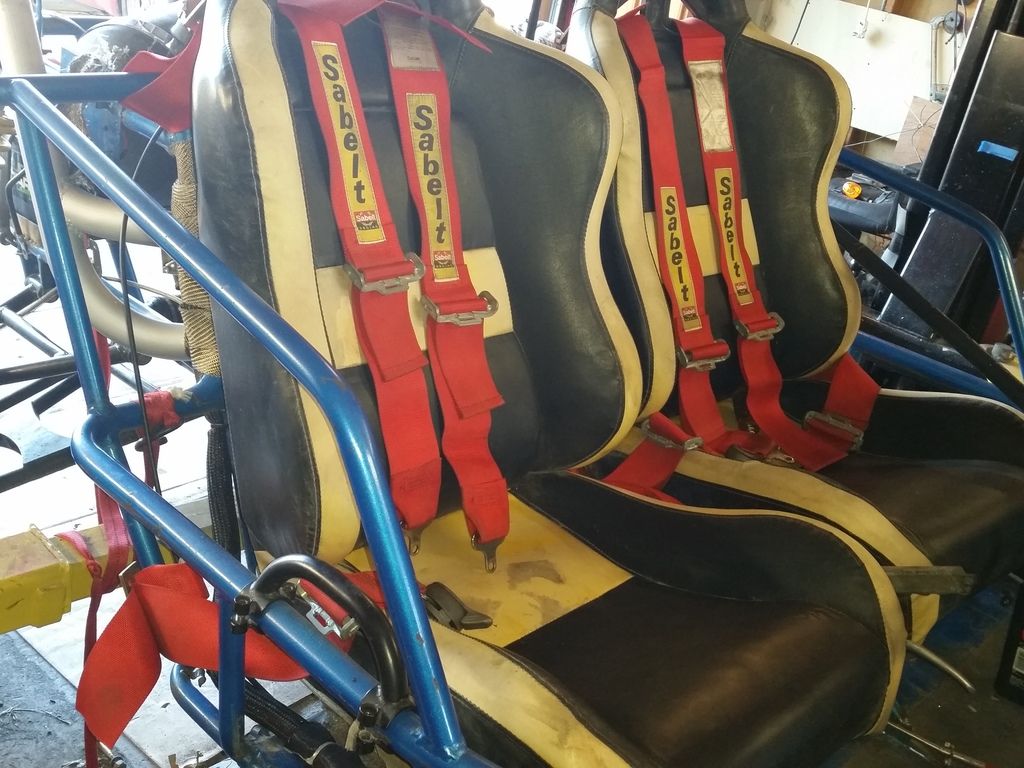
|
|
#53
|
|||
|
|||
|
I can't imagine it would take that much oil. But it's a good idea to leave the plug out because it would blead the air out as I added that thick goopy oil.
I saw a couple posts that indicate it only takes 3.5 or 3.7 oz of 80-90w oil. But they were for a different brand and it had a fill hole an inch or 2 off the bottom. |
|
#54
|
||||
|
||||
|
What buggy is the gear box out of?
|
|
#55
|
|||
|
|||
|
It's a SunL SLGK-250-2a.
|
|
#56
|
|||
|
|||
|
Well I finally made some progress. I rebuilt the carbs and got it running again. I previously couldn't get the clutch to disengage so I tore it apart, (I'm good at that), cleaned it up and when I couldn't find anything wrong, I put it back together. But then it wouldn't run so I had to order kits for the carbs. Getting it running again finally, I could recheck the clutch. And magically it's working. So I checked a few things and decided it was time for a road trip. I made it around to the front of the house and turned around, (tried to turn around). But, my little road test gave me some insight.
1st, I have to fabricate a linkage for the forward reverse lever. Especially since 2nd, it can't turn around any better than my big truck. 3rd, there is 0 zero weight on the front end. So, now I have a couple of concrete blocks hanging off the front to see if that helps. 4th, it binds when I turn the front wheels. Not sure if that's from sitting for years or other issues. I've dismantled the ball joints and tire rod ends and greased them, no help. Didn't expect steering issues. 5th, still need tuning work. 6th, I need to make the clutch a floor pedal, the hand clutch is just too confusing. 7th even with all it's problems it's gonna be fast! I goosed it a little around the corner and it just took off, then I gave it more and the chain started rattling. So, 8 is I need to sort out the rattle so I can goose it again! Question: For the manual steering racks, is there grease or oil inside? Are they hard to disassemble and clean? |
|
#57
|
|||
|
|||
|
They do get stiff after sitting. I had one that I just turned all the way left and covered the teeth with grease, then did the same to the right. Once I turned it back and forth a few times it worked great.
|
|
#58
|
|||
|
|||
|
I'll give that a try. Hoping it's just a glob of dried grease. Thanks
|
|
#59
|
|||
|
|||
|
We made some chain adjustments and some carb adjustments so it would idle better. Then I had my Son drive it (nothing crazy, sorry). The shiftier linkage cable broke, it was worthless anyways. We decided that relocating the clutch to the floor and the shiftier to the dash, would get it out of the way and hopefully be more solid and easier to learn. It's still making noise on hard acceleration. I asked him if the steering seemed to bind, but he said no, so maybe it's working out the kinks.
One thing we agree on, if we can work out the bugs, it's going to be a lot of fun! I was able to get a bit of video, hard to do holding a dog. Video Last edited by dan10101; 11-02-2015 at 07:20 PM. |
|
#60
|
|||
|
|||
|
Finally got to drive it on my own property. What a blast. Still things to do, but I feel better spending time and money on it to get it right.
Video! |
|
#61
|
|||
|
|||
|
|
|
#62
|
||||
|
||||
|
Great video, that thing is wicked fast. Just a suggestion. I would try to find some better ball joints for it and definitely some good shocks you might have to do a little fabrication for the joints. With the speed that thing does I would sure hate for the cheapo Chinese ball joint to go. I would also make a stronger more braced roll cage welded on. Nice job fitting the motor looks good. Also don't know if it is yours but nice El Camino.
|
|
#63
|
|||
|
|||
|
Thanks for the suggestions. I'm concerned about the suspension parts as well. They are in good condition and tight, greased, but still they will take a beating. Better shocks/springs would help. It bottoms out with just me in the buggy. I hate to see it with two people in it. The cage is pretty good, my son welded it, I didn't trust my welding. A couple more braces wouldn't hurt. Yes, the El Camino one of my other projects.
|
|
#64
|
||||
|
||||
|
You can also convert ball joints to heim joints, just make sure to spend the extra money for properly rated heims. You can find them as cheap as $8.00 each but they are used for conveyor systems. You need ones rated for automotive. As far as shocks go you will have to spend some $'s for a proper designed shock for the buggy but after the shock of cost and once on you will be glad you did. The correct suspension shock will give you control you never imagines and save the steering and rear axles.
|
|
#65
|
|||
|
|||
|
I'll have to look at all the options. I even thought of making it a long travel somehow but it's such a short wheelbase I may save that for the next buggy.
|
|
#66
|
|||
|
|||
|
Update on the build Feb 2016
I’ve been having fun test driving and even though I have a pretty good handle on the controls, it’s not something just anyone can pick up quickly. So I made the decision to move the clutch to the floor. I took the gas pedal that has a distinct appearance of a clutch pedal and uses the same type of cable, and cut a section out of the mounting bar and moved it to the left of the brake pedal. After moving the brake assembly over a bit, there is still room for a new gas pedal. Before 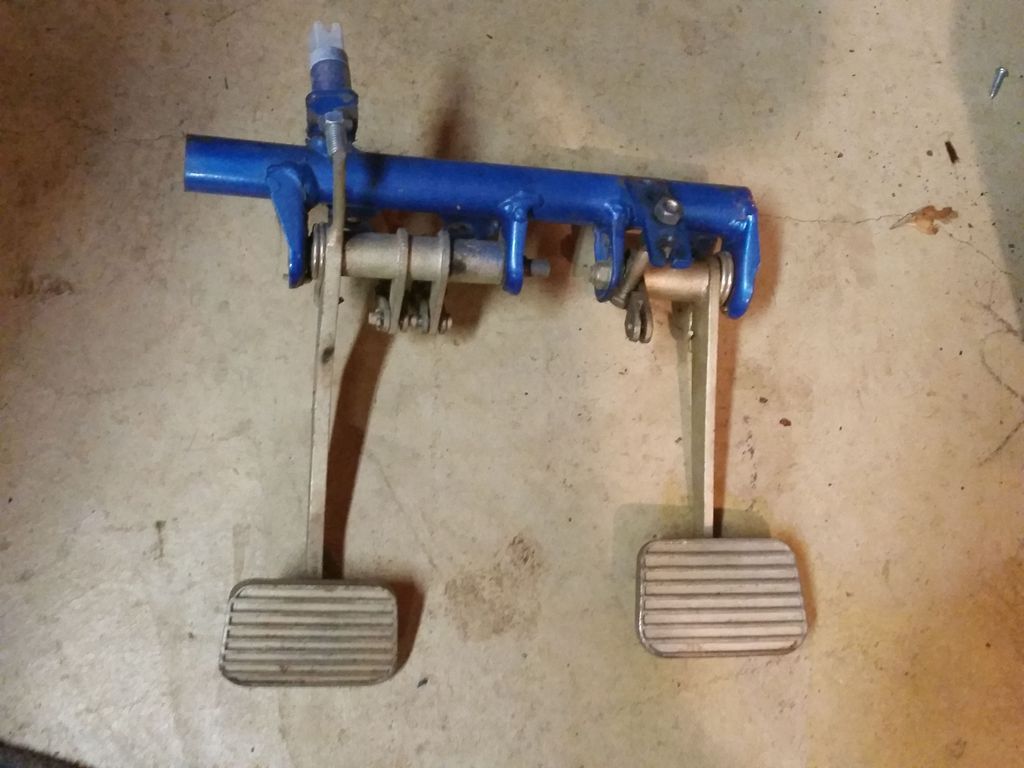 After  I found an import gas pedal at the wrecking yard and mounted it to the bar giving me a pretty good looking from a functional standpoint. I’ll tac weld it in place once I know I like the position. Moved motorcycle shifter to the dash and redesigned it to be more solid, easier to shift. Still has some give, I need to work on that. Now I need to find a knob for the SunL F-N-R shifter. The cable doesn’t get in the way, but may be an issue if someone is sliding over to take the wheel or if bodies are flying around inside the buggy. So, full belts are required. On that note, I moved some of the roll bar padding to be more protective of the passengers.  After taking it out in the mud I decided we needed front fenders, (wings), Here is the first one. I figured Red Bull stickers might work well here. I saw several other fender options. The problem is when the tires are turned, so fixed fender won’t really work if they are behind the tires, so I covered the area that would be hit when the wheels are turned. Seems to work fine.  Added another bar on each side to the roll cage. I feel a bit better. It's still too tall, but makes it easier for us old people to get in and out. Plus I'll build a rack of some sort to carry things or just to provide some shade.  Added a chain tensioner since the chain was doing weird things and even locked up once. The tensioner works great.  I redid the geometry on the gas pedal so it wouldn’t be so touchy. Every bump would cause a big surge in gas creating a wild ride. I took it out and parked it on the steepest hill I could find. Then just drove up it. Awesome. Haven’t been able to do that without lugging the engine. It helps when I know I'm in 1st gear. Finally, I took it down into the back yard, (some 3-4 acres of play area) and had no problem climbing back up the hill. They aren't really steep, maybe 20 degrees, but steep enough to give it a good test. Planned changes, For now, nothing but cleaning up some items like wiring, reworking the chain guard to fit around the tensioner, tack weld the gas pedal since I like the position. Adding some rear fenders A rack, since the roll bar is so high, I’ll had a rack under the bars. Possibly another on the rear of the buggy and again maybe on the front. Then maybe some heavier springs to keep it from bottoming out due to the extra weight! Or, as I said earlier nothing. I’ll just go drive it. |
|
#67
|
||||
|
||||
|
Nice job!!
|
|
#68
|
|||
|
|||
|
Dan, I know this is almost 5 years ago, but any chance you are still around? Believe it or not, i just picked up the exact same cart (in worse starting shape). Finished stripping it down, mine also minus the engine and CVT, so same rear end config as yours, just the FNR gearbox. I have a question. On my FNR, the input shaft just pulled right out. Was planning on taking it apart anyway to check wear and clean out the old fluid, but obviously this made it mandatory as the internal gears just dropped off. Wear was pretty much zero, everything fits up good. Nobody lubes it in a long time. But I cannot figure out how that input shaft is kept in place. Was thinking I would need something rigged up externally to hold it in. Did you ever have yours apart or run into this issue?
|
|
#69
|
|||
|
|||
|
Quote:
There are a few parts places for these buggies online. And I remember the whole unit wasn't real expensive, so I didn't feel bad thrashing on it pretty regularly. good luck with your build. I've moved on to a Jeep XJ build which has been a lot of fun. |
|
#70
|
|||
|
|||
|
Dan, many thanks for the quick reply. I was up doing some research last night, and I manged to find a parts diagram for the FNR box. It looks like there is a snap ring located somewhere on the input shaft that I did not find inside my box when I opened it. That might be the $1000 missing link lol. Anyway, am gonna look into that further and continue with the build. Your Jeep is way cool and fun I am sure. This one is mine, a 2005 diesel Excursion I've had since new with a 4.5 Donahoe Racing lift kit and big BFG's. Not as rad as yours, but she runs great out on desert dirt roads and can pull pretty much anything with a Torklift 20K Superhitch. Thanks again, Bill in AZ.
|
|
|