

 |

|
|
#101
|
||||
|
||||
|
I paid 9.99 for this one... http://www.highrpmracer.com/chain-ad...s-p-12883.html
I had to bend it back a tad at the motor, like you did, but it works just fine for now. It's more beefy than the stock one, but I don't know if it is 1/4", never measured.
__________________
T.J. Yerfdog Spiderbox, Uni Type air filter with 6" intake, 130 jet, Orange no-rev limit cdi, Red coil, iridium plug, 1500rpm clutch springs, 1500rpm contra spring, 13g sliders, 22" rears, 21" fronts, aftermarket reverse installed, and Trailtech Vapor. Last edited by T3beatz; 06-01-2012 at 08:16 PM. |
|
#102
|
||||
|
||||
|
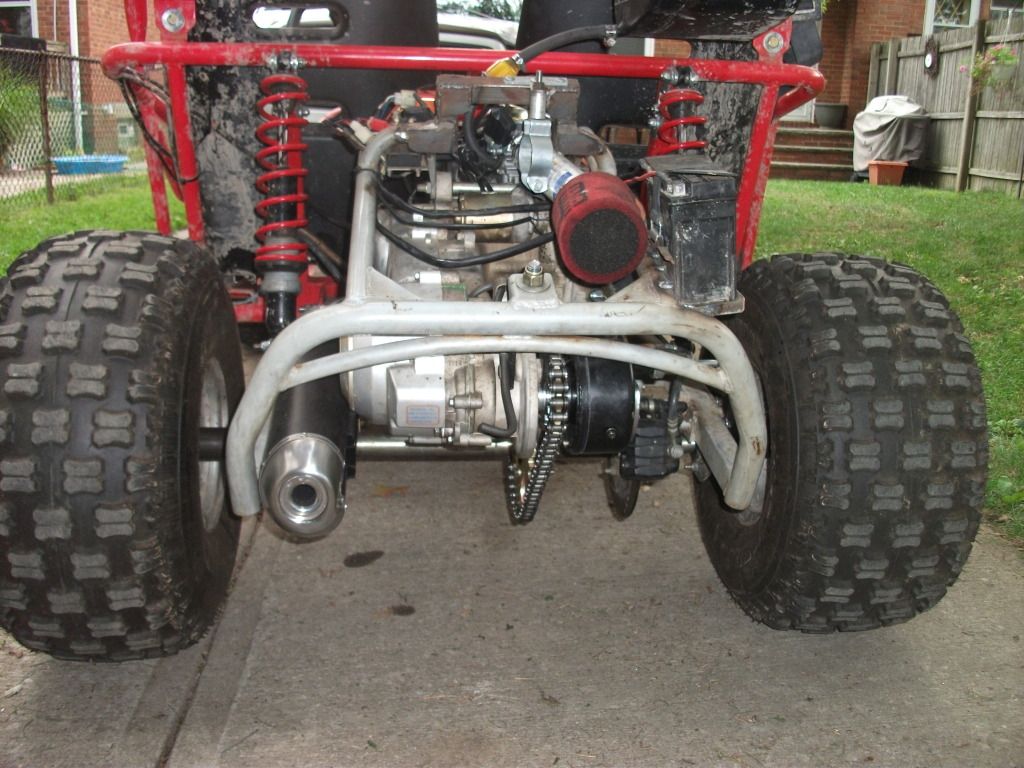
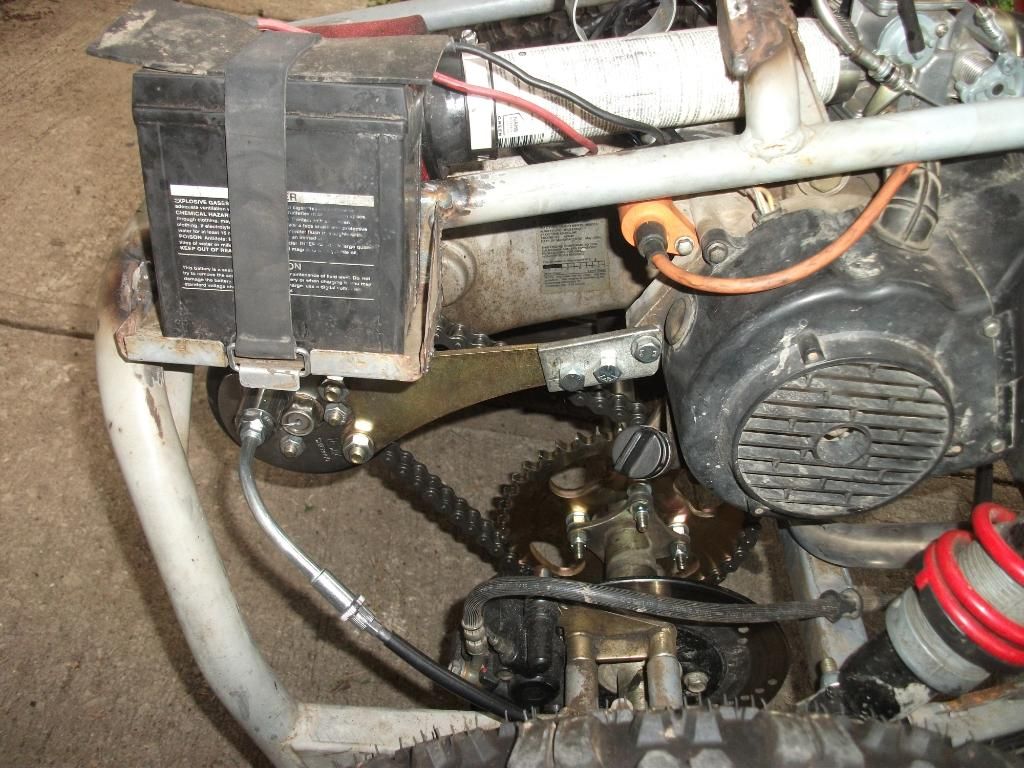
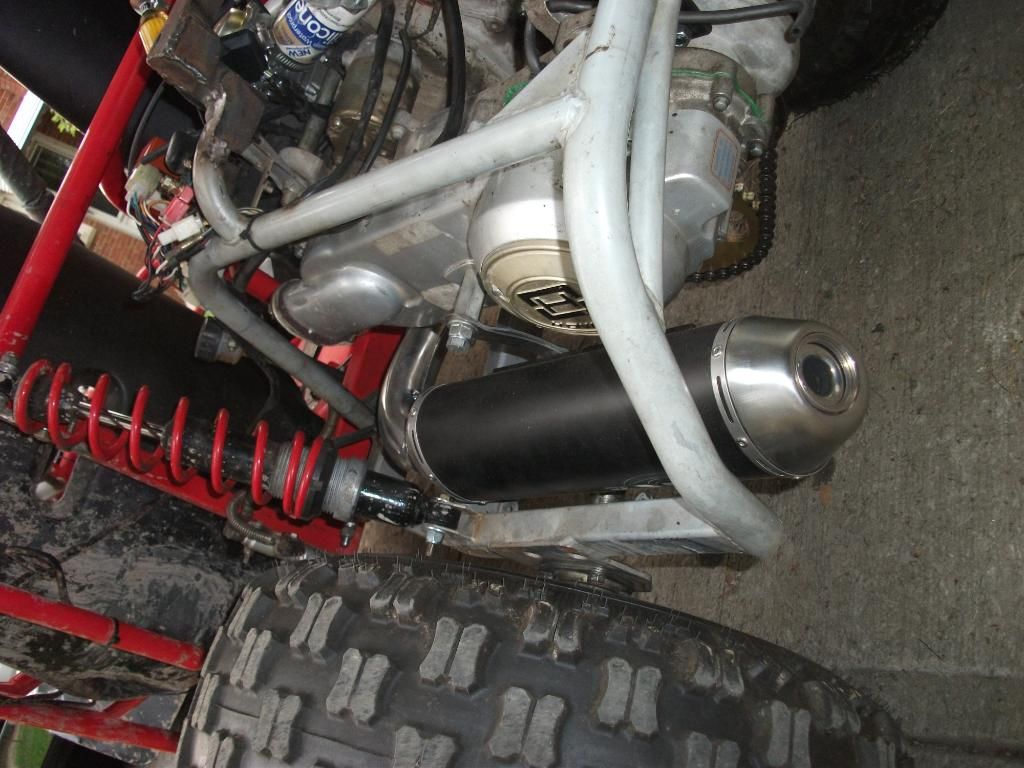
Did a few more mods to the Yerf
|
|
#103
|
||||
|
||||
|
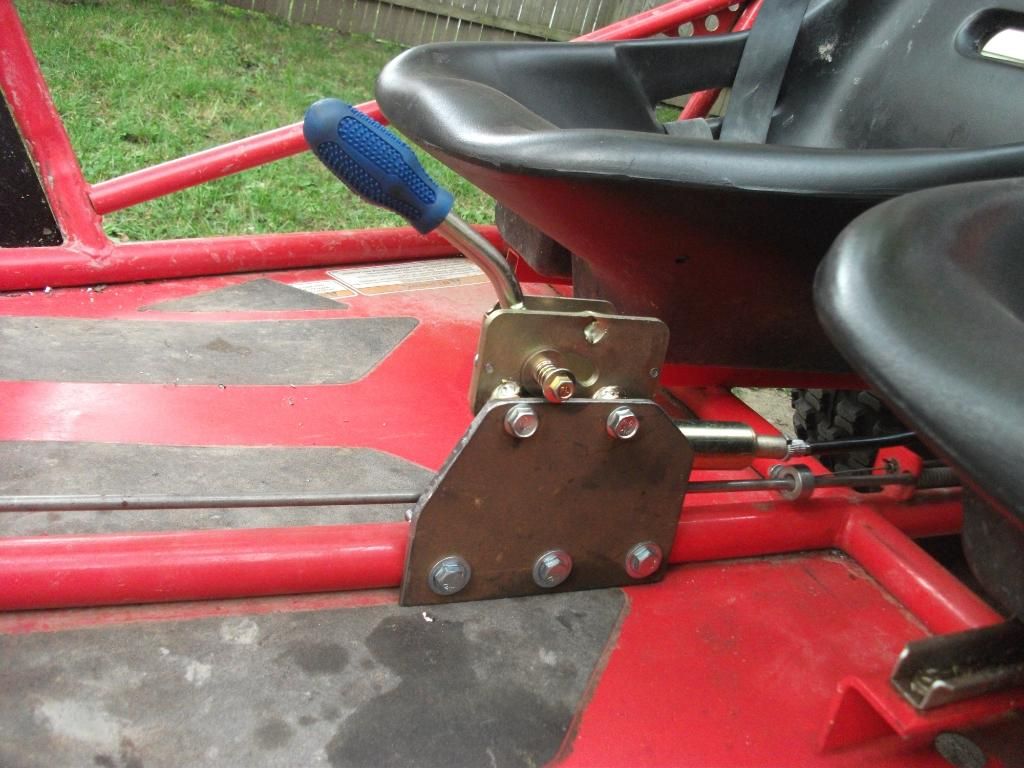
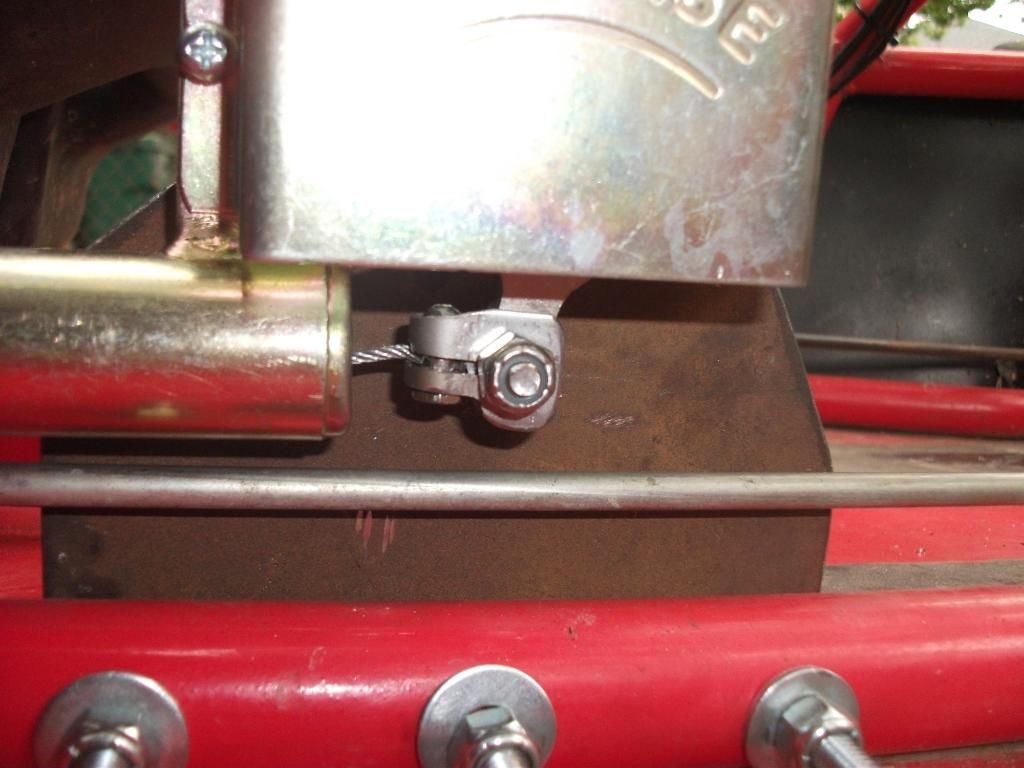
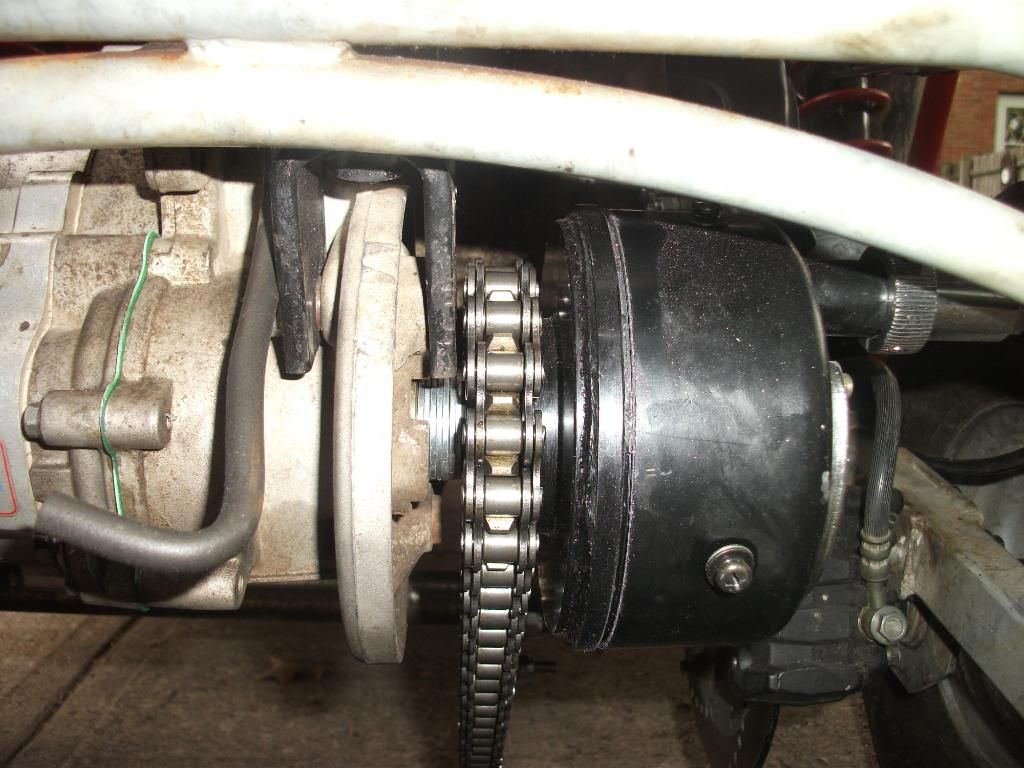
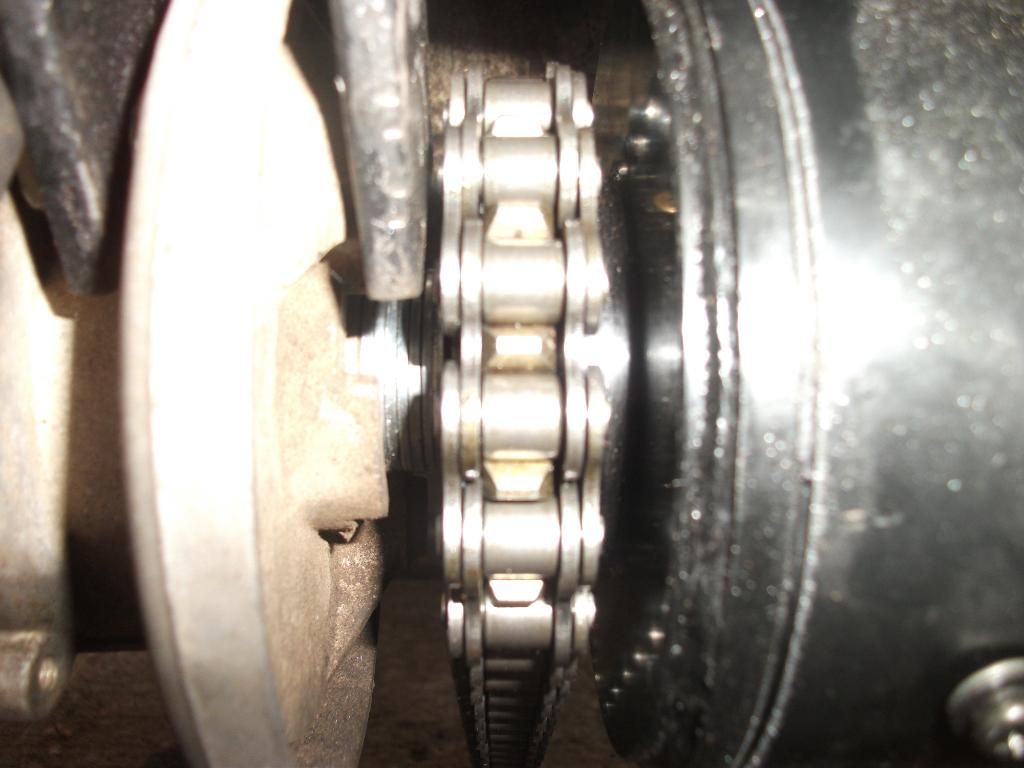
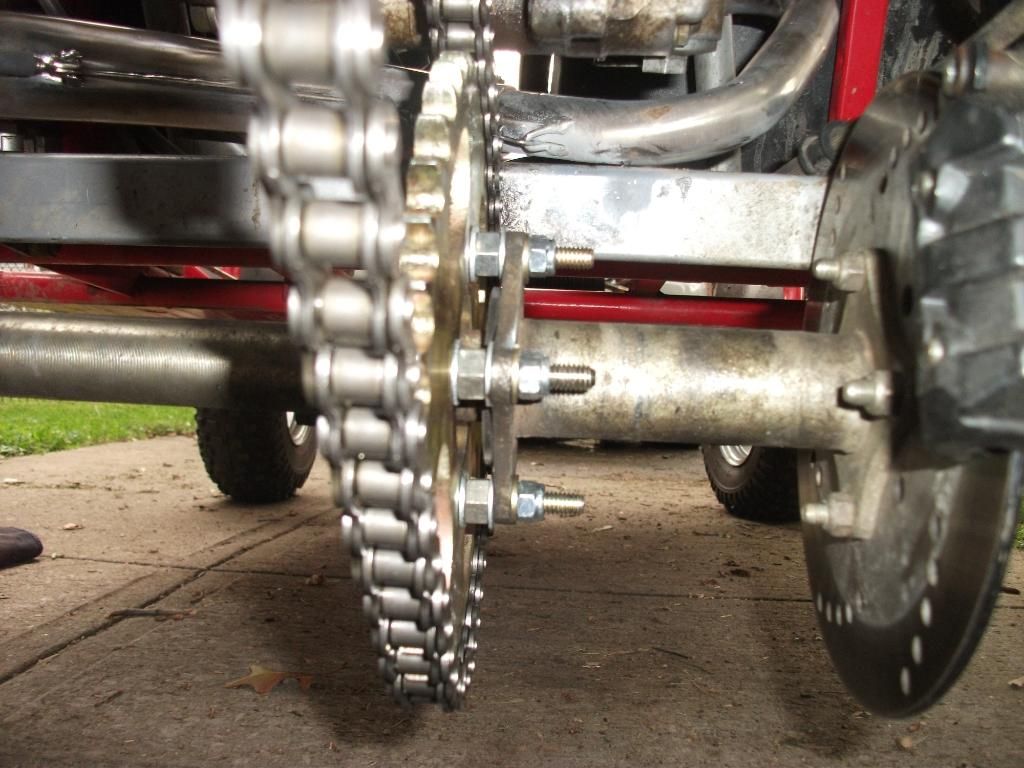
Here's the reverse set up
|
|
#104
|
||||
|
||||
|
Here's what I don'tlike about it. See all those flakes, they're metal.
Is that normal for a new gearbox? 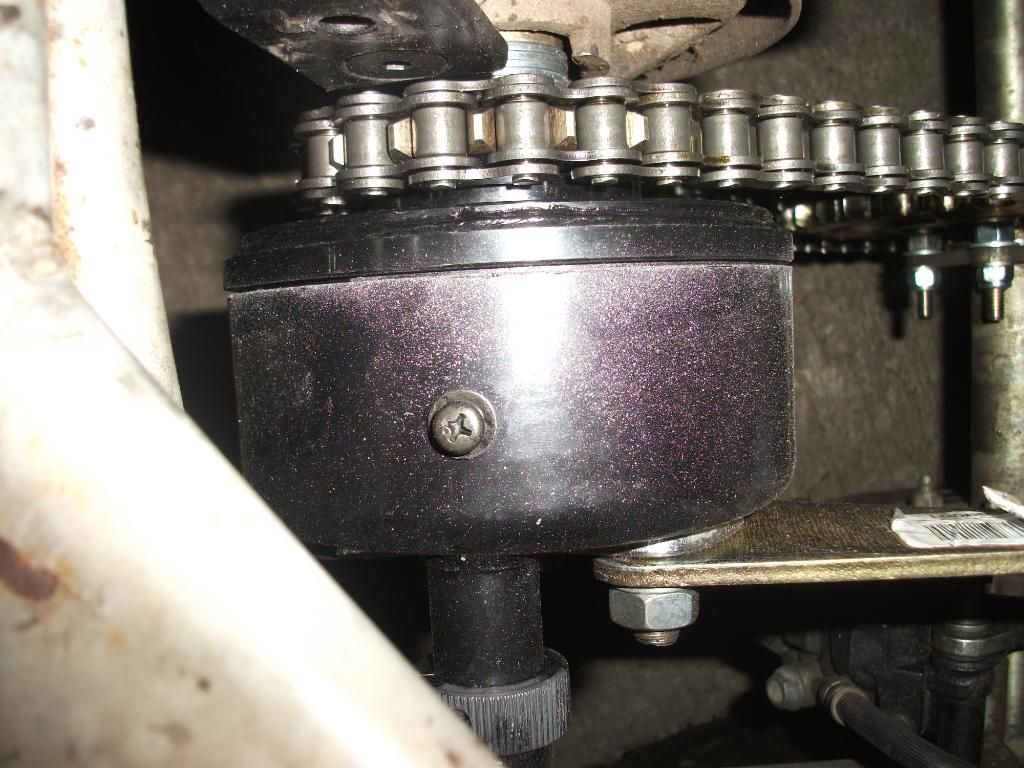 The bastards shorted me on the mounting bracket, so i had to add an extension. 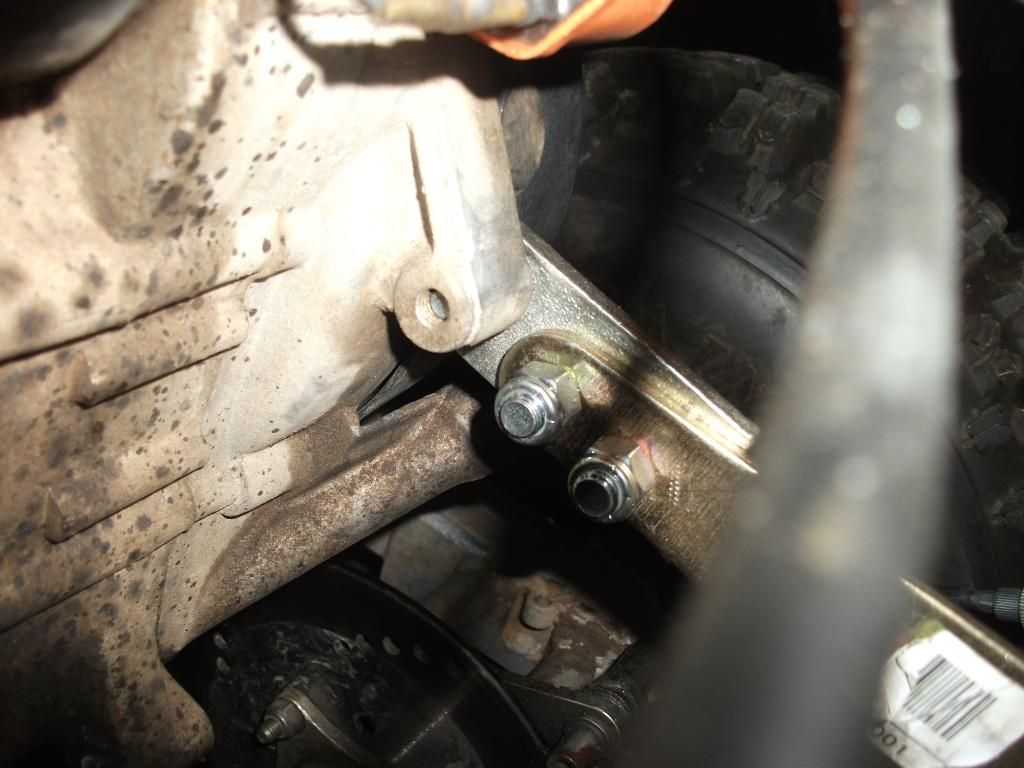
Last edited by xlint89; 09-17-2012 at 11:59 PM. |
|
#105
|
||||
|
||||
|
Nope the metal flakes are deffinately not normal.
TOM |
|
#106
|
||||
|
||||
|
And now here's the issues I have with the reverse set up bought as pieces off Ebay
1. The shift cable was WAY too long. Think it's 65" and I only needed it about 48" (had to cut it and add a ferule to the end after I made that custom piece to fit the ball that came on it stock) Thanks for the pics you guys posted on the other thread, I knew exactly what I had to make in order for it to fit.  2. The output shaft doesn't have enough spline length for my liking. As you can see all the washers added to shaft reduced the amount of spline contact area. I'm lucky if i have 1/2" of splines inside the gearbox. I used the 197mm shaft. http://www.ebay.com/itm/Outer-Shaft-...4f6c91&vxp=mtr 3. I had to use a flat head bolt and countersink it into the engine mount in order to keep as much spline area available as possible. You can clearly see how close I am to the mount with the chain. 4. I do not like having to space the sprocket on the axle. The self centering hole is not used and I'm completely relying on the grade 8 bolts. 5. I've got the sprockets aligned spot on, but yet I get some chain bind at 1 point during each revolution. (yes, I have 1/2" of slop in the chain at it's loosest point) 6. It seems tougher to push the buggy by hand. Probably part of the chain binding issue, and part of the metal flakes. 7. The buggy still lurches forward when in reverse, but then it slams into reverse 8. It appears the metal flakes are from the 2 halves of the gearbox contacting when in reverse. (the cable pulls the 2 halves tight) 9. The output shaft retaining nut (back side of the gearbox) doesn't have a good way to keep it locked on. I drilled the nut and shaft, then slid some SS wires through them like a cotteer pin to keep it from backing out. Once again, all the shims on the front of the gearbox eliminated alot of thread for the nut to grab. If anyone has any tips or suggestions on how to remedy any of these issues, please speak up. |
|
#107
|
||||
|
||||
|
Didn't think so.....

|
|
#108
|
||||
|
||||
|
After reading the install directions a bit more thoroughly, I MIGHT have the output shaft nut a bit too tight. We'll see how that works out tomorrow.
|
|
#109
|
||||
|
||||
|
I have done a yerf and a couple of the crossfire buggies without reverse. I got everything from Stuart at Blade, which was basically all Kinroad parts. No problems what so ever. The halves should not squeeze together when putting in reverse. At least none of mine do. The lurching sounds like either adjustment or binding internally. Does the gear have grease in it? There were several of those gears which look alike but some dimentions differ and won't work on another buggy it was not designed for unless you have the matching spacers and shaft. This can be why your spline and threads are short. Carter used a different shaft then Kinroad . They look alike but one is a bit shorter then the other and the spacers are of different lengths. Although the gears look pretty much the same the Carter won't work on the Kinroad or Kinroad on Carter unless all components, shaft and spacers are used. You should not have had to use spacers to line up the sprockets. Any rev. I have worked on had one spacer on the shaft then the rev gear slid up to it. The other spacer is in the rev box. The reverse assy that buggy depot sells all parts come from one source. Not sure who now but at one time he got them through Blade Pwr. Sports. I use an impact to tighten the nut on mine since the inner spacer keeps everything the proper distance and from binding.
TOM |
|
#110
|
||||
|
||||
|
I never had a problem with my sprocket being spaced like that, I used grade 8 nuts and bolts also....
And soapkart did a very easy solution to the cable length problem, he just cut the ball of the front end of the cable and slide the wire through a tightening setup (washers, nuts, and bolts) and that was it. My little brother did the same things and it works great! so if the cable ever breaks you can just buy a new one and slide it into the sheathing and cut the excess off.
__________________
T.J. Yerfdog Spiderbox, Uni Type air filter with 6" intake, 130 jet, Orange no-rev limit cdi, Red coil, iridium plug, 1500rpm clutch springs, 1500rpm contra spring, 13g sliders, 22" rears, 21" fronts, aftermarket reverse installed, and Trailtech Vapor. |
|
#111
|
||||
|
||||
|
as Tom said about the carter and kinroad .... I had to do like yourself and add extra spacers between the engine and sprocket because those are the exact two brands i had to mix and match the shaft (kinroad) and rev. assy. (carter). you have to make sure that the reverse assembly is seating against the step on the shaft next to the splines when you tighten it up. if the spacers are preventing that then the gearbox halves aren't properly together. It took me a lot of trial and error shimming to find the exact spacing setup, sprocket alignment wasn't perfect and i've since remedied that by moving the engine mount. flakkes--how well greased is it and do you hear any grinding/contact rotating by hand? have you tried cable and idle adjustment to eliminate the lurch/slam into reverse?
|
|
#112
|
||||
|
||||
|
Thanks for the guidance guys.
Unfortunately I do not know exactly what buggies these parts were made for. I just kinda followed the cheap reverse thread and bought similar parts since the links were old. The gearbox just says GY6. http://www.ebay.com/itm/GY6-150cc-Re...5335a2&vxp=mtr The output shaft. 197mm long http://www.ebay.com/itm/150cc-GY6-En...0c1281&vxp=mtr I wonder if this is the one I need? It's listed as 204mm long http://www.ebay.com/itm/Gas-Electric...c0d470&vxp=mtr The gear lever http://www.ebay.com/itm/Reverse-Leve...f61c5d&vxp=mtr The shifter cable http://www.ebay.com/itm/62-Reverse-C...17d24d&vxp=mtr And a 39T sprocket from BigE on the other site. If BD had any in stock I prob would have bought that kit and been done with it, but they have been out of stock on stuff for a REALLY long time..... (although I saw a couple listed yesterday when I was doing some research. UGH!!!!) Unfortuantely no spacers came with anything. I had to re-use my stock spacer and add quite a few myself as you can see. Hey X-bird, do you remember off hand what length output shaft you needed? As for the flakes, there's lots of grease on the inside. The metal flakes are from the 2 case halves touching when I put it into reverse and start spinning the output side. |
|
#113
|
||||
|
||||
|
Quote:
|
|
#114
|
||||
|
||||
|
Don't recall the length off hand, but the kinroad and carter were the same overall--it's the lengths of the various machined sections that you have to be checking out. the carter shaft has a longer splined area on the gearbox side with the step up to the wider part in a different location. this in turn made the Kinroad's shaft position the outer "fixed" half of the gearbox farther away from the engine, thus the need for additional spacers to move the rotating portion over to it. Otherwise, that half could have moved quite a bit on the shaft. I think it was about 3/8ths or so off. What Tom and I determined was that the spacers are different between the two--the carter has a "floating" main spacer that goes into the rotating side, but not as deeply as the kinroad's and that one i think may have been sort of fixed or locked to the inside of the case once installed. we probably spent an hour on the phone talking measurements, dimensions of both types etc ...
Last edited by x-bird; 09-18-2012 at 05:50 PM. |
|
#115
|
||||
|
||||
|
My bro got his from ebay, the 197mm one if I'm not mistaken. Mine is the same but my sprocket/hub can slide on the axle. My reverse gearbox is pretty old, it's not one of the newer ones like you guys have, it's pretty worn out. I plan on getting a new one very soon, but I was waiting for the prices to go back down to about $99.00 over the summer they went up to $200.00-$250.00 just for the gearbox itself! Now I see they are back down to about $129.00 which isn't too bad ether.
My brother also has a different rear end on his spiderbox so his measurements are different also, I don't remember if he had to slide his sprocket over or not, but I did before I switched axles and it was fine.
__________________
T.J. Yerfdog Spiderbox, Uni Type air filter with 6" intake, 130 jet, Orange no-rev limit cdi, Red coil, iridium plug, 1500rpm clutch springs, 1500rpm contra spring, 13g sliders, 22" rears, 21" fronts, aftermarket reverse installed, and Trailtech Vapor. Last edited by T3beatz; 09-18-2012 at 07:23 PM. |
|
#116
|
||||
|
||||
|
Prices are only going to go up. Everything I get has gone up in price due to the quickly shrinking dollar. Believe me guys, none of us make a killing off these parts. If one is selling for 200.00 the one for 129.00 will be either a second, defect or cheaply made. Nobody I know can afford to cut their price 71.00 and still make a profit. You can go to Harbor freight and buy a 200 piece tool set for under 100.00 or go to sears and spend almost 200.00. There is a difference in the quality.
|
|
#117
|
||||
|
||||
|
That is true! The bad thing is prices are going up but the money in my pockets is going down! lol
BTW, my Harbor Freight tool set has been working pretty good so far! lol 
__________________
T.J. Yerfdog Spiderbox, Uni Type air filter with 6" intake, 130 jet, Orange no-rev limit cdi, Red coil, iridium plug, 1500rpm clutch springs, 1500rpm contra spring, 13g sliders, 22" rears, 21" fronts, aftermarket reverse installed, and Trailtech Vapor. |
|
#118
|
||||
|
||||
|
The 204mm shaft seems to have the extra 7mm added in the splined area I'm concerned with. That's about 1/4" more. Think I may have to pick it up and try that one then. Thanks again guys.
Tom, I'm hoping these $130 gearboxs aren't seconds. I think the cost went up to around $200 because they were hard to get for a while there. Obviously a shipment of parts came in from Taiwan that has brought the price down. (I'm hoping at least, because if they are $200 for a "good" one, then the BD kit is actually a deal) |
|
#119
|
||||
|
||||
|
My little bro paid 115 for his gearbox, shifter, and mounting brackets as a kit about 6-7 months ago. It has been working pretty good ever since, If you break a gearbox down you can see there is not much to them. 200 bucks is not justifiable in my opinion.
__________________
T.J. Yerfdog Spiderbox, Uni Type air filter with 6" intake, 130 jet, Orange no-rev limit cdi, Red coil, iridium plug, 1500rpm clutch springs, 1500rpm contra spring, 13g sliders, 22" rears, 21" fronts, aftermarket reverse installed, and Trailtech Vapor. |
|
#120
|
||||
|
||||
|
Today I did break the gearbox down, and now I fully understand how it works.
What I did do was install a very thin shim between the splined "sun gear" and the bushing/spacer on the back half of the case. (giving me a tiny bit more clearance between the halves when the lever is pulled up) I also gave myself some slack on the cable so it doesn't pull the gear box quite as hard. Lastly I did 2 things. 1. I only went about 1/8 turn more past "snug" on the output shaft retaining nut. 2. I tightened that retaining nut before I tightened the mounting bracket. The first time I didn't do that, and I think I may have pulled the gearbox out of alignment causing me some issues. I now no longer have the chain bind i did, the kart rolls very easily now by hand, and the flakes of metal are now gone. I did still order the longer shaft because I stll like the idea of having more spline surface area than the 1/2" - 5/8" I have now. Last edited by xlint89; 09-19-2012 at 10:25 PM. |
|
#121
|
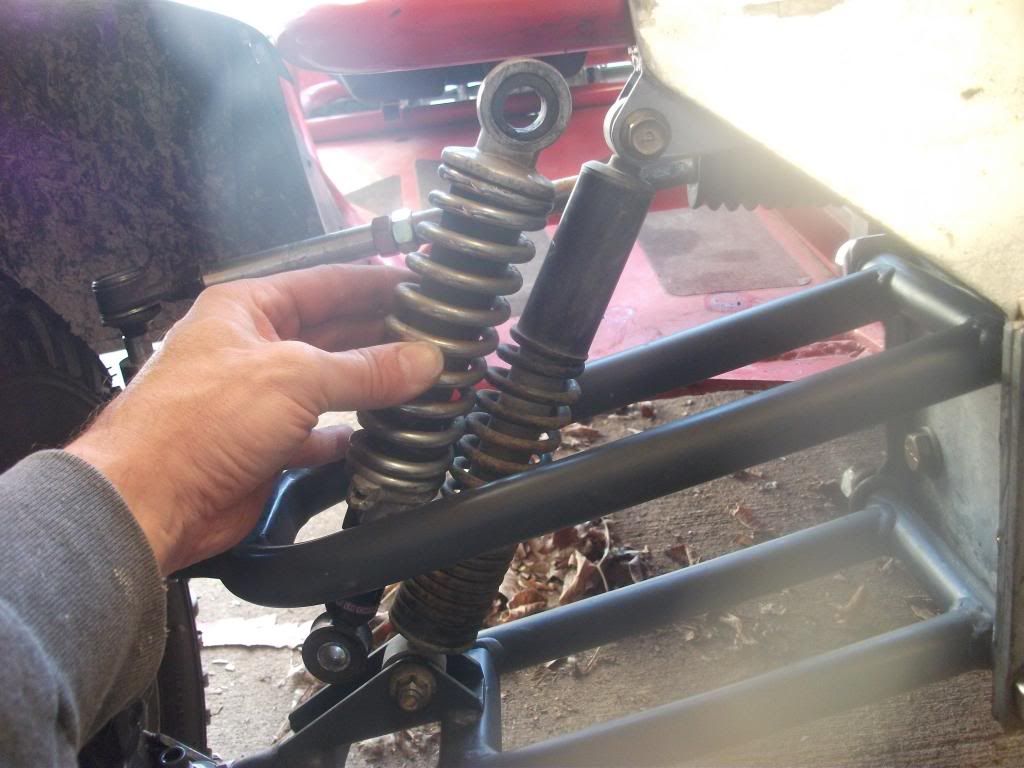
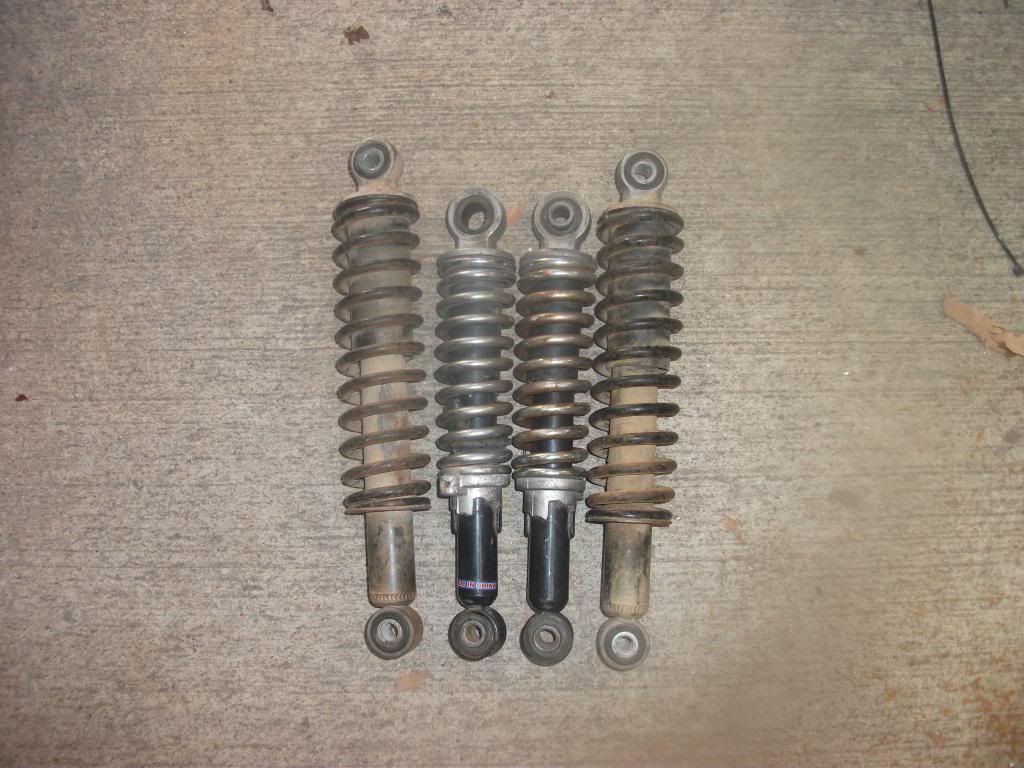
||||
|
||||
|
Pretty simple operation if you ask me! when I opened mine up the first thing I thought was... People pay upwards of 200+ bucks for this? But I guess it's a supply and demand deal.
I'm glad you got things figured out, I guess a longer shaft will help a bit too.
__________________
T.J. Yerfdog Spiderbox, Uni Type air filter with 6" intake, 130 jet, Orange no-rev limit cdi, Red coil, iridium plug, 1500rpm clutch springs, 1500rpm contra spring, 13g sliders, 22" rears, 21" fronts, aftermarket reverse installed, and Trailtech Vapor. |
|
#122
|
||||
|
||||
|
One thing I'd consider doing, if you have the thread area, is to get another locknut and double-nut it at the retaining nut.
|
|
#123
|
||||
|
||||
|
Actually X-bird, I drilled the nut and output shaft then safety wired them with SS wire. Kinda like a castlenut and cotter pin.
|
|
#124
|
||||
|
||||
|
Bad news!!!!!
Took the kart up to MI this week end for some cool woods riding. Did a quick lap to check things out, then picked up the GF's nephew to take for a ride. We wound up doing the same lap, hit the road heading out for a long top speed run and POOOOFFFFF!!!!!!!!!! She shut down. I could tell it was WAY over-revving with that 39T sprocket on there. Not sure how many RPM it was turning, but it was screaming, and not really much over 30 MPH I would guess. Got back to the house, found little compression by placing my finger over the plug hole when cranking. The exhaust rocker had about 3/16" clearance instead of the 4 thousandths it was set up with. And now turning it over by hand it gets REAL tight in one spot. Not sure what I'm going to find when I yank the head off yet. UGH!!!!! Oh well, looks like it's time to beef it up. |
|
#125
|
||||
|
||||
|
Sounds like you had a valve float and smack the piston. Probably just need a valve unless it done more then poooofffff. If it didn't feel like momentarily hitting the breaks the damage should be minimal.
|
|
#126
|
||||
|
||||
|
Yeah, that 39T sprocket is something else, sucks that you can't shift. I know the feeling, I feel like I'm pushing it way to hard on long flat straits with the 39T, that's why I went to 13G sliders hoping that the gearing would help keep the revs down a little if the belt road a little higher on the variator.
__________________
T.J. Yerfdog Spiderbox, Uni Type air filter with 6" intake, 130 jet, Orange no-rev limit cdi, Red coil, iridium plug, 1500rpm clutch springs, 1500rpm contra spring, 13g sliders, 22" rears, 21" fronts, aftermarket reverse installed, and Trailtech Vapor. |
|
#127
|
||||
|
||||
|
Bummer, I'm sorry to hear about the trouble.
|
|
#128
|
||||
|
||||
|
You were right.
EX valve contacted piston. Then the IN valve contacted the EX valve. Both valves are bent....... |
|
#129
|
||||
|
||||
|
OK, so I'm a little confused on this.
If I did the ratio calculator correctly, the 13 tooth engine sprocket and 31 tooth axle sprocket (stock on the Yerf) gave me a 2.26:1 ratio. And the reverse gearbox has 16 teeth. So if I used a 38 tooth axle sprocket, should give me a 2.26:1 ratio as well. But I used a 39 Tooth as recommended on the BD sight. That extra tooth shouldn't have made ALOT of difference. So why I'm confused is..... The kart was screaming in RPM, but didn't really have the speed to back it up. I assumed it was the gearing change, but the calculator shows it shouldn't have made much of a difference. I checked the sliders and they are all sitting correctly inside the variator. And the clutch sheave opens up just fine when I pull on it. So what would cause me to scream in RPM (enough to float the valves) and not have top speed to back it up? If I had to guess, I was turning 8-9k RPM and maybe getting 30 MPH max. Prior to this I was getting 38 MPH top speed and not revving nearly as high. Any thoughts? |
|
#130
|
||||
|
||||
|
No big deal,
 you were just off in your calculations a touch. the 13/31 gives a ratio of 2.38, (31/13)= 2.38. With a 39 tooth it equals a even 3.00. Oh yea! Your screaming on the top end to get any speed. We figured at one time you loose roughly 1.10 mph for every tooth up on the axle sprocket. The only way I found to balance out the problem to an acceptable compromise is to use a 14/38 gear set in the trans. you'll get back approximately 3 mph without loosing any noticeable torque. you were just off in your calculations a touch. the 13/31 gives a ratio of 2.38, (31/13)= 2.38. With a 39 tooth it equals a even 3.00. Oh yea! Your screaming on the top end to get any speed. We figured at one time you loose roughly 1.10 mph for every tooth up on the axle sprocket. The only way I found to balance out the problem to an acceptable compromise is to use a 14/38 gear set in the trans. you'll get back approximately 3 mph without loosing any noticeable torque.Another route is to tune the motor for the upper rpm range, IE: cam, head work, exhaust ,etc. The logic is since your forced to operate in the higher rpms because of the gearing, get the motor to function best up there. Tune the motor for higher end power and depend on gearing for the torque power. There's so many frickin variables and strategies it's tough to figure what to do. Reminds me of a crap game! |
|
#131
|
||||
|
||||
|
Thanks Ckau. Does that 3:1 ratio include the 16 tooth sprocket on the reverse gearbox now? (16T engine 39T axle)
So maybe I should look into a 36 tooth sprocket to get me closer to stock ratio? Or I could swap the internal gears as you mentioned too. My Yerf had never really bogged down on any hills thus far, so I'd like to keep the same gearing. My motor is modiifed decently. Nikasil 58.5mm kit, port matched intake manifold, NCY ported head, TK exhaust, NCY CDI It ran really well at higher RPM before. It didn't seem to accel any better with the new gearing than before the change if that makes any sense???? |
|
#132
|
|||
|
|||
|
any place at all have this complete reverse kit
|
|
#133
|
||||
|
||||
|
The fun never seems to stop.......
I'm taking this little hiccup as an opportunity to beef up my motor.  I bought and installed a NCY 2.2mm stroker crank along with the 1.6mm spacer that goes under the cylinder and an A-10 cam shaft. I'm going to use my stock (home ported) head in the mean time while I get my perfromance head repaired or replaced. As I attempted to install my cam, I found that my 90 link (stock) chain is too short. The cam won't even seat on the holder. If I were try and install the holder, something will break for sure. So I added 2 links onto my chain, and now it's WAY too big. I had to modify my chain tensioner by threading a small bolt (and reinforcing it) onto the bottom of the tensioner to take up the extra slack. Hopefully the chain guide can handle the extra bend in it now. Not sure why this is??? NCY 2.2mm stroker crank 1.6mm spacer and 2 X .020 gaskets NCY 58.5mm nikasil cylinder and piston NCY .015 head gasket Stock head (home ported) Last edited by xlint89; 11-04-2012 at 09:35 PM. |
|
#134
|
||||
|
||||
|
So I went and bought the HD axle for the Yerf Dog from BD. I gotta tell you, I have not been happy with anything I ever got from that place.
 1. The sprocket and brake rotor hubs that slip over the splines are way too loose for my liking. I've got what I feel is excessive play up/down and left right for something that is going to put all of the engine's power and go karts weight on them. 2. The hub splines are too tight. The hubs are supposed to slide on the axle about 1 1/2" and 1 goes on 1/2" before it binds up, while the other slides on 1/4". If I hammer these things on, I'm either "A" going to damage the bearing hangers or bearings on the axle, "B" never going to ever get them off, or "C" both. 3. One hub is tapped for the axle nuts while the other side is drilled out. (no threads) 4. When I called them and left a message about this I never got a call back. So I'm done buying anything from them ever again........ I wish Tom at Syc Powersports would carry all of the Yerf Dog stuff. He's been a great help with everything I've ever needed, and seems to be with everyone else judging from the feedback left by others. (great job Tom) I'm really bothered by the amount of slop on the sprocket/brake rotor hubs. Those are small splines and I have about 1/8" slop up and down, while getting almost 1/4" slop left/right. I don't think it'll be tough to strip them with this much play. And that's with the hub clamps installed. I cannot get them tight enough to hold the hubs still. And now I need to see why the wheel hub splines are too tight, then modify them to fit properly. It just pi$$es me off when you pay $300 (more than I paid for the cart) for a part and it comes to you with such poor quality control. Anyway, I found a 36 tooth sprocket at Tractor Supply for $30. The hub hole was a perfect fit off the shelf. All I had to do was drill it for the 4 mounting bolts. Pretty sure it was said that a 37 tooth would equal the same ratio as stock before I added the reverse gearbox. I'm hoping the 2mm stroker crank can make up for the minor ratio change and that this will bring my RPM back down to normal operating range. I'll keep you guys posted. |
|
#135
|
||||
|
||||
|
Yeah, I have not ordered anything serious from BD other than the Front spindles and they messed that order up pretty bad! lol they kept sending me the same side spindles, at one point in time I had 3 driver side spindles, I had to take a picture of what I had and send it to them in order to get the correct spindle. I'm sure they didn't make any money on that order due to how many times they had to re-ship stuff.
Did they ever get new Rear axles in? ones that are not bent? they were selling the bent ones for a lot of money.
__________________
T.J. Yerfdog Spiderbox, Uni Type air filter with 6" intake, 130 jet, Orange no-rev limit cdi, Red coil, iridium plug, 1500rpm clutch springs, 1500rpm contra spring, 13g sliders, 22" rears, 21" fronts, aftermarket reverse installed, and Trailtech Vapor. |
|
#136
|
||||
|
||||
|
xlint89; Hate to hear so many problems out of them. When I first got started with the buggy thing BD had a very good reputation and track record. Travis I believe his name is was very knowlegeable on these buggies and engines, in fact at one time they were working on making the GY6 into a 4 speed. Had contacted him from time to time for some unusual parts for my experiments. It seems to all have started a year or so ago and started with their website being infected with some malware and expired security certification, at least this is what Norton and Microsoft would warn me of when they blocked me from entering their website. Since that time I have heard nothing good about them or their products. I really wonder what happened to them, if new owners,divorce, state of the economy,or just plane old neglect. Hopefully they recover from whatever problems they are having. There are not even a handfull of dealers today who actually research parts or mods for these buggies as compared to pre-2008. Most on e-bay are there to just sell parts to make money and could care less about the quality or buggy scene. There are some good scooter dealer buisnesses out there but even though the same engines some parts work well with scooters but not so well on buggies,and tunning tecniques are different with scooters compared to buggies. I do know this economy has taken its toll on many dealers but has affected all in the industry.
Last I want to thank you for the kind words and confidence in me. I haven't been on here much lately due to the long hours lately trying to search out reliable suppliers, the many phone calls I get from customers who bought used and need advise or hard to find parts plus the added service I have been getting. It gets to be too much at times for one person but not consistent enough to hire someone, then there are the problems brought on by Murphy's law. Just who the hell is this Murphy guy anyway. Anyway once I get past the blip I'll be back on here more consistantly. TOM Last edited by SYCARMS; 11-13-2012 at 07:35 AM. Reason: mispelling |
|
#137
|
||||
|
||||
|
Hang in there Tom, good quality is always worth waiting on!!!

|
|
#138
|
||||
|
||||
|
Yes, he got a few more new ones. Not bent.
I think I'll be installing set screws into the brake/sprocket hubs. |
|
#139
|
||||
|
||||
|
Hmmmm....... Doesn't seem to have the Heavy Duty axle listed any more. I wonder what's up with that????
It's a joke how much I had to grind off of the axle to make the wheel hubs fit. I then drilled and tapped the brake/sprocket hubs for set screws to hold them even and in place. You could hear "tink, tink, tink" as the axle spun and the brake rotor would move up and down on the splines. I'm going to have to weld the wheel studs onto the wheel hub on one side since they were kind enough to not tap that hub for threads. Actually they drilled them for the wheel studs/bolts to fit through the hub. (too big to even tap them myself) The icing on the cake for me is the writing in big letters on the wheel bearings CHINA. What an extremely over priced piece of fecal matter!!!!!! |
|
#140
|
||||
|
||||
|
Quote:
wheel studs are typically knurled with fine splines and press-fit into the holes. are you saying they're drilled so large that the stud passes through them? |
|
#141
|
||||
|
||||
|
Sorry X, I know I said studs. What I should have said was bolts.
They tap the hubs so you can run the bolts into the hub. You then install the rim and nylock nuts. The problem here is they drilled the hole 12mm to install a 12mm bolt. |
|
#142
|
||||
|
||||
|
I'll bet there made for the neuroed studs. Usually when they use a screw in stud the threads that screw into the hub are larger then the stud threads and are left handed threads otherwise when you tighten the nylock nuts the bolts would loosen. When the hubs use neuroed studs the hole will be 12.5 -13mm for a 12mm thread when the bolt is pressed in the stud usually a grade 8 or 10 is harder then the cast which allow's the neurod stud to cut into the hub creating a grip so that the stud will not spin in the hub when tightening.
|
|
#143
|
||||
|
||||
|
Thanks Tom, but they supplied 8 nuts and bolts, and only 1 hub was tapped with the other being just drilled too big.
Just poor quality control is all it was I'm sure. |
|
#144
|
||||
|
||||
|
Yup sounds like it. They should have caught that.
|
|
#145
|
||||
|
||||
|
New to me (used) carb, same issue.
Installed the Mikuni VM 28 (flat slide even though it's designated as a VM) and am having the same issue. Run the motor, shut it down, wait 2 mins and the fuel starts bubbling and pouring out of the overflow. I'm going to install a new needle and seat, but doubt that will change anything. It didn't fix anything on the last carb. (VM 26-606) On a good note, it seems to be running pretty good thus far. NCY +2.2mm stroker crank Breaking in the new rings (NCY 58.5mm) NCY ported head with flat bottom SS valves (suppose to raise compression) A 10 camshaft Mikuni VM 28mm (flat slide carb) So far 15 pilot jet and 150 main 2 turns out on the idle mixture screw and top clip on the needle Uni filter TK exhaust NCY CDI Bando coil Iridium spark oplug 14g rollers 16T engine sprocket (reverse) 36T axle sprocket Last edited by xlint89; 12-09-2012 at 11:18 AM. |
|
#146
|
||||
|
||||
|
I know of one person who uses the VM-26 carb with a 4mm stroke, 63mm bore and 4 valve head and his runs really rich. The VM-28 is too big for your mods. Still weird the problems your having with the several carbs you have used. Is the float at the correct adjustment?
TOM |
|
#147
|
||||
|
||||
|
So far the kart seems to like the 28mm. Not saying the 24 or 26 wouldn't work, just seems to be doing OK for now.
Yeah the float is adjusted to spec. They call for 22-244mm float height. I'm at 22 right now. I found that if I shut the fuel spupply off, it does stop. So maybe it is the needle, seat , or O ring on this carb. We will see. In any case, the fuel shut off will be the fail-safe for now. |
|
#148
|
||||
|
||||
|
Replaced the needle and seat on the carb, but I use the petcock now regardless. (never had one installed on it)
Now I have ANOTHER issue with the overly priced HD axle from BD. The driver's side axle nut keeps coming loose. It's a nylock nut. So I'm going to have to use safety wire or a cotter pin of some sort. I have been enjoying playing on the kart in the snow though. Came a little fast thru one turn and smashed into the curb side ways pretty hard. Dented the rear passanger rim. I sure hope I didn't damage anything else, but it did hard.... DOH!!!!! |
|
#149
|
||||
|
||||
|
I was never a fan of anything other then a castle nut on front and rear axles or balljoints and tierods. If you have a fastnal by you they should have the castle nuts and if not can order them.
|
|
#150
|
||||
|
||||
|
Cool. Thanks Tom.
|
|
#151
|
||||
|
||||
|
[QUOTE=xlint89;29427]Replaced the needle and seat on the carb, but I use the petcock now regardless. (never had one installed on it)
Now I have ANOTHER issue with the overly priced HD axle from BD. The driver's side axle nut keeps coming loose. It's a nylock nut. So I'm going to have to use safety wire or a cotter pin of some sort. QUOTE] The "nylocks work good but their only usable one time. After installing and removing a couple of times the holding power of the nylon insert is gone. Shurelocks work on the same principle only they have a steel insert which gives them a longer service life but they still have be replaced. I use the shurelocks extensively and have no problems with loosening but then I replace them with new ones after a few uses. Fastenal carries both in most all sizes, buying in quanities of 100 or so cost pennies each and keeps a good supply on hand. Shurelocks don't depend on torque pressure to hold like a standard nut but will stay in place regardless of the position they are placed on bolt threads. They stay and won't vibrate off. A bolt may get loose but you won't lose it and have something fall off. Your not stretching or stripping threads so bolt life is forever. A couple of examples, a shock mount,, you can tighten enough to take up side clearance in the tabs but leave the bolt loose enough to allow the shock to pivot without pinching. A wheel hub can be set to a proper bearing tension without having to either tighten or loosen to get a cotter pin to line up as with castle nuts. Anywhere else on a buggy you don't have to crank down on them for holding power but rather simply snugging them up holds firm. This is very handy if you got to bust a nut loose or tighten up in the woods. You can loosen or tighten with a pair of pliers if that's all you got |
|
#152
|
||||
|
||||
|
Thanks Ckau, but that nut has never been removed.
It's holding a splined hub on, so need to worry about putting too much tension on a bearing, etc.... Took the kart for a little ride tonight, and it worked loose again. Just going to go with a castle nut and call it good. I appreciate the heads up though. |
|
#153
|
||||
|
||||
|
Getting close to throwing in the towel on this one..... I can't figure it out.
Kart still has a severe "pull" to the right. I've replaced the A arms with new ones. Replaced the ball joints with heim joints Adjusted and checked Toe in so many times now it isn't funny. 1/8" - 1/4" Toe in. Nothing is bent or broken. Wheel bearings spin nice Tire pressure checked prior to driving it. It's a simple system, but I can't seem to find the problem. Nothing looks out of place. It ran nice for quite a while. Then I let the neighbor take it for a ride and it seems like it developed the 'pull" after she took it out. I let her put it away, so I cannot say for sure that's when it happened, but seems likely. I also developed a leak in one of my front tires about the same time. Coincidence????? Hmmmmm......... |
|
#154
|
||||
|
||||
|
U think the frame could be twisted xlint89? There must surely be a reason for the hard pulling......hmmmm. best wishes of it though!
__________________
MASTERBATES TM 150 XRX-P&P head,A13cam,opened exhaust,140 main,38 pilot,adj cdi, perf coil,115mm variaitor,12 gm rollers,NCYpulley,2000 rpm springs,racing clutch,taller rear tires,and etc. 
|
|
#155
|
||||
|
||||
|
1. Do you have stripped rear hub so only one wheel is pulling?
2. Is the rear axle or swing arm skewed so it always pushes in one direction? |
|
#156
|
||||
|
||||
|
^^ditto^^ also check your shocks. low pressure in one at the rear will do some pretty funky things to the handling as well. you'd be surprised at how much the chassis or swingarm can flex while under suspension load in a corner. check your frame for cracks as well. dimensionally one side can open up (get longer) under compression if something structural is going on. lmk if you need a rim and hub--have a few s-box rears and one hub in the scrappile.
Last edited by x-bird; 03-20-2013 at 07:40 AM. |
|
#157
|
||||
|
||||
|
Thanks guys. I'll be looking at the back end for some signs of damage/misalignment.
No stripped rear hubs. New HD axle from BD recently installed. (had the pull prior to the new axle) I'll have to look at the rear swing arm closer. Maybe the bushings have gone bad. It used to flex a bit once the TQ was applied when the CVT kicked in. I'm sure it couldn't have gotten any better since I started adding more power to the thing. I will look into the shocks and frame as well. I appreciate the offer X, but I have a spare set of wheels and tires and the HD axle doesn't work with the stock hubs. I appreciate the suggestions guys, thanks |
|
#158
|
||||
|
||||
|
This is frustrating.
So I inspected the frame and swingarm for cracks, nothing. The SA bushing on the passenger side (side it pulls on) had a lot of slop in it. So I installed a larger bolt that took up the excess room between the bolt and the steel sleeve inside the rubber dampener. It seemed to do the trick quite nice. No problems with any of the shocks from what I could find. Removed all 4 wheels and bungeed the steering wheel dead center. I then pulled measurements from rear axle to the front spindle as best as I could by myself. Repeated this numerous times to make sure I get the same reading. Driver's side rear to driver's side front 68 15/16" Passenger side rear to passenger side front 68 15/16" Passenger rear to driver's front 82 5/8" Driver's rear to passenger front 82 11/16" Set the front wheels with 1/16" toe in. Doing all of this seemed to help just the slightest bit. It didn't pull quite as hard, but still pulls to the right pretty bad once you take your hands off the wheel. (it used to not do this) It's actually so bad, that if you push the kart by hand, the wheel will start to turn to the right when pushing it forward. The only thing I can see is the passenger side front spindle does not tilt as much as the driver's side. What I mean is the bottom of the spindle on the driver's sits forward further than the top of the spindle. The passenger side appears to be situated in a more vertical stance than the driver's. (it's a front to back tilt, not a side to side tilt) It's not a major difference between the 2, just something I noticed while staring at my front end for hours now. The only thing left that I could replace would be the bulk head. But I reinforced that a long time ago with 1/2" steel plate in the front and an additional 1/4" plate to the back so movement is not likely. I then used 1/2" grade 8 bolts to secure the bulk head to the frame. Where the frame bolts to it, I welded in extra 1/4" plate for support that can be seen in my first pics of this thread. So I'm really at a loss with this one. 
|
|
#159
|
||||
|
||||
|
Did you try swapping wheels left to right side to see if the problem followed?
|
|
#160
|
||||
|
||||
|
sound maybe like a lower or upper a-arm is twisted a bit making the driver's side have more caster than the other? That could cause a bit of pull. did you check the camber between the two sides?
|
|
#161
|
||||
|
||||
|
From your measurements your caster is off. Your right front is leading the left front by 1/8" Caster is what will cause the pull. The longer the wheelbase the less it will pull. These buggies have a short wheelbase so it will show more.
|
|
#162
|
||||
|
||||
|
Quote:
Quote:
How can I go about correcting caster? I'm kinda stuck with what I got aren't I? |
|
#163
|
||||
|
||||
|
From your description of the front spindles and measurements given you will have to figure out what is bent and straiten it. It could be in the Strut, controlarm or frame. I wou;d start with the contro; arms then strut before the frame. Observation and measurements is the only way to go with this. Find identicle refferance points on both sides then measure and compare. Sometimes a good looking over does the trick and get another set of eye's other then yours. Once you find the problem chain, jack and comalong is what will be needed and also some sturdy anchor points to anchor with chain.
|
|
#164
|
||||
|
||||
|
Will do, thanks again Tom.
|
|
#165
|
||||
|
||||
|
Unfortunately Castor is the toughest thing to adjust. Castor on the yerf is built into the lower mount for the front bulkhead. If the mount is twisted or bent out of square with the frame then everything is off. The mount isn't welded all that great so it doesn't take much to knock it out of wack. I had trouble with metal fatigue in the front frame tube causing my mount to give. I use a piece of angle underneath the strengthen the mount.
It takes quite some time and effort to get this right. You might find a better way but for me I found the only way to know dead on was to take inside measurements of the frame front to back, side to side then draw a accurate square rectangle on a sheet of plywood based on the numbers. drew a center line through the pattern to check the lower mount. Set the frame down on the pattern and see how it matches. you got to get the frame square. Ratchet straps, pipe clamps, whatever. like Tom’s suggestions. then you can check the front mount to see if it lines up square using the center line. it may be advantages to cut the mount loose and re weld properly with some bracing if you find it off. the mount should set dead center , square with the frame and with a 6 degree tilt up. Then check the bulkhead for square. Measure up down and diagonals across the box and A-arm mounting tabs. A large set of dividers makes this easy. Set the dividers for one measurement then check the rest to see if they match. The whole idea behind this is, Fact: Something somewhere is out of geometry causing the problem. you got to start at the beginning and work your way out to find it. Basically dis-assemble totally the front end and then re-assemble one piece at a time taking measurements along the way till you find the culprit. It doesn't show up in this pic but there are layout lines and reference marks all over this sheet of plywood to check square and straight. |
|
#166
|
||||
|
||||
|
Thanks Ckau. If you look at post #6 at the beginning of this thread, you can see I welded 1/4" gussets and a plate on the bottom of the frame mount to reinforce that point.
Not to say it or the bulkhead cannot be out though, but is something I do need to look into. I do appreciate your input on this and like the idea of using the plywood to check and square the frame and such. Looks like I will be recruiting some help in this matter. Thank you to all who have helped thus far. I would also like to say thank you very much to Ckau for his help with the heim joints conversion. You do great work. |
|
#167
|
||||
|
||||
|
Did you always have this pull? If not when did it start?
|
|
#168
|
||||
|
||||
|
No did not always have it.
I let the neighbor take it for a spin one night a while ago. I took her for a ride showing her the track to stay on, then let her have at it for a while. She disappeared for some time (enough for me to start to wonder if I should go look for her) but ended up coming back. So when we were ready to leave, I let her park it. So I do not know if it developed the pull then or not. It had been a while before I got back out to the kart, but seemed to remember it having the pull right around then. And about that same time, I developed a slow leak in one of the front tires as well. Coincidence?????? Maybe...... |
|
#169
|
||||
|
||||
|
The only thing I can see is the passenger side front spindle does not tilt as much as the driver's side. What I mean is the bottom of the spindle on the driver's sits forward further than the top of the spindle.
 You already have pretty good measurements from what you posted. I would be suspect with the above statement."bottom of spindle on the drivers sits forward than the top of the spindle" This right there tells me you might have more positive caster on the right side which will cause a pull. On a car 3-4 degrees will cause a pull and you will not see 3-4 degrees. Being that you see the differance makes me think you will have an excessive caster on the right side causing your pull. I would pull that drivers side spindle to match the right side since the right side looks strait. I had a customers recovered stolen buggy in for serviceabout a year ago. His buggy pulled hard to the right, his left strut and lower control arm looked like it was pushed back. I wraped a log chain around the left rear of the main frame to my F350 then pulled the left side until it looked strait as compared to the right side. When finished and driving down the road it would slightly vear to the right when letting go of the wheel but with hands on the wheel it seemed normal. Before doing this when letting go of the steering wheel it would go for the drainage ditch. |
|
#170
|
||||
|
||||
|
OMG!!!!!!! You guys are NOT going to believe what it turned out to be....
Some of you actually nailed it. Take a good look at the last pic of post #8 http://buggymasters.com/forum/showthread.php?t=2601 I will inform you all of what it was, I just want to see who actually notices what it is first. It did take a second set of eyes to make me realize the problem though. Thank you ALL for your help and guidance on this long lasting, frustrating issue I've been dealing with. Fortunately now it has been found and corrected.       
|
|
#171
|
||||
|
||||
|
One shock is from the front a arm and the other is from the rear swingarm??????
|
|
#172
|
||||
|
||||
|
Actually the first pic of post #102 (top of this page) REALLY shows the problem.
Sorry Bear, that is not it. |
|
#173
|
||||
|
||||
|
Rear axle is off to the left?
|
|
#174
|
||||
|
||||
|
negative.
|
|
#175
|
||||
|
||||
|
i still look at your front end pics and think the bulkhea has a slight twist and angle off to one side, but that may be the camera angle. The last picture in #8, looks to me like you have 2 different length shock bodies. so either your rear crossmember on the main frame is twisted, the mounts are off or the shocks are different.
I'll modify my answer after looking at the pic on this page since the shocks are a different set. your swingarm, if it's not the camera angle/fisheye. is waaaay off. Again it comes down to either shock mounts or twisted tubes/attachment points. if the shocks aren't hanging straight top to bottom and are forcing the swingarm sideways under compression, you'll end up with different wheelbase side to side which will vary as your riding. Same thing happens when one shock blows out or is set at a different spring rate. despite it being a rigid axle design there is enough flex in these frames for dimensional change to occur under load. Also, your swingarm looks like it's due for the reinforcement mod across the top tube. Last edited by x-bird; 03-30-2013 at 09:11 AM. |
|
#176
|
||||
|
||||
|
Neither of those guesses X.
What reinforcement mod on the top tube? I altered the top swing arm tube to clear my intake. And I've added 1/4" gussets to the motor mount/chain adjustment since the last pics of it. I'll get you guys some fresh pics of her as I've done a few more mods since then. And I know how we all love pics. 
|
|
#177
|
||||
|
||||
|
OMG What is it!!!???? ur killing me!
 
|
|
#178
|
||||
|
||||
|
all i'll say is that pic up top doesn't look right--so if it's not the camera angle, something has the right side "squished" so broken frame/swingarm tube or you have two different size tires. or the right tire's rubbing as it's a lot closer than the left.
|
|
#179
|
||||
|
||||
|
Yes!!!!!!!
The tire height difference between the 2 is it. They are both Kenda Dominators I got from BMI already mounted on the rims. When they showed up I noticed a difference right out of the box. One is shorter and wider by 1/2", the other is narrower and almost 1 1/2" taller than the other. If you put 2 different sized tires on a solid axle, the kart automatically wants to turn in a semi-circle. Funny thing is they never gave me a problem for a long time. Apparently once they started to wear this all changed. I had swapped the front tires from side to side numerous times, but I never swapped the rears...... So I've been chasing my tail for months because of something so simple. Now that the stock rears are back on she tracks nice and straight, not quite as fast top speed wise, but they're only temp. until my new tires show up. Thanks again guys for your tips and suggestions. Oh, and X, yeah it was the camera angle that makes it look like the right was almost rubbing. Last edited by xlint89; 03-31-2013 at 09:23 AM. |
|
#180
|
||||
|
||||
|
Geez, with all the mods I was overlooking the obvious!!! good catch and I'm glad to hear problem cured!!!

|
|
#181
|
||||
|
||||
|
So you never swapped the rears and only the fronts...
|
|
#182
|
||||
|
||||
|
lmao well at least it wasn't a bent frame/twisted one
|
|
#183
|
||||
|
||||
|
I have a question. So, in order to get a 4 bolt rim and tire( I have the single center bolt).
Do I just purchase a hub that fits my spindle? Then I can get those options?
__________________
Growing old is mandatory  Growing up is optional  https://www.youtube.com/watch?v=NEXoa-8d7qE |
|
#184
|
||||
|
||||
|
|
|
#185
|
||||
|
||||
|
Quote:
Or you can just purchase new tires and have them mounted on the rims you have now. |
|
#186
|
||||
|
||||
|
Oh Crap! I noticed the two tires but I imediately dismissed the thought right off the bat cause I figured A: gotta be camera angle, B: he knows better! Ha!
So simple and obvious it slipped by. Happens around our place so much we dudded them "Brain Pharts" I can only imagine the gut jerking thoughts you had about starting over on the front end after reading some of my/our posts! Glad it's is a easy cure and you can get back to having fun. |
|
#187
|
||||
|
||||
|
I just thought you weren't holdin your mouth right.
__________________
MXR TrailBender 160R SYC Perf head P&P,Matched intake and exhaust, A12 cam, Orange CDI & coil, Motorio pulley, 115mm Variator and lightweight drive face,11gm Sliders, UNI, modded muffler + 200 horsepower  http://www.youtube.com/watch?v=3hx-hEWl10c I'll take your insults as compliments and blame it on your lack of intelligence. |
|
#188
|
||||
|
||||
|
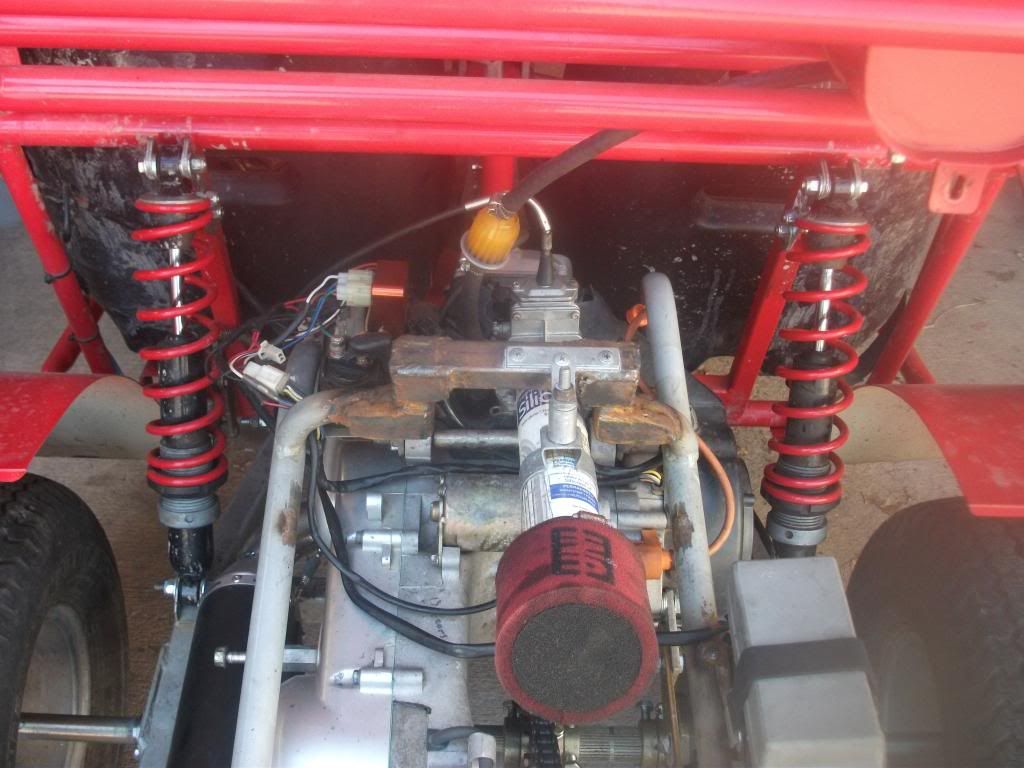
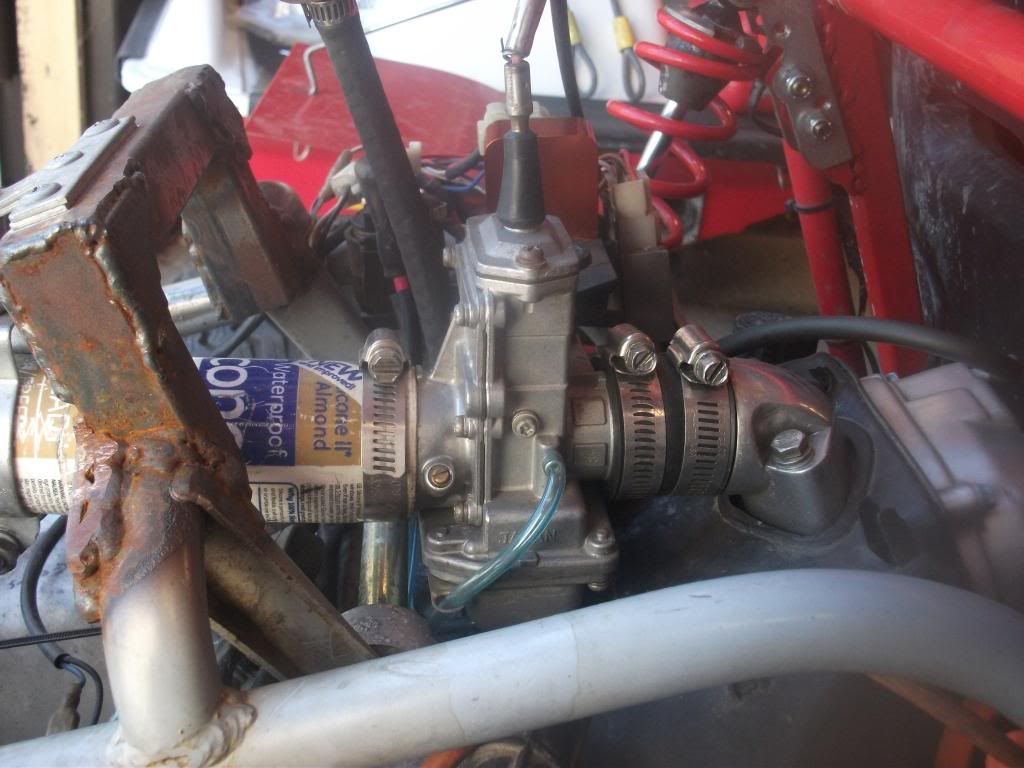
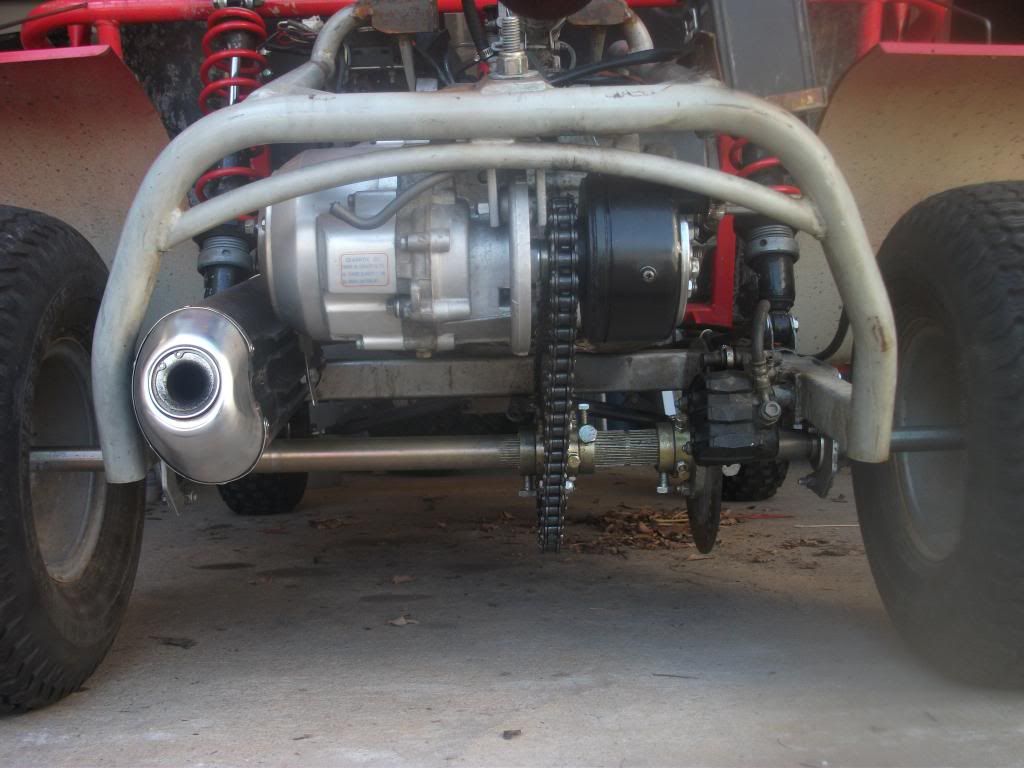
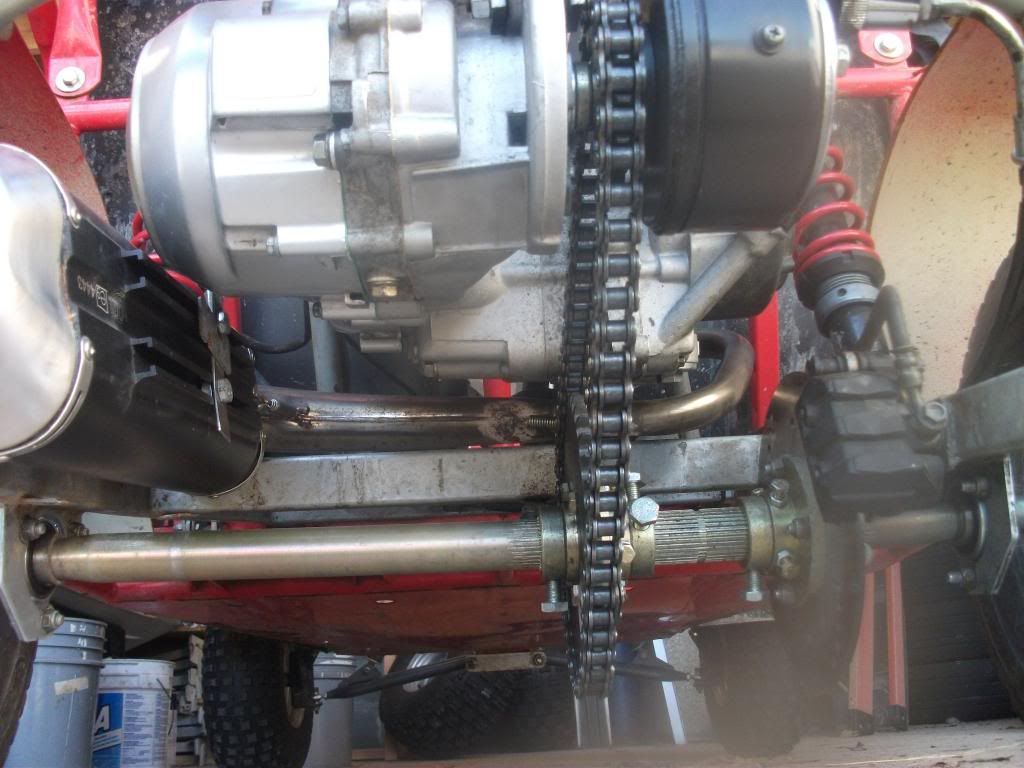
As I stated earlier, never was a problem before. Once they "wore in" it must have changed something.
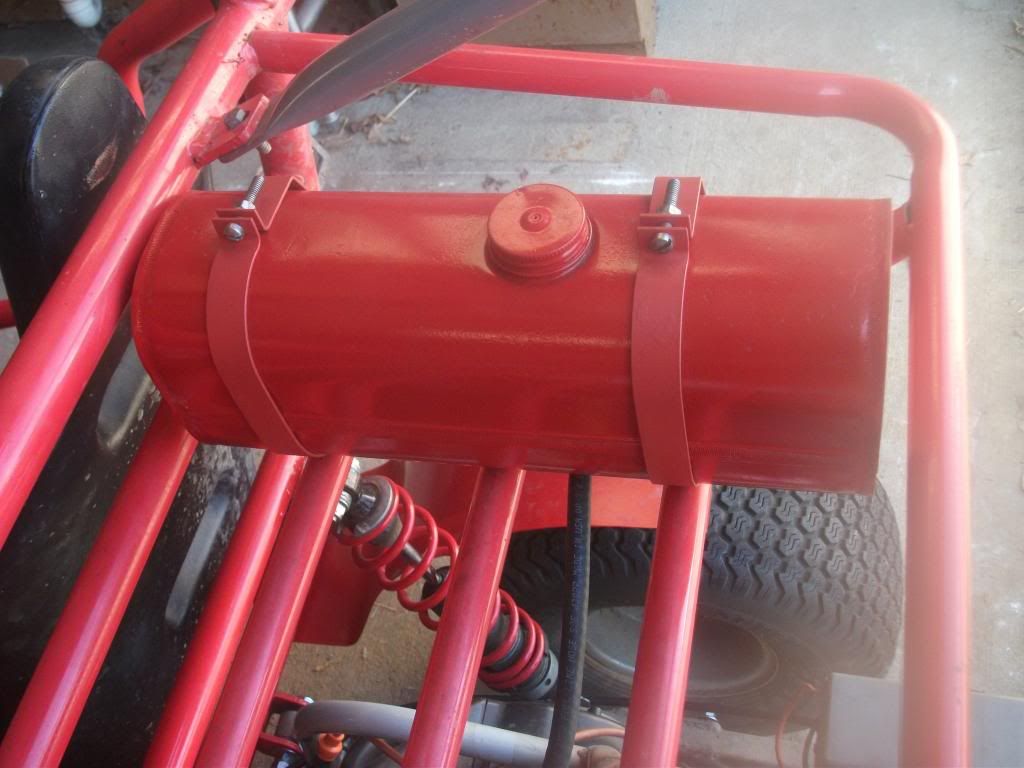
Anyways, it is nice when it's an easy fix, but sure do feel dumb.... Here are the latest pics/mods to her now. 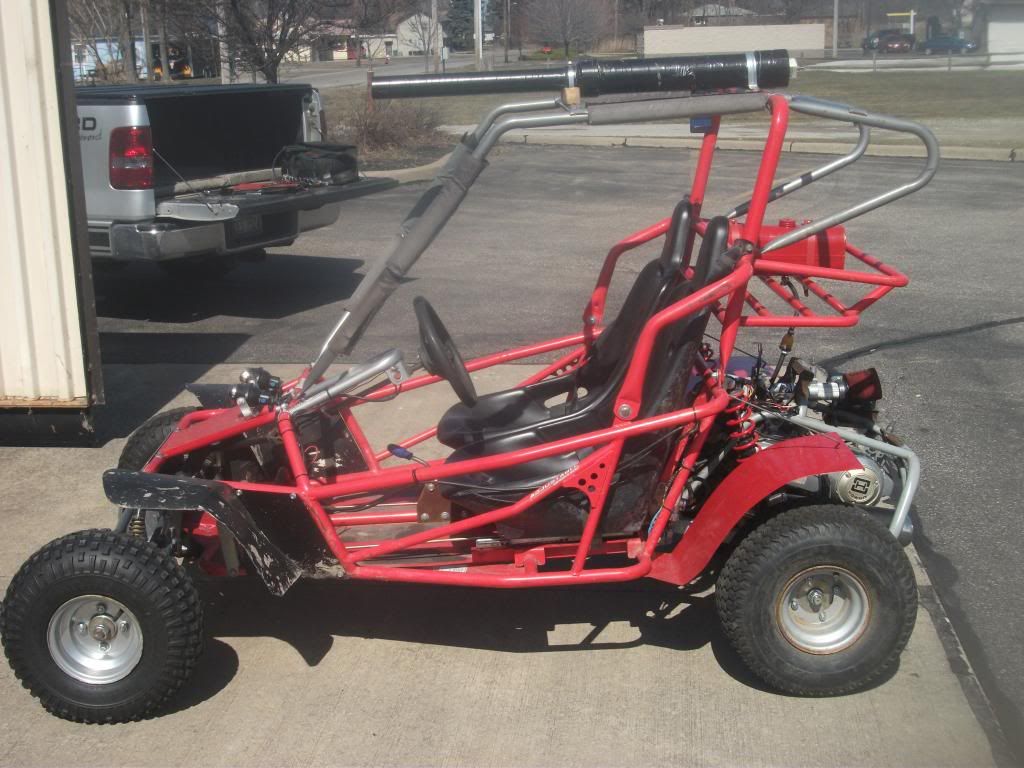 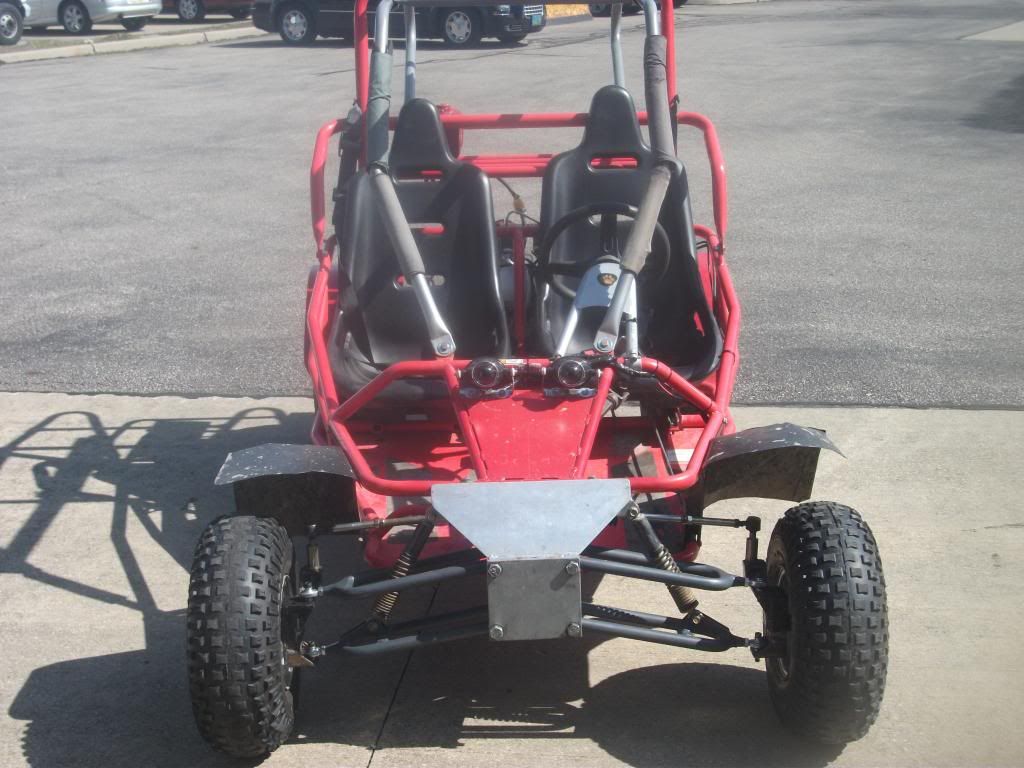 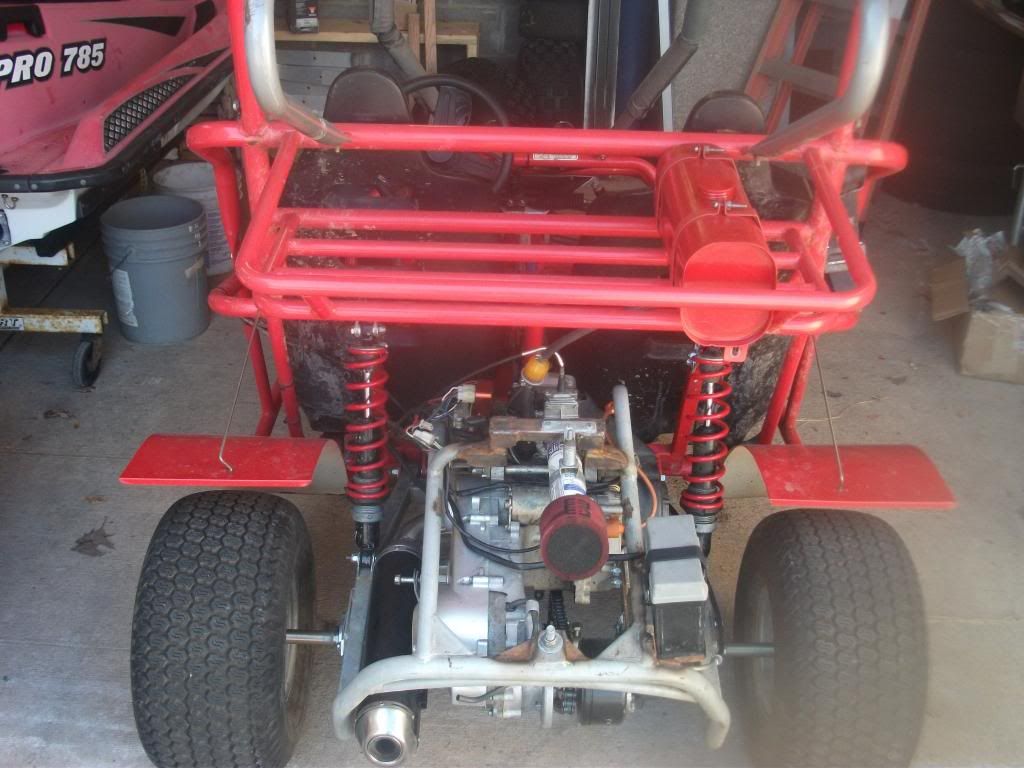 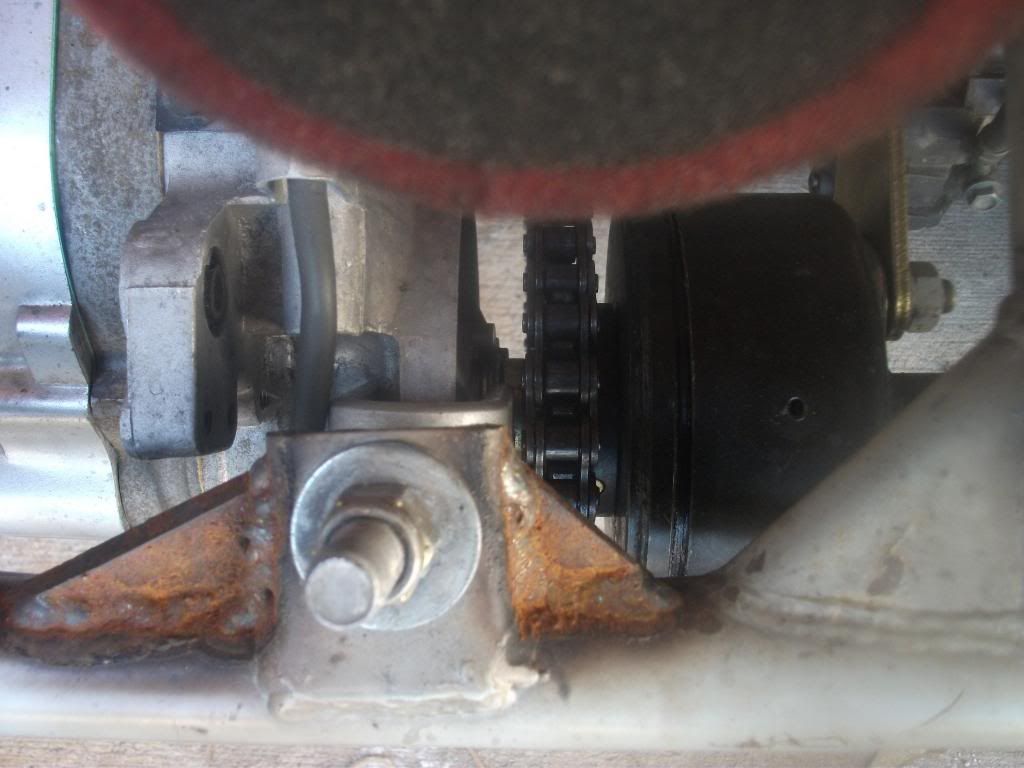 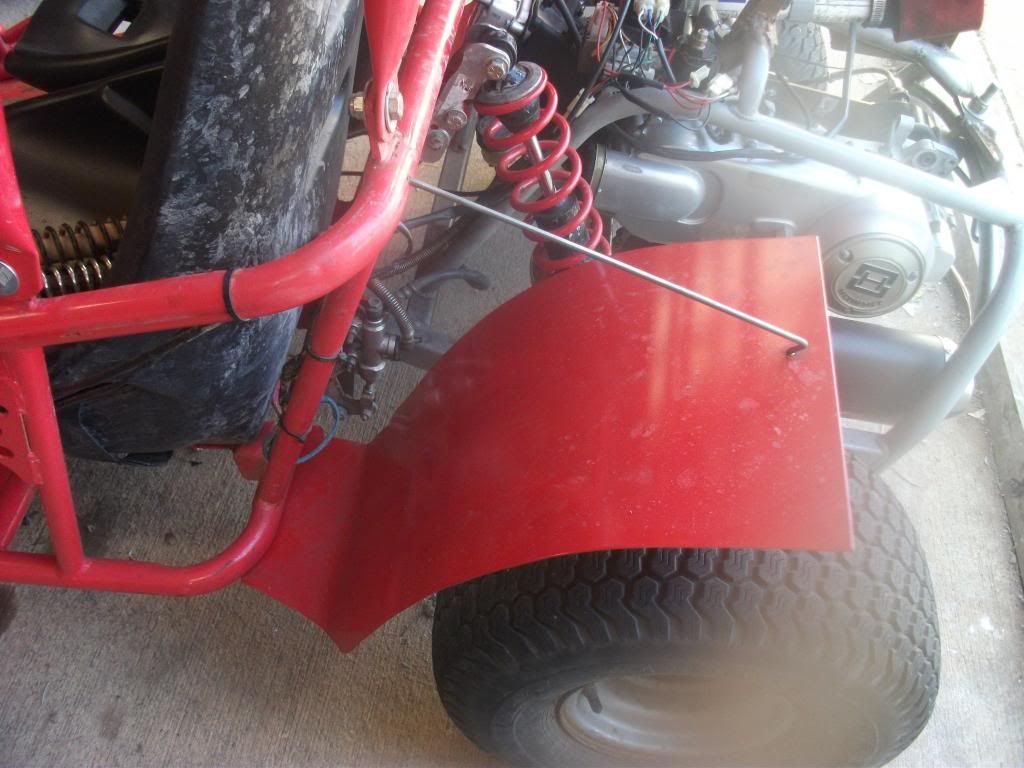
Last edited by xlint89; 03-31-2013 at 10:32 PM. |
|
#189
|
||||
|
||||
|
|
#190
|
||||
|
||||
|
|
#191
|
||||
|
||||
|
Thanks, after reading this thread i started thinking about that i have a 6 inch rim in the front(145-70-6) and a 8 inch rear(18-9.5-8). not sure sure how what size of bigger tires to search for that would fit my rims.
Didn't mean to jump move attention from your thread Xlint
__________________
Growing old is mandatory  Growing up is optional  https://www.youtube.com/watch?v=NEXoa-8d7qE |
|
#192
|
||||
|
||||
|
|
#193
|
||||
|
||||
|
Quote:
Ditch the 6" front rims for an 8" and you can get 20" front tires with no problem. You'll want 10" rims if you want something bigger than 20" up front. With an 8" rim you can get 22" tires for the rear with no problem. I wouldn't go much bigger than 22" for most buggies though. |
|
#194
|
||||
|
||||
|
Thanks Xlint.
__________________
Growing old is mandatory  Growing up is optional  https://www.youtube.com/watch?v=NEXoa-8d7qE |
|
#195
|
||||
|
||||
|
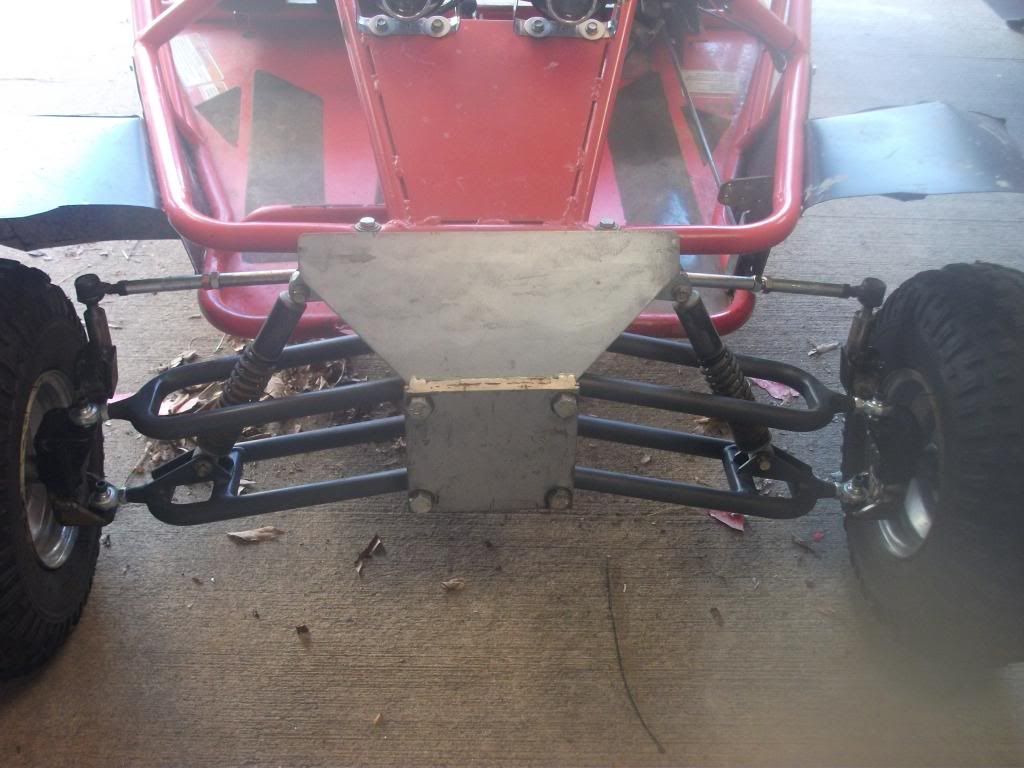
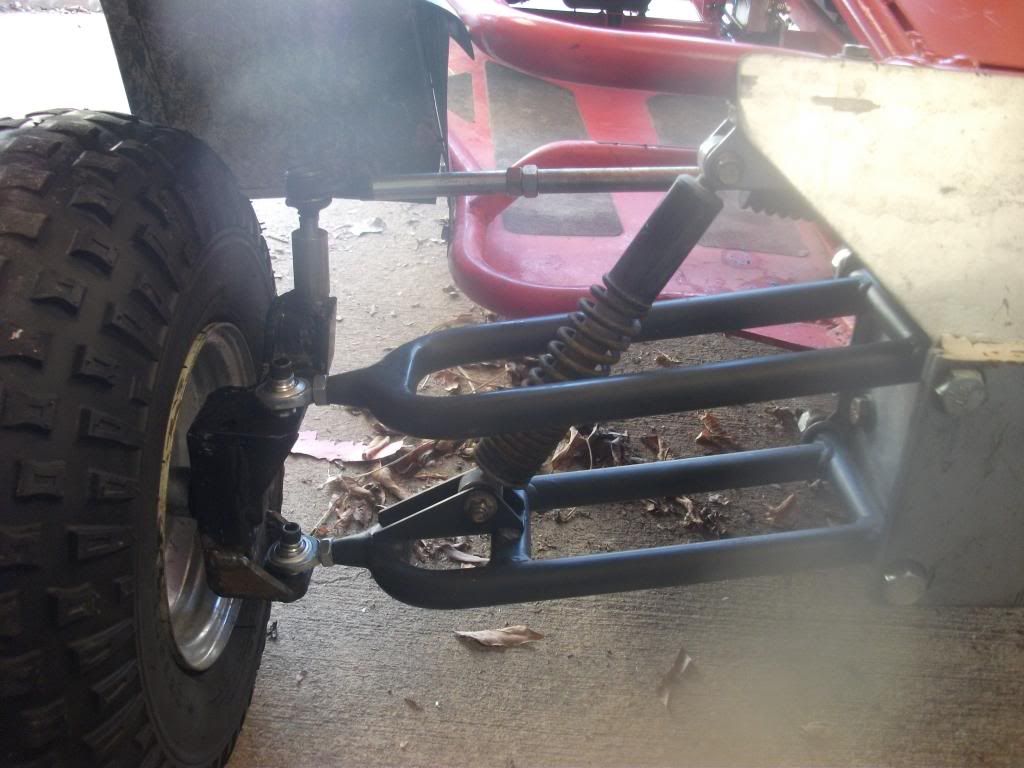
In the last pics above are my shocks choices up front.
The ones installed presently are from a TRX 200. About the same size as stock and cost around $30 shipped used. Great for smooth terrain and light weight passengers. Very cushy ride, but bottom out too easily in big bumps. The slightly taller ones I'll have to look up, but were also around $30 shipped used, they are quite a bit stiffer than the TRX 200's, but should work well in the bumpy trails I'm hoping. Around 1" taller than stock, so they should work for most people if they're looking for an easy swap on their Yerf. I'll report back with my results after I test them out. |
|
#196
|
||||
|
||||
|
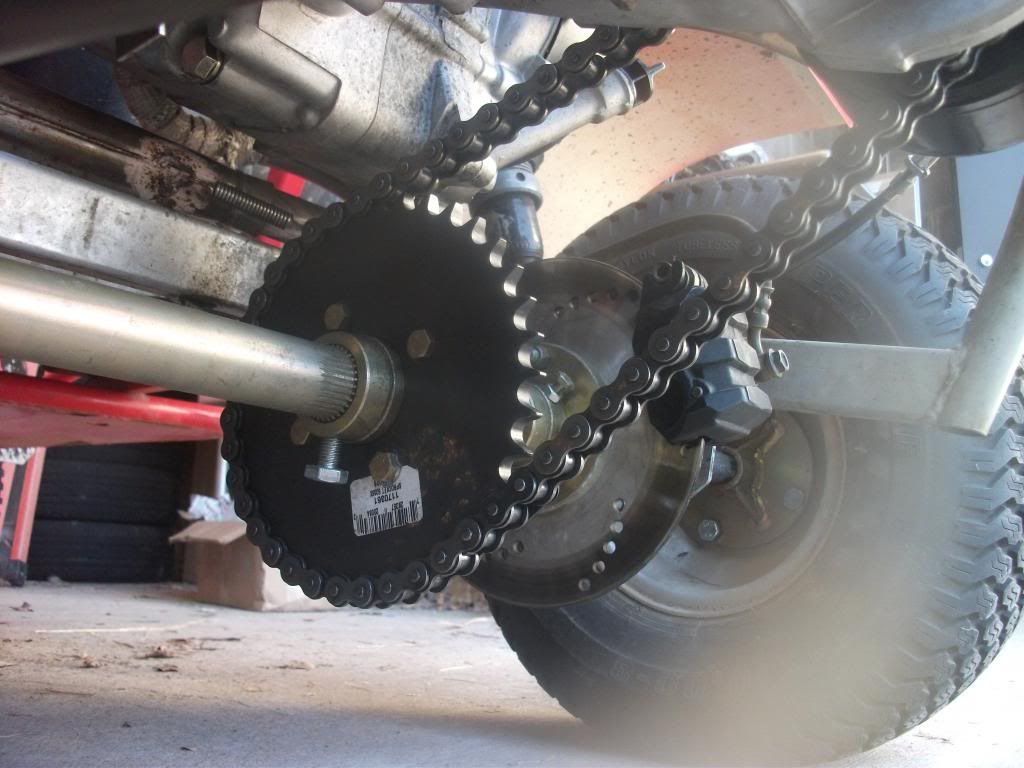
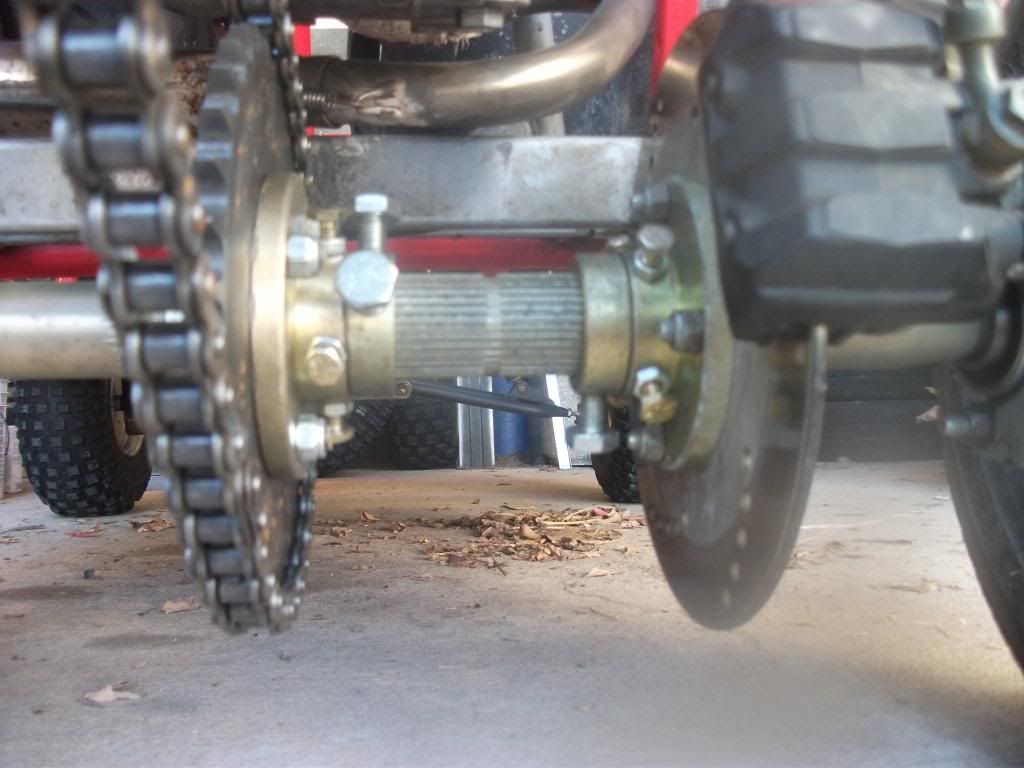
You can see my modified stock axle I'm keeping as back up.
Also pictured are the set screws I added to the brake and sprocket hubs for the HD axle I bought. The hub's "fit" was way too loose for my liking. The hubs could rotate back and forth quite a bit. The locking collars they supplied prevents them from moving side to side, but the back and forth bothered me. You're applying all your engine's torque and the torque of the kart slowing down on a sloppy fit on very small splines. IMO it wouldn't take long for them to slip and strip under heavy abuse. And I abuse this thing pretty good. Also pictured is my Tractor Supply 36T sprocket. If you stand on your head, you can get the sku number if you're interested.... 
Last edited by xlint89; 03-31-2013 at 10:51 PM. |
|
#197
|
||||
|
||||
|
Quote:
 Thank you again for your help with the heims. It seems like they're going to do just fine. I've been  them pretty hard so far. them pretty hard so far.
|
|
#198
|
||||
|
||||
|
looks good; If you find that you have to keep checking/tightening the chain, then the upper main bar the tensioner/mount is on is sagging/bending down in the middle-- sooner or later the swingarm begins to splay out on the bottom sides. a flat plate or piece of angle iron going across it will stop that issue. Run a straight edge across the top rear, measure the gap at the middle, write it down and check it on occasion to see if its changing. BTW, love the caulk tube intake--awesome redneck-ness!
As far as rear tires go 2slick, watch the width. i ran 12.50 wides (22s) and had to modify to stop them from hitting the frame. you'll have to pre-calculate based on rim width and offset to find out how much room you have before you order Last edited by x-bird; 04-01-2013 at 09:06 AM. |
|
#199
|
||||
|
||||
|
Glad to hear the fix was that simple.
 I have stories I won't talk about that top that one,LOL I have stories I won't talk about that top that one,LOL And there's still a shortage on red paint. And there's still a shortage on red paint.
|
|
#200
|
||||
|
||||
|
Will do Xbird and the yerf dog looks sweet Xlint
__________________
Growing old is mandatory  Growing up is optional  https://www.youtube.com/watch?v=NEXoa-8d7qE |
|
|