|
|
|
|||||||
| Other tech issues For all other technical issues. Think frame, suspension, steering, brakes, etc |

 |
|
|
Thread Tools |
|
#1
 02-06-2012, 02:34 PM
|
||||
|
||||
|
Hey guys, I need a little advice on what to do for the heim joint mod. I've read through a few of the treads and I see that some guys use 3/8" heims and bungs and some use 1/2" ones. Which will provide good holding power and still be fairly easy to install?
I was leaning towards these http://www.ebay.com/itm/1-2x-1-2-20-...ht_3739wt_1396 since pretty much everything is in the kit, but I don't know if the bungs are the right ones. Would the bungs need to be strait and not stepped like the ones in the link? I was wondering this because I don't know if they have to be welded on both sides of the A-arm end, front and back. If so where can I find a good reasonably priced set of bungs that are the correct length and strait? or can I use a half inch coupler Thanks for the help! Next, I know I will have to drill out the ends on the A-arms once I cut the old tabs off, what type of drill bit is needed to cut holes of that size? Last edited by T3beatz; 02-06-2012 at 03:19 PM. 
|
|
#2
02-06-2012, 07:03 PM
|
||||
|
||||
|
I used 3/8 heims on my daughters Yerf and some thought maybe they weren't big enough. They have been on there for well over a year & half with zero problems and trust me, this buggy is not babied. The kit you posted looks like a nice set up, good luck..
|
|
#3
02-06-2012, 07:55 PM
|
||||
|
||||
|
Thanks Rarerat I looked through your thread when you modded your daughters, it looks good. I was kinda confused about the 3/8" or the 1/2" route, I just figure why not just go with the 1/2" if the cost is gonna be pretty much the same. The problem with that is I have to figure out how I'm going to drill out the holes for the bungs on the A-Arm. I have no clue what type of drill bit to use for a huge hole that will go all the way through the pole.
|
|
#4
02-06-2012, 08:02 PM
|
||||
|
||||
|
I would just wait until you get your bungs and see what you need to do. On a 1/2" heim you may need to just cut out a section of the A Arm for the bung. If I remember right on the 3/8 heims I used there wasn't much meat left on the A Arms after I drilled them for the 3/8 bungs. Either way it's a pretty simple mod and you will flat LOVE the results, it wont even seem like the same buggy.
Good luck..
|
|
#5
02-06-2012, 11:48 PM
|
||||
|
||||
|
Since I just bought all this for the wife's Spiderbox! She's broke 2 of the 3/8" heims just in the last month so I'm replacing them with 1/2", I'm having 4 new A-arms tubes made that are 2" longer and using rubber encased steel bushings instead of the tube & bushings that attaches to the bulkhead to see if it works better.
This is the cheapest route I could find for quality(12,224lb) 1/2" Heims: 2 of these :http://www.ebay.com/itm/1-2-x-1-2-20...item5ae109bc9e 4 of these :http://www.ebay.com/itm/1-2-3-8-REDU...item5ae1846ad7 4 of these :http://www.ebay.com/itm/3-8-CONE-SPA...item5643da5323 1 of these :http://www.ebay.com/itm/2-DOM-1-OD-x...item5637b2a738 ( you only need 12", you might find a drop @ a steel fab/supplier shop locally cheaper) This comes to about $65.00 (possible shipping on tubing). You'll want to use 3/8" grade #8 bolts-(I think they're 2-1/2"long) because a 1/2" hole in the spindle flange doesn't leave very much material around the cone spacer. A 1" bi-metal hole saw is what you should use if you have a drill press and you want to make a jig to hold the A-arm since the bit cuts it in two leaving your saddle cut. Simplest route is to cut the A-arm in two down the center of the bent and just weld in the short piece of tubing at the correct angle to be horizontal with the ground, then weld the bung in the tubing(You only weld the lip end of the bung). You can try to weld the bung without the tubing but if you overheat the weld, you'll be chasing the threads. If you're worried about your welding then cut a gusset at the backend of the tubing and weld it around the radius of the A-arm. Last edited by metalstudman1; 02-06-2012 at 11:54 PM.
|
|
#6
02-07-2012, 02:28 AM
|
||||
|
||||
|
Thanks metalstudman1 for the links... I'm sure that is the stuff I'll buy, I might as well go with the 1/2" heims just for the piece of mind.
so basically once I get the tubing welded in place and at the right angle, the bung will just slip right in and I weld the part that sits on the tubing. got it! I'll post some pictures when I start, should be by within the week depending on how quick this place ships. Just out of curiosity why are you making your A-arms longer? and what is an rubber encased steel bushing? lol can you tell I'm a noobie?
|
|
#7
02-07-2012, 06:00 AM
|
||||
|
||||
|
I've still been kicking around ideas for my heim setup. Nicely priced out setup! rather than go the tubing-bung route, i've been looking into having a shop locally drill and tap 1/2-20 thread into a piece of 7/8 OD round stock. at $12.50 each for 2-inch lengths, (gets me through my tubing and into my gusset plates on the arms) it's a bit pricey. I have another shop to price them out through. I like your idea of putting them into the a-arm in relation to how the kart sits vs putting them in line with the arm tubing and ending up with misalignment from the get-go.
a rubber encased bushing is just like the bushing that your engine mounts with to the rear subframe. it allows some twisting movement at the attachment point so that the twisting torque of the engine, or in this case suspension, isn't transferred directly from one component to the next (which can = bent or cracked components). Last edited by x-bird; 02-07-2012 at 06:10 AM.
|
|
#8
02-07-2012, 01:50 PM
|
||||
|
||||
|
Nicely put x-bird!!
I'm making the front suspension width 4" wider for added stability. The rubber encased bushings is what's on most ATV's A-arms (pivot points) and they work very well allowing free movement and added cushion when hitting obstructions (rocks,roots,ect...) Of all the old & wore out ATV chassis I have, none of the bushings are wore out.
|
|
#9
02-11-2012, 02:29 AM
|
||||
|
||||
|
Just waiting on a response from buggy depot, to see if they will exchange my uneven spindles for an even set. If so I can go ahead and purchase a set of longer upper A-arms to make my front end a 3rd gen. Instead of the setup I have now. I want to be able to flip my A-Arms back over and get my steering back on track.
I plan on ordering the setup metalstudman posted this week, either way it goes I'm gonna do the mod. I just don't want to start welding into the old top arms if I don't have to.
|
|
#10
02-13-2012, 07:52 PM
|
||||
|
||||
|
A little bit of forethought. while considering these ideas of mounting the heims, keep im mind the shocks you plan to use. I reversed the lower shock mount to allow for a shock with a little more length and travel. The shock gets real close to the inside of the upper a-arm at full droop. Having the bung extend into the inside of the arm could cause interference with some shocks. Especially if you plan on upgrading to a aftermarket shock. While this pic was intended to show some damage to the pass.side, it also shows how close the shock sits behind the upper a-arm on the drivers side. It also illistrates that simply welding a bung into the a-arm holds up very well. The hit tore the arm from the mount and snaped the shock but the arm only spun on the threaded heim. The heim and bung mount were un damanged.
Drilling the arm to recieve the bung just about cuts the arm in half but welding around the bung front and back proved plenty strong.
|
|
#11
02-13-2012, 08:07 PM
|
||||
|
||||
|
ckau- that works shock busted makes my wallet hurt!!!
|
|
#12
02-13-2012, 11:46 PM
|
||||
|
||||
|
Any chance of someone wanting to do the Heim joint installation for some of us that don't have all proper tools? For a fee of course.....
Kinda like the BD upgrade? Just send the A arms in the mail and a payment via Paypal??? I really think this is the way to go VS. the BD ball joints for the Yerf.
|
|
#14
02-17-2012, 05:42 PM
|
||||
|
||||
|
Use High Misalignment rod ends. I finished my setup about a month ago. Outside to outside is 56" with 8 x 7 rims.
__________________
If the only tool you have is a hammer, Then all your problems look like nails.
|
|
#17
02-17-2012, 09:33 PM
|
||||
|
||||
|
With the list I made the cones take care of the need for misalignment spacers because I'm using the less expensive inserts. I plan on posting a complete play-by-play of my mod as soon as I get my bent tubes get done,(I can't bend a 3" radius).
|
|
#18
02-18-2012, 12:42 AM
|
||||
|
||||
|
looking forward to the post metalstudman1, I'm ordering my stuff right now, I don't think I'm going to go with the tubing, I'll just weld the bungs directly to the a-arm. From the specs of the tubing it says the inner diameter is .870", which is about 7/8 inch. I'll grab a hole saw of that size and the bung should fit right in.
Last edited by T3beatz; 02-18-2012 at 11:07 AM.
|
|
#19
02-18-2012, 10:45 AM
|
||||
|
||||
|
Going a slightly different route for the lower arm. Rather than use heims, which the person i'm working with felt would be fairly susceptible to bending from the pull of the shock and damage from natural obstructions (rocks in my case) we came up with a conventional pin-thru mount for the lower arm. (and yes, i'll be bronze bushing it lol) He's working on the kingpin and spacer block today, when those are done, i'll attach my two plates to the assembly then be able to tack them to the arms.
Last edited by x-bird; 02-18-2012 at 11:35 AM.
|
|
#20
02-23-2012, 04:33 PM
|
||||
|
||||
|
Well, my stuff came in today... but, when I ordered it I forgot to change the cone spacers and reducers to 4, so now I have to order the rest of them, I only have 1 each now. On the other hand the Bungs and heims look great, they are nice and beefy! I guess I won't be able to start my mod until next week, I'm ordering the rest of the stuff now.
Another thing I'm debating on is buying the longer upper a-arms. I have the uneven spindles, so i was gonna just drill new holes equal distance from the spindle body and cut off what I don't need. Do you think that will work? If you need pics I can show what I mean. Or do you think the uneven setup is just as good as the even, other than the shock mounting position?
__________________
T.J. Yerfdog Spiderbox, Uni Type air filter with 6" intake, 130 jet, Orange no-rev limit cdi, Red coil, iridium plug, 1500rpm clutch springs, 1500rpm contra spring, 13g sliders, 22" rears, 21" fronts, aftermarket reverse installed, and Trailtech Vapor.
|
|
#22
02-24-2012, 08:07 PM
|
||||
|
||||
|
Ok, I was out doing a couple eyeball measurements with the heims and bungs, and from the way the bungs are made after you drill the hole out and stick them in the a-arm there will be about 1" of just the bung sticking out of the a-arm. Once the heim is installed this makes the holes about 1" out from the original mounting locations, basically the spindles will be 1" wider on both sides of the buggy. Will this effect anything negatively, or will I be fine? I'm worried that my tie rods wont be long enough for that extra 1" extension.
the bungs and heims are the same ones from the links that metalstudman posted.
__________________
T.J. Yerfdog Spiderbox, Uni Type air filter with 6" intake, 130 jet, Orange no-rev limit cdi, Red coil, iridium plug, 1500rpm clutch springs, 1500rpm contra spring, 13g sliders, 22" rears, 21" fronts, aftermarket reverse installed, and Trailtech Vapor.
|
|
#23
02-24-2012, 08:23 PM
|
||||
|
||||
|
You will definitely need to extend the tie rod tubes. What I did was get a pair of steel 1/2"-20 circle track tie rod tubes, cut the LH threaded end off and reamed the tube to fit over the existing tie rod tube. I drilled a hole in each one for a rosette weld to pin it. I swapped out the stock tie rods with high misalignment rod ends.
__________________
If the only tool you have is a hammer, Then all your problems look like nails.
|
|
#24
02-24-2012, 08:35 PM
|
||||
|
||||
|
I wonder what thread is the stock rod ends? maybe I can find a set of female spacers that might work??
__________________
T.J. Yerfdog Spiderbox, Uni Type air filter with 6" intake, 130 jet, Orange no-rev limit cdi, Red coil, iridium plug, 1500rpm clutch springs, 1500rpm contra spring, 13g sliders, 22" rears, 21" fronts, aftermarket reverse installed, and Trailtech Vapor.
|
|
#25
02-24-2012, 09:00 PM
|
||||
|
||||
|
You can drill out the stock threads and tap it for 1/2-20. You could also make adapters to move the tie rod tab on the spindle closer to the rack.
__________________
If the only tool you have is a hammer, Then all your problems look like nails.
|
|
#26
02-24-2012, 09:38 PM
|
||||
|
||||
|
The wider the track of the front end the better the stability. Extending the steering arms can be done soooo many ways!!!Another,Simple way is to go to Lowes or local building supply and getting a piece of thin wall steel tube slightly larger than the arm, cut the arm and slide the tube over and weld the ends of the tube-DONE!!! I tried a heim on the steering arm instead of the ball joint and found I needed more steering effort,so I went back to ball joints- but that just me.
|
|
#27
02-24-2012, 10:18 PM
|
||||
|
||||
|
Quote:
I plan on getting a set of these for the back so I'll have a little extra stability all around. http://www.ebay.com/itm/3-ATV-WHEEL-...#ht_937wt_1163
__________________
T.J. Yerfdog Spiderbox, Uni Type air filter with 6" intake, 130 jet, Orange no-rev limit cdi, Red coil, iridium plug, 1500rpm clutch springs, 1500rpm contra spring, 13g sliders, 22" rears, 21" fronts, aftermarket reverse installed, and Trailtech Vapor.
|
|
#28
02-25-2012, 05:58 AM
|
||||
|
||||
|
Quote:
My joints were totally shot by the time I converted so any change would have felt like a huge improvement to me 
|
|
#29
02-25-2012, 07:39 AM
|
||||
|
||||
|
Any additional effort could be attributed to a few things.
1. The heims are new and need to be lubed 2. The ball in the heim is in a bind with the race causing extra effort. 3. The geometry is off from the rack centerline to the heim pivot point. I found it necessary to lower the rack mount to bring the tubes parallel with the upper a arms. A heim is designed to work with the load pushing or pulling along the centerline of the ball. If it is loaded on an angle, additional effort is encurred due to the loss of leverage.
__________________
If the only tool you have is a hammer, Then all your problems look like nails.
|
|
#30
02-25-2012, 08:52 AM
|
||||
|
||||
|
Lyonperf- I agree with all the items listed. My rack is lowered and in straight alignment with the A-arms and spindle tabs,Yes maybe they were just tight from being new!!! Since my daughter was starting to drive the Spiderbox she let me know it was harder to turn as I didn't notice much of a change. When the ball joints wear out I'll probably go back with the heims as she'll have stronger arms!
|
|
#31
02-25-2012, 09:14 AM
|
||||
|
||||
|
Keep in mind the other factors of tire pressure and driver's weight. Weight has a significant effect on suspension angle.
__________________
If the only tool you have is a hammer, Then all your problems look like nails.
|
|
#32
02-26-2012, 12:15 AM
|
||||
|
||||
|
Thanks guys, I'll take all of this into consideration will doing the mod. For now, I'll just try and focus on the heims for the spindles... after I tackle that and extend the tie rods, I'll see about switching to heims there also. I'll be beefing up the front end while I have it apart also. Trying to get prepared for this years buggy bash at St. Joe state park in june.
__________________
T.J. Yerfdog Spiderbox, Uni Type air filter with 6" intake, 130 jet, Orange no-rev limit cdi, Red coil, iridium plug, 1500rpm clutch springs, 1500rpm contra spring, 13g sliders, 22" rears, 21" fronts, aftermarket reverse installed, and Trailtech Vapor.
|
|
#33
03-05-2012, 01:02 PM
|
||||
|
||||
|
MSM, do you know off the top of your head what size pipe I will need to extend the tie rods? I'm not with my buggy and I was gonna stop by and try and pick some up.
__________________
T.J. Yerfdog Spiderbox, Uni Type air filter with 6" intake, 130 jet, Orange no-rev limit cdi, Red coil, iridium plug, 1500rpm clutch springs, 1500rpm contra spring, 13g sliders, 22" rears, 21" fronts, aftermarket reverse installed, and Trailtech Vapor.
|
|
#34
03-05-2012, 02:36 PM
|
||||
|
||||
|
The stock steering arms are just over 5/8"(.64-.65). the 3/4" thin wall tubing from Hardware store should fit externally and 3/8" rod internally.Hope that helps
|
|
#35
03-05-2012, 02:50 PM
|
||||
|
||||
|
Thanks, that should point me in the right direction, I'm at home now so I'll cut it and take a half with me once I leave. I'll try lowes, and if they don't have what I need I'll head over to the metal supply (it's a further drive).
oh yeah and other than bmi, what is a good place to get rack boots for this buggy? I think they are out of stock, I think buggy depot has some in, but I was gonna try and find something that may fit locally. T.J.
__________________
T.J. Yerfdog Spiderbox, Uni Type air filter with 6" intake, 130 jet, Orange no-rev limit cdi, Red coil, iridium plug, 1500rpm clutch springs, 1500rpm contra spring, 13g sliders, 22" rears, 21" fronts, aftermarket reverse installed, and Trailtech Vapor. Last edited by T3beatz; 03-05-2012 at 03:21 PM.
|
|
#36
03-05-2012, 09:57 PM
|
||||
|
||||
|
I did that same search for rack dust bellows a month ago and didn't find anything even close- so I bought 3 sets from BD. They are an exact match and after all the research a good price for a pair: Steering Rack n Pinion Rubber Boots - for Yerf Dog (pair) is your search phrase.
|
|
#37
03-05-2012, 11:52 PM
|
||||
|
||||
|
Well, I got every think put back together for the most part, I just have to re-install the steering column and run the wires, I'm working on that now. I should have everything done tomorrow, I'll post pics once it is complete.
Thanks for the help on the tie rod tubing, I went up to lowes and they had a couple types (square and round) the round fit pretty snug but it would catch at certain points and I did not feel like boring it out (don't think I have the tools for it). So, I ended up going with the square tubing, it fit perfectly and it wasn't too hard to weld up.
__________________
T.J. Yerfdog Spiderbox, Uni Type air filter with 6" intake, 130 jet, Orange no-rev limit cdi, Red coil, iridium plug, 1500rpm clutch springs, 1500rpm contra spring, 13g sliders, 22" rears, 21" fronts, aftermarket reverse installed, and Trailtech Vapor.
|
|
#38
03-06-2012, 04:56 PM
|
||||
|
||||
|
ok, I'm close to being done, I still have to put the fenders back on, and the seat belts. I also need to find some good non slip floor mats so I wont scratch up the black paint to bad. This was a weekend job so It's not great, but its good enough.
My Ackerman steering still sucks! I still get the push effect... I think I might have to put a spacer in between my rack and the bulkhead to get the geometry better. Ohh, and in one of the pics you can see the ATV spacers on the back wheels I got the ones that add 3" over all, 1.5" on both sides. here are a few pics...
__________________
T.J. Yerfdog Spiderbox, Uni Type air filter with 6" intake, 130 jet, Orange no-rev limit cdi, Red coil, iridium plug, 1500rpm clutch springs, 1500rpm contra spring, 13g sliders, 22" rears, 21" fronts, aftermarket reverse installed, and Trailtech Vapor. Last edited by T3beatz; 03-06-2012 at 05:03 PM.
|
|
#39
03-06-2012, 05:10 PM
|
||||
|
||||
|
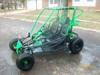
I like the color scheme ...the green hornet ...
how much camber change do you get through your range of travel and which way? (pop a shock and just run from full droop to full compression.) Try running your heims out a little further depending on which way it's changing to.
|
|
#40
03-06-2012, 05:16 PM
|
||||
|
||||
|
Thanks, I was gonna go with a Kawasaki slash monster energy theme...
I'll try and move the heims out and see if I can get that to work a little better.
__________________
T.J. Yerfdog Spiderbox, Uni Type air filter with 6" intake, 130 jet, Orange no-rev limit cdi, Red coil, iridium plug, 1500rpm clutch springs, 1500rpm contra spring, 13g sliders, 22" rears, 21" fronts, aftermarket reverse installed, and Trailtech Vapor.
|
|
#41
03-06-2012, 05:33 PM
|
||||
|
||||
|
Man! That thing looks sharp.I'm really liking that cloth top. give some detail on how you made that.
About that push... just for funzies, swap sides with the rear wheels. this will point the V tread pattern pointing the opposite way. you won't have such an agressive bite.This should allow the rear to slide around a little more. If this enhances steering then the problem is probably lack of grip on the front tires. also try adjusting the heims to give some negitve camber, (tops lean in). That's the beauty of the heims, you can tune the front end. Mine is set at 3 degrees negitve camber, 1/8" toe in. These setting might not be right for you but it's a good place to start.
|
|
#42
03-06-2012, 09:15 PM
|
||||
|
||||
|
Love the color and job you did. just curious-why do you have the lower A-arm upside-down?
|
|
#44
03-06-2012, 10:38 PM
|
||||
|
||||
|
Quote:
As far as the top goes, It's just some black nylon from the fabric store it's a little thicker than rip-stop nylon that they use for kites. I then measured the area I was gonna cover and added about 1 1/4th inch to each side, I folded that excesses over and tack sewed it in a few places on each side (this is for the smooth edge). After that I got some 1/4" eyelets (from the same fabric store), one set came with the punch needed to seat them and the other was just a set of 15. They are very simple to install, you just cut a small hole where you want the eyelet to be located insert one side, slide the other side over it from the other side of the fabric, use the little tool that is included and a hammer or mallet to tap it down and they bend over each other forming the hole. That's pretty much it, a $10.00 dollar roof in about 1 1/2 hour of time. This is the eylet kit I used from Hancock's it comes with the tool, I also bought an extra set of 15 without the tool, they had a half off sale at the actual store. http://www.hancockfabrics.com/Eyelet...VVviewprod.htm Now as far as the steering goes, it's just that my outside wheels have more angle when turning than my inside wheels. When riding on dirt all is somewhat good, but when I get on pavement I can see the outside wheels sliding a little. metalstudman1 Just like GX150 said, the shock wont clear. I was gonna just extend the top A-arms but I just said what the hell, I'll leave well enough alone. Also, It might clear but my angle would be very extreme with those longer shocks, I know I could have just re-angled the heims and re-do the tie rods but I just said F-it... I'm gonna just get it done. lol
__________________
T.J. Yerfdog Spiderbox, Uni Type air filter with 6" intake, 130 jet, Orange no-rev limit cdi, Red coil, iridium plug, 1500rpm clutch springs, 1500rpm contra spring, 13g sliders, 22" rears, 21" fronts, aftermarket reverse installed, and Trailtech Vapor. Last edited by T3beatz; 03-06-2012 at 10:40 PM.
|
|
#45
03-11-2012, 08:28 PM
|
||||
|
||||
|
I still can't figure out my steering, I still think I'll never get it right with the buggy depot Spindles, since they have no angle and are 90*'s. but I should at least be getting even turning and it's just not working. I'm going out tonight to space the rack, if that does not work I'm giving up! lol
__________________
T.J. Yerfdog Spiderbox, Uni Type air filter with 6" intake, 130 jet, Orange no-rev limit cdi, Red coil, iridium plug, 1500rpm clutch springs, 1500rpm contra spring, 13g sliders, 22" rears, 21" fronts, aftermarket reverse installed, and Trailtech Vapor.
|
|
#46
03-11-2012, 08:48 PM
|
||||
|
||||
|
Can you post pic's of the tires turned both ways to their max. Let's see how much camber & toe exist when turned. There is a fine balance of these two to get a good bite
|
|
#47
03-11-2012, 09:37 PM
|
||||
|
||||
|
Sure, here are a few pics of what I'm talking about. I posted some pics a while back before the mod, but I thought the mod would help but it didn't so my problem must lie somewhere else. excuse the mud, I was riding yesterday and didn't have a chance to clean it off.
You can see what I'm talking about with the bdx spindles being 90* they should have a slight angle (I think towards the center line of the rear axle) where the tie rod ball joint bolts to shouldn't they. the rack is not super tight right now either, I had to get longer bolts so I can space it out a little to see if that helps, now I have to find some spacers. T.J.
__________________
T.J. Yerfdog Spiderbox, Uni Type air filter with 6" intake, 130 jet, Orange no-rev limit cdi, Red coil, iridium plug, 1500rpm clutch springs, 1500rpm contra spring, 13g sliders, 22" rears, 21" fronts, aftermarket reverse installed, and Trailtech Vapor.
|
|
#48
03-11-2012, 10:04 PM
|
||||
|
||||
|
You need to adjust the top heim out or the bottom in to get the tires straight up and down or slightly in at the bottom, with your weight in the buggy the toe out condition get's worse. Toe in is better than toe out!!!
|
|
#49
03-11-2012, 10:13 PM
|
||||
|
||||
|
I plan on adjusting that a little more to get it correct, (I thought that adjusting the heims was the camber?) the tow in or out is when you adjust the tie rods right?. I had it strait up and down at first but I still got the same outside wheel thing. It gets to the point where if I turn left, I can go and manually push the back of the left wheel some more and it will move until the wheel is just about pointed towards the other! basically it's past the point were the tie rod is holding it back and it will just swing around. that's why I think moving the rack back a little will help in this.
__________________
T.J. Yerfdog Spiderbox, Uni Type air filter with 6" intake, 130 jet, Orange no-rev limit cdi, Red coil, iridium plug, 1500rpm clutch springs, 1500rpm contra spring, 13g sliders, 22" rears, 21" fronts, aftermarket reverse installed, and Trailtech Vapor. Last edited by T3beatz; 03-11-2012 at 10:15 PM.
|
|
#50
03-11-2012, 10:42 PM
|
||||
|
||||
|
Your correct about camber. Slight camber in & toe in help. I've posted about this before- the rack location isn't ideal for the taller shocks being up so high. Also the steering shaft was over the gas pedal (my toe hit it!) so moving the rack down and over fixed both issues. With the steering arms lower they move laterally with the spindle instead of down to it. I don't know if this will help but it may get you to thinking!! Sorry about all the dirt!!!!
|
|
#51
03-12-2012, 07:52 PM
|
||||
|
||||
|
Thanks for the pics metal, I'm trying to figure everything out right now. I'll let you know how it goes to see if I'm gonna have to move things around, I really don't want to if I don't have to.
__________________
T.J. Yerfdog Spiderbox, Uni Type air filter with 6" intake, 130 jet, Orange no-rev limit cdi, Red coil, iridium plug, 1500rpm clutch springs, 1500rpm contra spring, 13g sliders, 22" rears, 21" fronts, aftermarket reverse installed, and Trailtech Vapor.
|
|
#53
04-21-2012, 05:54 PM
|
||||
|
||||
|
Well, after a few more mods I think I'm about done with the front end other than a new set of shocks!
I changed my uneven A-Arm setup to an even one and I notched my rack (added 4 total, 2 to each side). Man what an improvement all this has done to turning and overall drive ability of the buggy! I can turn around in the middle of the street now without needing to back up, and now every thing feels a ton more solid. Once I moved my shock mounts back up top I had to fab up new mounts for them that put the shock further out on the A-arm, this also stiffened them up a little, just what I needed for the SC shocks, I blew them out so just running on springs and they got a tad on the soft side! If your running the uneven setup converting to an even setup is a must, and you can still use your uneven spindles... I have a little video and I'll get some pics and post them soon. T.J.
__________________
T.J. Yerfdog Spiderbox, Uni Type air filter with 6" intake, 130 jet, Orange no-rev limit cdi, Red coil, iridium plug, 1500rpm clutch springs, 1500rpm contra spring, 13g sliders, 22" rears, 21" fronts, aftermarket reverse installed, and Trailtech Vapor.
|
|
#54
11-23-2012, 10:46 AM
|
||||
|
||||
|
Can someone please explain to me the difference between the cone spacers
http://www.ebay.com/itm/390069397977...84.m1423.l2649 And the high misalignment spacers? http://www.ebay.com/itm/390330633364...84.m1423.l2649 I want to gather the parts needed for the conversion and not sure what to get? And if anyone that has done this before is interested in doing it again (for a fee of course) please let me know. I don't have the proper tools, welding skills, or confidence to take on this for the first time on a brand new set of A arms. Thanks
|
|
#55
11-23-2012, 02:26 PM
|
||||
|
||||
|
Ok, you don't want to get the kits with any spacers that are 1/2" inner diameter. You want 3/8" ID spacers.
High misalignment ones are used if you need the extra angel from the A-arms, I find that the standard cone spacers work just fine for the type of angle from the spiderbox. they used to have the kits with the 1/2" heims and bungs, with 3/8" spacers but they don't have them anymore, so you will need to order the spacers separately.
__________________
T.J. Yerfdog Spiderbox, Uni Type air filter with 6" intake, 130 jet, Orange no-rev limit cdi, Red coil, iridium plug, 1500rpm clutch springs, 1500rpm contra spring, 13g sliders, 22" rears, 21" fronts, aftermarket reverse installed, and Trailtech Vapor.
|
|
#56
11-23-2012, 06:03 PM
|
||||
|
||||
|
ditto the above--if you not "adding" travel through longer arms/shocks and more droop, cones are fine-- shouldn't be to difficult to find 3/8ths ID spacer to run through the cones and ball. if you go with high misalignment spacers, you need the 1/2" bore on the heim because the spacers fit into the bores and reduce the diameter to 3/8ths.
|
|
#58
11-23-2012, 07:51 PM
|
||||
|
||||
|
Yep, cones will be fine, My shocks on the front are 13" and I have moved the mounting holes inward (made new brackets) so my angle is much more steep and I use the cones and I have no issues. The bungs just have to be welded in at the correct angle with the shocks you intend to use (just about level to the ground) I eyeballed most of my stuff and it turned out good enough! lol
Also to add, you will want to get some 1/2" to 3/8" reducer inserts for the heims (from the same seller). http://www.ebay.com/itm/1-2-3-8-REDU...item5ae1846ad7 these are the cone spacers you need: http://www.ebay.com/itm/3-8-CONE-SPA...item5643da5323
__________________
T.J. Yerfdog Spiderbox, Uni Type air filter with 6" intake, 130 jet, Orange no-rev limit cdi, Red coil, iridium plug, 1500rpm clutch springs, 1500rpm contra spring, 13g sliders, 22" rears, 21" fronts, aftermarket reverse installed, and Trailtech Vapor.
|
|
#60
11-26-2012, 07:12 PM
|
||||
|
||||
|
If I get the heim kit with the high misalignment spacers, I don't need the reducers because they use a 3/8" bolt already.
If I get the kit with the cone spacers, then I need the reducers. Do you need 1 or 2 reducers per heim with the cones? If you need 2 per heim, then it's only a $3 difference between the cones with reducers and the high misalignment. So would the high misalignments be better? It's only a $6 difference after you buy 2 kits.
|
|
#61
11-26-2012, 10:29 PM
|
||||
|
||||
|
i'd go with the high misalignment spacers. They allow a greater range of travel before reaching bind than the cones--they incorporate the ball's curvature giving a few degrees more angle. With those, the tie rods will most likely reach full extension/bind before the heims ever do.
|
|
|
|