|
|
|
|||||||
| Mini Buggy General Discussion General Discussion forum for Mini Buggies. (American Sportworks, HammerHead, Carter, etc) |

 |
|
|
Thread Tools |
|
#1
 03-13-2015, 11:23 AM
|
|||
|
|||
|
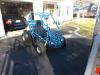
To fill in: I took the Dog out on a quick run. Was still working on it, didn’t have the seatbelts back in yet. Went out in the street for quick spin, came back to shop. Came off the concrete entrance, hit the dirt drive. At same time, I turned right to a line my self up to shop. (not a hard turn) rear wheels came off the concrete hit the dirt, and I laid it over on the drivers side. When I reached for the roll cage my hand slipped and when outside of cage, and arm hit the ground with the dog. I dislocated my shoulder. (not pleasant at all). This a few months ago, and shoulder is still not back to normal. Needless to say, I’m gun shy still I think. I have new 5 points and sisy bars on both sides now. But it just surprised me how easily it rolled. I wasn’t going fast at all, and wasn’t much of a turn. So would like see if I have some issues with the dog, that need corrected, or was it just a fluke, and bad timing to make the turn.??
One thing I noticed was there is pretty good gaps between the spider cage, and the connection on the frame. Like ½ inch on both sides. Is this normal, or do I need to put some spacers in to tighten it up? Also, have a front end lift kit, with 19 inch tires in front, 22” in back. Behind the front wheel, I’m setting little over 13” off the ground. To high? Also, with the rear tires, they are more rounded. They are 10” wide, but only really riding on less than half of that. Problem? With that said, I do have a set of 2” inch spacers that I bought, but never have put on. I’ve heard that the axles on Dogs, are not all that good, and putting spacers on, could break axle. is this correct? If anyone knows. One last thing, both front and back shocks are adjustable. I can tighten or loosen them up. Would it be better to keep them tight? The backs at the time was on their lightest setting. Since then have preloaded them to where I half to hop up on the back cage to get them to move. Fronts are still on a pretty soft setting still. Am I thinking correctly the stiffer they are, less prone to flip the buggy? I’m sure I’ll get over my gun shyness, but there is my thought about the kids. I don’t want to scare them, or of course see them get hurt. So want to cover the bases, before I let them go play in it. Thanks for any input. 
|
|
#2
03-13-2015, 12:16 PM
|
||||
|
||||
|
never let go of the wheel!
You cover a lot of ground there, lol. I'm very leery of the spiderbox axles, having sheared one and put it onto the roof, crushed forearm, lots of fun. Took a long time to feel confident in her again. Spacers without other mods to strengthen the axle ... Hell NO! IMHO. shock/Spring load goes both ways. if the shock doesn't bottom out and the setting is light, it will help avoid a roll a little since it will take up the sideways motion as body roll and give you reaction time to turn OUT of the roll. (note the caps as to direction to turn) Too stiff and you could just start going over with no sensation of pushing it to it's limit. too soft and you could bottom out too easily and go over. Swingarms are easier to flip than IRS. Height, take it from someone who probably runs more ground clearance than 99.5 percent of the buggies out there (i know of a couple equal or higher than mine). the higher you go, the more prone to rolling it you are. basic physics. High CG = bad news. If you're not running terrain that requires that much ground clearance, lower it. if the new 5 points are the chinese skinny harnesses, sh1t-can them and buy a set of 3-inch racing harnesses used off e-bay. (simpson, RJS etc.) Don't stop to think about it, either can them or sell them to some sucker. (Nice of me, ain't it?) The NHRA and other sanctioning bodies require recertification or replacement every 2 years. there's tons of perfectly good 2+ year old REAL harness sets out there for sale dirt cheap. BTW, the yerf looks pretty killer. I have a Sunl axle that you might be interested in. check the classifieds.
|
|
#3
03-13-2015, 01:53 PM
|
|||
|
|||
|
you are direct. not a bad thing.
 Thanks BTW, wife is even impressed with what I've done to it. So much, that she is the one that found the Duce so we call all go riding. gotta love her. Thanks BTW, wife is even impressed with what I've done to it. So much, that she is the one that found the Duce so we call all go riding. gotta love her. to update. the Dog has been in the shop all winter, and have been working on her. I've put a bunch of upgrades and modes on her. kept me out of the house most of the winter. But haven’t got her out enough to really get the new feel for her. (hoping this weekend)!!!! Have a place south of town, that is perfect trail riding. Hills, sand, jumps, water. I'm guessing my height, matches what’s out there. And makes sense on the shock adjustment. So guess will just adjust when I get it out there. Guess I might need to soften the back, and tighten up the front a little. Thanks for the info. on the Harnesses. I've heard pros, and cons about them. For the most part, it sounded like they are good for what I'm using them for. However, it sounds like your pretty strong against them. I'll take your advice. So I will be looking into something like you suggest. No substitute for safety. I wasn't suggesting spacers for strength. Just to get more riding width in the back. But guess you confirm that it’s not a good idea. Since we on the subject, and you know dogs, I was wondering if to make a handle “T” bar from the front so passenger would have something better to hold on to.?? Or is that just putting something in the way where could do more harm? Not much room on those dogs. But passenger really don’t have much to hang onto either. Is the sisy bar up, and out front on the roll cage enough? I might be interested the axle. I’ll take a look. Thank you.
|
|
#4
03-13-2015, 05:06 PM
|
||||
|
||||
|
the spacers without additional work will just put more stress on the axle by putting the tires and load further away from the bearing, putting more leverage on the axle where it least wants it.
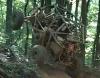
The harnesses when new will be fine, but over time i guarantee you the straps will loosen up in the buckles as you're riding and you have to keep snugging them up as you ride. They're most likely also not tested/rated for stretch. In the case of a roll or hard impact, webbing straps, even rated ones, stretch a surprising amount. There's a lot of guys on here who know tons more about the spiderboxes, I don't have one, only had the swingarm and back end parts of one on my build at one point. Pretty sure one of the guys did a "T" bar for the passenger. As far as sissy bars, no idea what you've done without pics of it. If you mean nerf bars , they're always a good thing if you ride around trees. In addition to having a lot of tree scars, mine kept me from wiping a quad out when he and i slid together when he was passing me on a narrow trail going up a hill. If i had sucked his front tire under my back tire when he ran up on it instead of it riding forward and off the nerf, he'd have been done for.
|
|
#5
03-13-2015, 05:21 PM
|
||||
|
||||
|
I ran the wider Buggy Depot axle plus ran wider offset rims on he front of my Yerf. It was very stable on off camber slopes and had as much or more clearance as yours. Mine was geared down for technical riding and was close to 60" wide up front with 22x8-10 tires. I ran Joyner 4-point belts and pads in the Yerf because of the open latch design.
|
|
#6
03-14-2015, 08:50 AM
|
||||
|
||||
|
The Dog's are really tippy with stock set up. Look at all the youtube videos of guys putting it up on 2 wheels.
Xbird really knows a lot more about suspension than me, and has sound advice for sure. But I am running wheel spacers on my stock Yerf axle. However, I did modify the hubs to try and alleviate some of the added pressure. Post #27 shows what I did. http://buggymasters.com/forum/showthread.php?t=2601 And when modifying the front spindles, pretty sure I slightly widened the front stance as well. Widening the Dog is a good thing for sure. But you can still tip it with little effort. Yes, important thing is to keep your hands inside the kart at all times. Tough to resist no putting your hands out, but you have to.
__________________
My Yerban assault vehicle: 2.2mm stroker crank, 62mm Nikasil cyl, Taida large vavle head, American made valve springs, ported intake manifold, TM 28mm carb, stock CDI, Bando coil, TK exhaust, stock CVT except for the 14g sliders, 13/40 internal gears, 16T drive, 31T axle sprocket, 22" rear tires, and ONE BIG POTATO CANNON mounted on top..........
|
|
#7
03-14-2015, 08:58 AM
|
|||
|
|||
|
Wider and lower will always be less tippy. A set of straps on the wheel to keep your hands inside is a good idea too. They're loose so you can get in and out of them easy but they stop your reflex reaction of reaching out.
Heres an fl350 with wrist straps. http://www.google.com/imgres?imgurl=...d=0CB8QMygCMAI
|
|
#8
03-15-2015, 08:39 AM
|
||||
|
||||
|
stock yerf has the worst roll center of any buggy out there . The chassis is light and with one person, 70% of the center of gravity is on the left side. This means any turn to the right regardless of speed can upset the balance. Increasing the wheelbase width helps but does not cure the problem. Using spacers will only increase rear axle failure. Adapting to a longer rear axle is the only real viable alternative. Even this won't fully eliminate the bad roll center but it is the most effective. Unfortunately it is the nature of the beast. Staying aware of the problem is the best prevention.
There's a thread posted on how to do the axle conversion. This conversion will strengthen the rear, eliminate axle failure and with a set of 10 wide 6/4 offset wheels will give a wheelbase of 54". Huge improvement over roll center. A 5 point belt system and a set of arm restraints are a must. I prefer the latch/lock system because the restraints are attached at the belt lock so they release at the same time. Steering column restraints mean your still attached after the belt is released. A separate and timely process when having to get out. especially if your injured. Climbing from a wrong side up buggy is not as easy as it seems. The swing arm slop in your pictures can be cured by using some washer/spacers on each side of the bushing to fill the gaps. Moving the battery from the swing arm and relocating under the passenger seat will help improve some weight balance. A grab bar for the passenger is not a bad idea but they need a restraint system otherwise they can catch that bar in the face. These pics show all of the issues addressed. This swing arm and axle system has been "bulletproofed" about as good as it gets.
|
|
#9
03-15-2015, 08:57 AM
|
||||
|
||||
|
Damn nice job with the dual disc brakes Ckau.
I like the heim joint swingarm too.
__________________
My Yerban assault vehicle: 2.2mm stroker crank, 62mm Nikasil cyl, Taida large vavle head, American made valve springs, ported intake manifold, TM 28mm carb, stock CDI, Bando coil, TK exhaust, stock CVT except for the 14g sliders, 13/40 internal gears, 16T drive, 31T axle sprocket, 22" rear tires, and ONE BIG POTATO CANNON mounted on top..........
|
|
#10
03-15-2015, 12:26 PM
|
||||
|
||||
|
I was riding with someone in there HH 250 a few weeks back and he rolled it on its left side. The 5 point harness supplied by HH worked just fine. The held by 200lb but in the buggy. The only thing I did not like was the effort it took to release the belt due to the pressure the release button was hard to push. If you do upgrade to a better 5 point I would suggest the Jr. Dragster 5 point belts. They are identical to the 3" belts used for cars but have only a 2" webbing which is more than you will ever need but much more comfortable.
|
|
#11
03-16-2015, 10:18 AM
|
|||
|
|||
|
CKUA, that is awesome. Love the dual disk brakes. And that’s cool how you attached the swing arm. I’ll look into doing something similar. I got the dog out this weekend. Did some tweaking. But noticed once I got up to around 30mph, the azz end was getting squirrelly on me. By time I hit 35, on the dirt road, I shut it down. Was going all over the place. I’m guessing this is coming from the slop on the swing arms????? There was some newly placed soft sand on the road. But never had issue before with stock shocks and tires. Now with the new shocks and tires, it feels like it floating across the sand.
X-bird thanks for the advise on the shocks. Following what you said made a huge difference in the ride. I had to stiffen everything up. Fronts almost to the max. Seems like to much. But after seeing what they where actually doing, didn’t give it a 2nd thought. I didn’t have rubber cap on the back shocks, so used a few zip ties and put them around the shaft just tight enough so they would stay in place, traveling up the shaft.. In the end, I adjust the rears where they first started. Sissy bar referring to I guess would be more likely called a grab bar. (we call’em sissy bars around here. ) could you put a pic up on what you did with the nerf bars. Might be interested in something similar. And thx everyone else for the advise. Didn’t know there was strap restraints for buggy’s. That’s awesome. Will be looking into those. I knew the dogs where easy to tip. Kids get a mouth full every time I let them take it out. WE do drive around a large body of water.. Thing I’m scared of most is the axle busting while drive across the dike while one or both kids are in the buggy, and they hit the water. Or whatever reason. There is rocks on the water side of the dike. So more than likely if you do hit the water, good chance it’s not going to up side up. Why a big issue with me. Quick release harness, and straps is a good thing to look into for me. Pic kind of shows you what I’m talking about. The dike is wide. Prob. 15 feet or so. Long as you don’t get stupid, no reason it should ever happen. But also why my next investment is a new axle. I completely up graded the front end for this reason. But the exhaust I got has adjustment on it. (silencer). I take it off, and you can hear where it is at all times. And I make sure I keep an eye on them as they are coming across the dike. Really liked being able to hear where the kids where on the trail at all times. Love that exhaust, but could only get for right side. So had to do some adjustments for the reverse box. Flip side of that, I can put the silencer on, and turn it all the way down. Do a little sneak peak cruising in town at night. If you do hear it, really not for sure what it is driving by. Son and I had a good time with it this weekend. Short lived however. Had a few welds brake on me. I’m a newbie welder. Anything major, I have my friend do. But I’m getting better. Really need to find out why I have the squirrellyness at higher speeds. Hoping tighten up the swing arm will take care of it. Thought I was about done with the dog. Looks like I still have work to do. Thanks guys. 
|
|
#13
03-16-2015, 05:26 PM
|
||||
|
||||
|
the way the spiderbox frame widens out at the base sort of negates the need for nerfs. my rear tires stick waaay out from the frame sides and were prone to hooking trees so i put the nerfs on.
filling in the voids between the swingarm bushings and the frame mounts should get rid of the squirrelyness unless your hubs or rims are bent or loose.
|
|
#14
03-16-2015, 07:49 PM
|
||||
|
||||
|
good looking yerf there eagle looks like you put a metallic flake paint on there cant really tell but looks like it pops nicely. With the bigger tires and higher ride height that also increases a roll possibility.
__________________
Hammer head Single seater know as herbie under construction Aluminum fuel tank, aluminum wheels, custom fuel/cargo rack, entire rewire, trail tech vapor, ported big valve head, a12camshaft, 12 gram sliders, straight intake, kirkey wide seat, front end extension. 4 point harness, welded cage. Hammerhead exhaust. Blade Single Seater Restore welded cage, engine build, new wiring harness/electric box, spun aluminum fuel tank.
|
|
#17
03-18-2015, 02:09 PM
|
|||
|
|||
|
Yes, metal flake paint. I used the metal flake paint you can get in the CAN at Auto Zone or whatever. But the paint really doesn’t come out unless you put a clear coat on it. They got a clear coat in the can also at same places. Just got be careful with it. It wants to Run real easy. 2 thin coats, then a thicker coat for the last. The kids scratched the paint up all the time. Found using a good paint, with a clear coat and (in a can) touch ups are easy. Little expensive at first when starting out. When can's are $12 a pop, and clear coat is $7. But after that, breeze to touch up and fix. Dupli-color Metal, paint, and Dupli-color, perfect match clear coat. When patching areas, they blend in very well, and even if don’t get all clear coat off, the metal flake still covers good when feathering out. And just put some more clear coat back on.
Warning::: I use black gloss epoxy for the black,- in back and front, and floor boards. Don’t get the clear coat on the epoxy. They DO NOT mix well together. Pic shows the damage to buggy after I laid it on its side. Next day, went in sanded down, wiped it down with clear rag. Put a few coats of blue, few coats of clear. In less than 2hrs, had it out in sun curing the clear coat. 2nd pic. Couldn’t tell anything happened. No, I didn't make fenders. Was going to, but to find diamond plated aluminum, was crazy. (at least in my area.) BD has them for around $140.00 I think. for all 4. They mount nicely for the back. But the front hardware I dismissed. Took some 3/8 rod, and welded the rod to the spindles, and used the mounting hole already in the fender. Turned out not to bad, however, I think i'm going to add one more rod for support. I like how the fenders turn with the wheels. Just got to make sure you mount them so they dont hit the frame when in a full turn. That was the hardest part. And if half to do it again. I have them predrill the rear fenders like they did. But don’t pre-drill the front. The way I mounted them, would have better to have 2 holes. One up front, and another one in the back. I got some washers in the swing arms. Hopefully get it out soon, and see if that helps the stability of it. Thanks
|
|
#18
03-18-2015, 02:21 PM
|
||||
|
||||
|
those are pretty cool colors, I just never have luck with spray paint the stuff scratches and chips so easily even with really good prep work. I have those same rear tires on my yerf. I have a 110lb sand blaster I think I might be putting it to real good use this summer and probally do a 2 stage urethane paint.
__________________
Hammer head Single seater know as herbie under construction Aluminum fuel tank, aluminum wheels, custom fuel/cargo rack, entire rewire, trail tech vapor, ported big valve head, a12camshaft, 12 gram sliders, straight intake, kirkey wide seat, front end extension. 4 point harness, welded cage. Hammerhead exhaust. Blade Single Seater Restore welded cage, engine build, new wiring harness/electric box, spun aluminum fuel tank.
|
|
#19
03-18-2015, 03:06 PM
|
|||
|
|||
|
I’m sure urethane paint, any real auto paint would last longer than any can paint. But I think the clear coat does help a lot. Will scratch or chip, if you smack tools against it. But kids and dogs can jump in and out of it, and holds up pretty well.
Sand blaster would be nice to have. I’d be sanding it down by hand. Well, the kids can sand pretty good. However, the epoxy holds up really well, if prep it correctly, even coming out of a can.
|
|
#20
03-18-2015, 03:49 PM
|
||||
|
||||
|
Quote:
__________________
Hammer head Single seater know as herbie under construction Aluminum fuel tank, aluminum wheels, custom fuel/cargo rack, entire rewire, trail tech vapor, ported big valve head, a12camshaft, 12 gram sliders, straight intake, kirkey wide seat, front end extension. 4 point harness, welded cage. Hammerhead exhaust. Blade Single Seater Restore welded cage, engine build, new wiring harness/electric box, spun aluminum fuel tank.
|
|
#25
03-22-2015, 07:23 PM
|
||||
|
||||
 i've been out for a while and just scanned through this. 1st point is ckau's yerf is totally cool and if i never said it before, much respect. 2nd nothing beats a set of racing harnesses. 3rd i notice you said lift kit, is that the BD kit? i remember seeing the pic they put on their site when they 1st started selling them and thinking, "not good". although your pic doesnt look bad compared to the pic they had. i just wonder if that kit doesnt take screwed up stock front end geometry and take it to the next level of screwed up. my yerf sits i believe about 13" under the belly and 9" under the axle and seems pretty stable but if i did try hard enough and took a hard right it might pull a general lee. are you stock width with that kit because the kit pushing the arms that far down would narrow up the front stance, which would kill a bit of stability. i am using spacers front and rear and a crossfire axle and mine sits pretty wide which helps. nice looking piece by the way........good work! here's a few pics, one next to a stocker
__________________
"LUCIFER" JOYNER JD400, CROSSHAMMER 250R, YERF GX150, CROSSFIRE MBX150, BMS 800V-TWIN '16 RZR 900s , '17 ACE 900XC, '99KX250, '94 KDX200, '18 SSR SR170TX
|
|
#27
03-24-2015, 11:19 AM
|
||||
|
||||
|
That's why you use wrist loops, helmets, and 4/5pt seatbelts
__________________
Yerf-Dog Spiderbox  Reverse Gearbox Heavy Duty Ball Joints Heavy Duty Chain Tensioner Canvas Roof/Netting Key Start LED Brake Lights Headlights SOLD!
|
|
#28
03-24-2015, 11:53 AM
|
|||
|
|||
|
Thx jersey. Nice yerfs btw. I did get it out this weekend. Learned a few things. 1 my welds are getting better. No breaks this go around. However make sure every nut/bolt has a lock washer or nylon nut. Or both. I don't like using lock tight. I'm still a little gun shy. But x-birds suggested shock adjustment made a difference, and I can feel what its doing better then before. After putting spacers on the swing arm. It helped a little. But still waves back and forth on me at higher speeds. (You guys balance your tires)??? Be beneficial on my back to get tractor out and smooth out the trails. They pretty choppy. And rear shocks with swing arm only does so much. Thinking buggy might be to fast for the kids. 38.9 mph. With 235 lb person. Not liking the idea of son or both kids going faster than that. With CVT trani. Can I put a restriction plate or bolt behind the gas petal? Or would that affect the ability to go up hills? (Just want to restrict top end.). Is that possible to make it adjustable from person to person?
Yes. Its what they called a lift kit from BD. But really all it did was make it easier to put different or larger shocks on it. And since came with shocks. Didn't think bad deal. Came with tie rod riseor extensions and brackets so longer shocks can be used. I like brackets rather then Cutting and moving the shock mounts. Gives easier options.
|
|
#29
03-24-2015, 03:51 PM
|
||||
|
||||
|
i wonder if you can shim the variator in the cvt at all so the belt doesn't climb to the highest position on the pulley???? i know you could only go so far because of the case side to variator fan blade clearance, but that could be spaced off with an added gasket or two.
i think with a throttle stop it would eventually get there ...maybe, and yes a stop might impede the low speed climbing power a bit too ...
|
|
#30
03-25-2015, 08:10 AM
|
|||
|
|||
|
That could work. but if I'm going into the case, might as well just change out the rollers. Got a feeling trying to limit the top end with a pedal stop, not going to work so good. Got a few hills pretty steep, and will need the rpm range to get over them. by rights, if I keep the kids on the trails, wont be able to get up to those higher speeds.
Just wondering if anyone found a trick to limit the top end, but keep everything else with a CVT.
|
|
|
|