

 |

|
|
|||||||
| Mini Buggy General Discussion General Discussion forum for Mini Buggies. (American Sportworks, HammerHead, Carter, etc) |

|
|
Thread Tools |
|
#1
|
|||
|
|||
|
I picked this beast up a few weeks ago because I was itching for a project. It's a yerf dog "spiderbox". My plans are to lift the front end, tune the engine a bit, and outfit it for back road/2track/oRV route cruising with my wife. In Gladwin, I can drive out of town from my house and be legal on county roads with an ORV sticker.
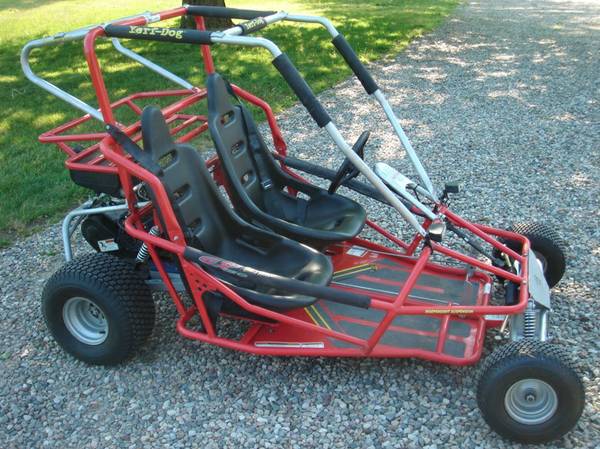 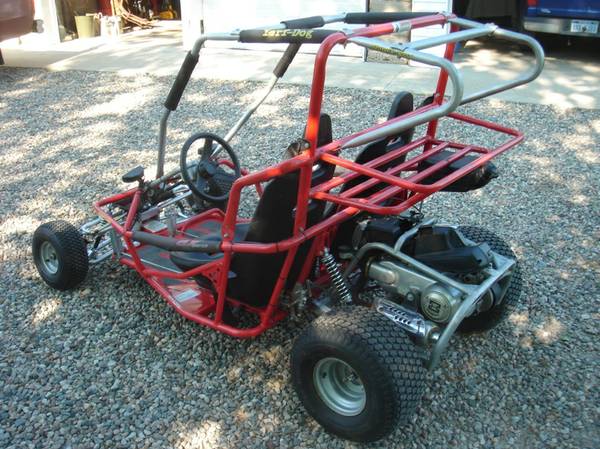 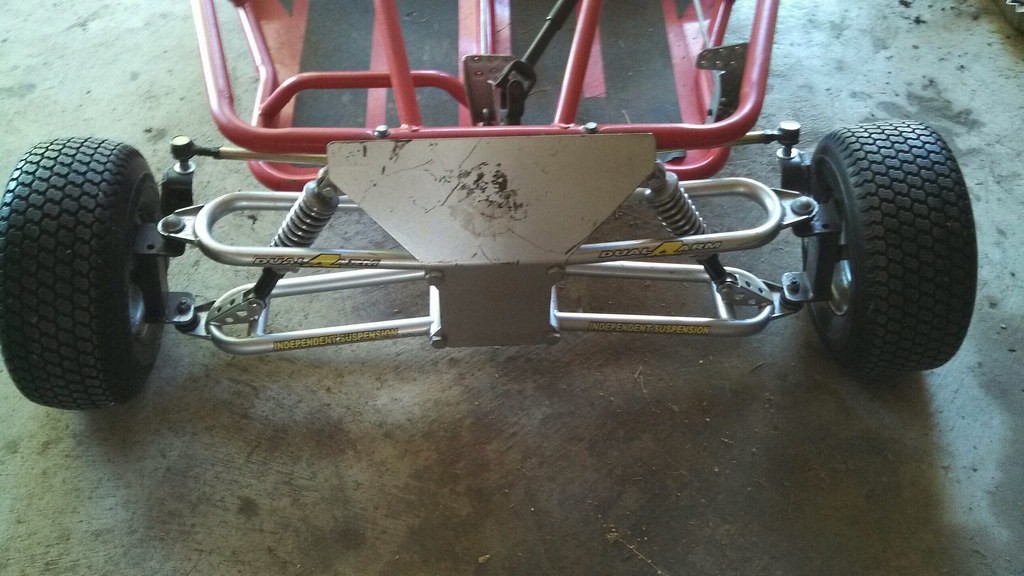  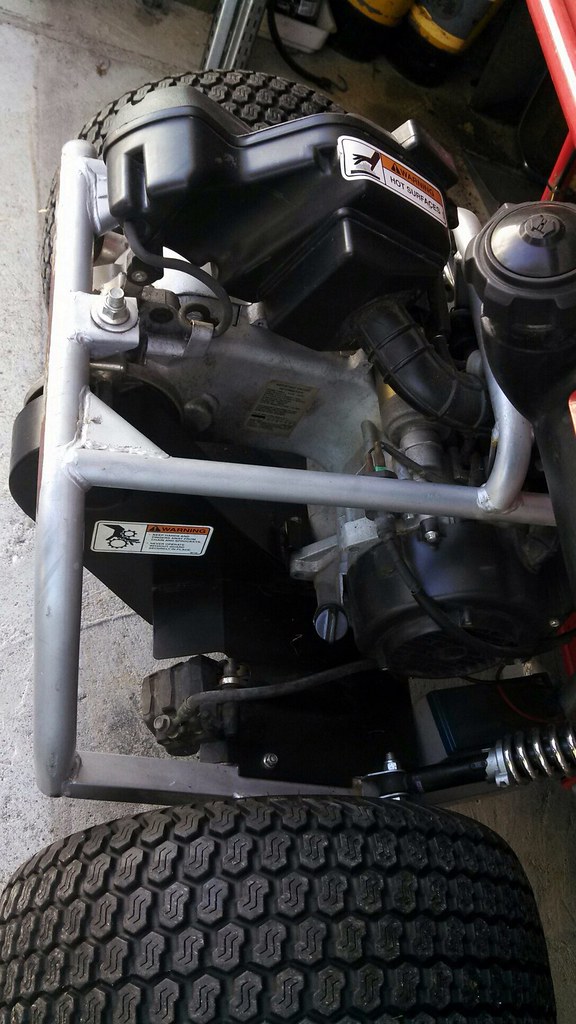 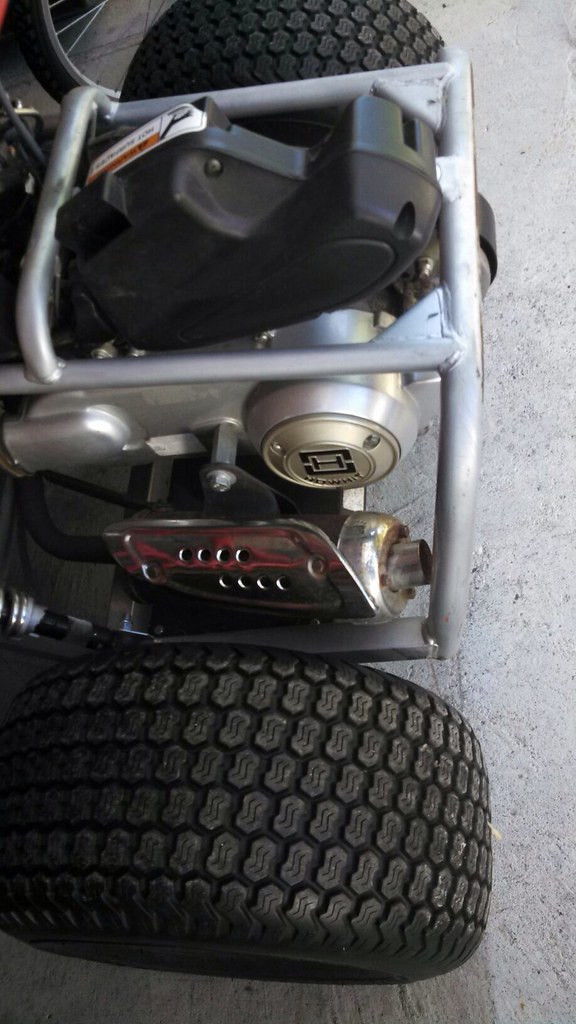 So far I've installed an aluminum intake manifold (because the stock rubber one is cracked), a set of heavy duty ball joints, updated the rollbar padding, added a "dune flag", lubed the chain, added a UNI filter, new transmission vent hose, changed the oil, put together a battery box for my dual battery set up, moved the headlights up top, installed a 12v outlet, and installed a motorcycle radio setup . Here's the battery box:  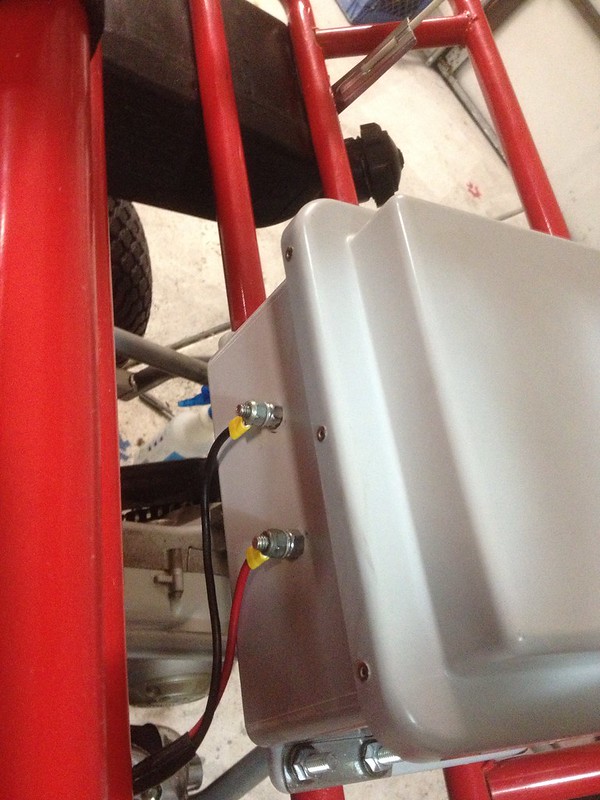 Wired in a switch between the two batteries after reading about wiring them parallel. Apparently if one of the batteries is a little older, it can cause the other battery to go bad faster. So, to keep this from possibly happening, and to have a back up battery onboard just in case I drain it with the radio or lights, I went with the switch. I also added some finger twist knobs to make the box quick release. 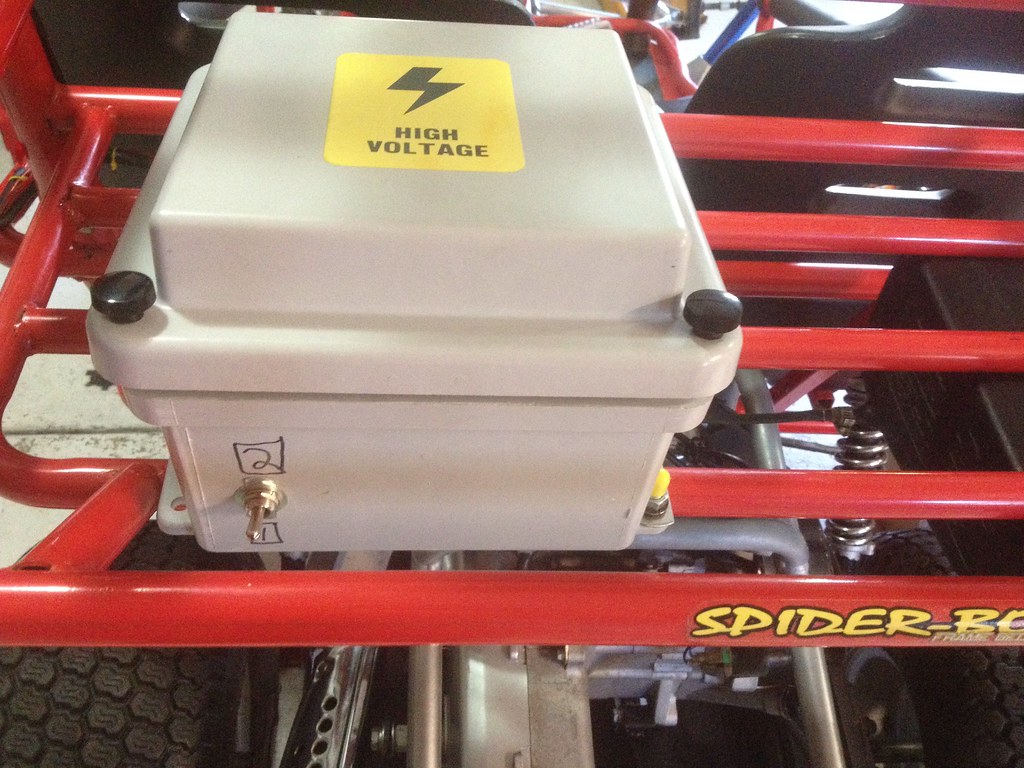 The buggy's front end was kind of screwed up when I got it. The ball joints were bad, so I swapped those out. However, it had even spindles, uneven a-arms, and the steering rack was too short. The guy I bought it from had replaced front end parts due to his kid running it into a tree. Luckily he gave me the old steering rack, because once I got the balljoints on, I realized that there was a compatibility issue with the spindles/a-arms, so I ordered a set of the longer top a-arms from BD. Then I realized that the steering rack was too short. So I swapped in the old one that he gave me with the buggy. I have it adjusted pretty decent right now, but the true test will be when I put the new wheels/tires on. I have a the 8" 4 bolt wheels and hubs ready to go, just waiting on the Duro ATV tires to come in. Here's some shots: Finally the front end seems to be coming together.  I mounted the radio in waterproof outdoor products box that I use for kayaking .  I mounted a couple "tool tubes" to the top bars to store tools/extra fuel in. I am also a member at ADVrider.com and got the idea from there.  The Uni Filter and the "performance" 30mm intake. Does anybody know if it actually makes much of a difference? I just got it because it was aluminum and it shouldn't crack.  Just waiting for tars.  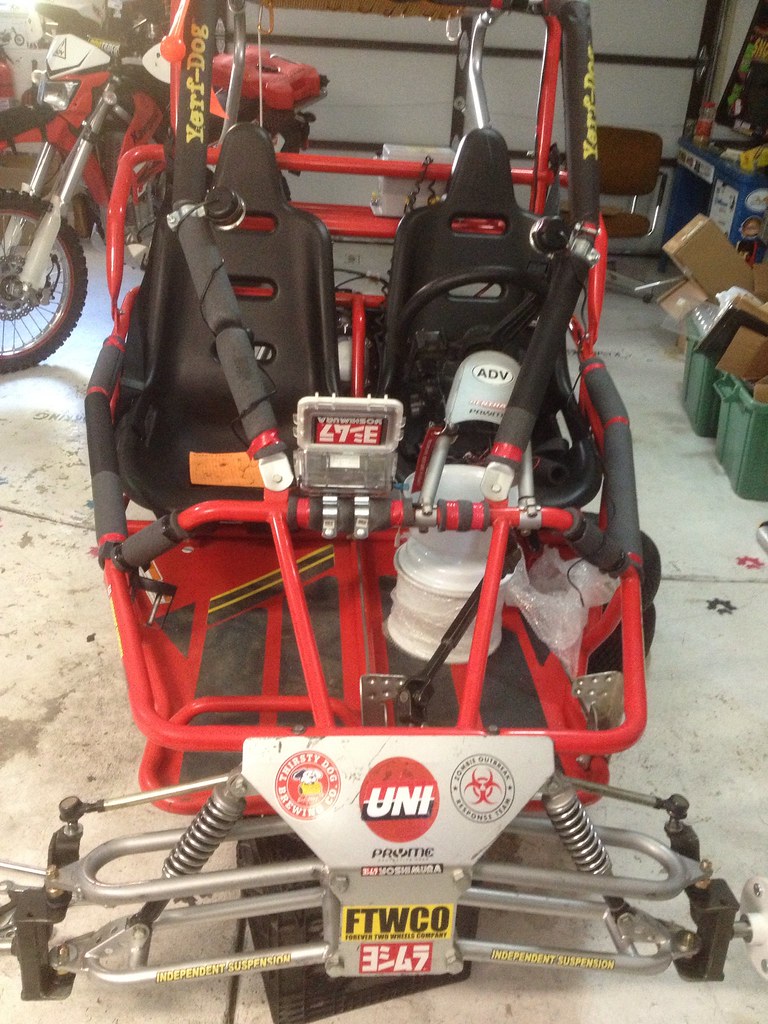 I would also like to say that I've been working with Travis @ Buggy Depot for parts on this rig and they has been very helpful. |
|
#2
|
||||
|
||||
|
Very nice, very clean! most yerfs now days are bent, beat, stripped and rusted.
Can you weld? If not, make friends with someone who can. That's the main down fall to these frames. They suffer from stress cracking. There's key areas you can address now to prevent future issues. There's threads all over the forum that discuss this. The uni and intake will definitely improve performance but unless you rejet the carb you are now running very lean. That's not good. The uni flows approx. 60% more air than the stock box. A 120 to 122 jet will be about right. if you do exhaust upgrades you'll need a 128.5 or better. the yerf transmission is geared very, very low. 13/41, Great for pulling and torque but you'll find yourself running out of gear before getting any high cruising speed. It can be a little frustrating at times. but then with 2 adults you'll be glad you got it as long as you're not in a big hurry. The stock plastic gas tanks are troublesome Those tanks are prone to crack, leak and spill gas. The angle of the filler neck was not well thought out. They leak from the cap vent when going up hill .The capacity is not quite a gallon. If you fill to the top you'll loose a portion until the level is below the filler neck which means a 2/3rds to 3/4 capacity. The capacity is good for approx. 2 to 3 hours ride time at best. The uni rejet will cut the time down a little further. Think about a tank up grade if your planning to do some distance.. A 3.5 g. tank will last most of a day or more. |
|
#3
|
||||
|
||||
|
Same as above. First thing to do is copy the upper control arm tab onto the lower arm. Those sheet metal tabs are notorious for breaking, even with the BD joints and washers. The very next thing I would do is replace all the grade 5 junk bolts holding the front end together with quality grade 8 bolts. If you have a drill and bits, going a size up also helps on the hardware.
Like Ckau stated, get a welder, and practice, you will need to know how if you plan any long distance or heavy off roading. Take a look around, those yerfs are very common, and just about anything you can imagine has been done to them.
__________________
ASE Master and Toyota Master Diagnostic Certified Buggy Building Trainee '04 Dazon Raider 150 'modded' |
|
#4
|
|||
|
|||
|
Ok, an upjet will be in the next stage, I was getting a little backfire, which I believe indicates a lean condition. How big of an issue is the chain adjuster? I was trying to look to find a chain slack tolerance and I came across a thread about how it will break and wreck a bunch of stuff. Any idea on how much chain slack there should be?
Also, I would like to eliminate any extra noises that I can. I think the chain guard is really vibratey. I see that coating the floor with Bedliner can be helpful. |
|
#5
|
|||
|
|||
|
What they said. I just bought one to fix up. Mine is not in the shape yours is in. One thing about the Yerfs, they are easy to fix. Keep the updates coming. You have already posted some ideas I would like to use. The tool tubes are a must. Where did you get them?
__________________
MAXXIM 150 yellow clutch springs, 10g. rollers, filter mod, goat gears, 39t sprocket, A12 cam. |
|
#6
|
|||
|
|||
|
Quote:
|
|
#7
|
|||
|
|||
|
Wife approved!
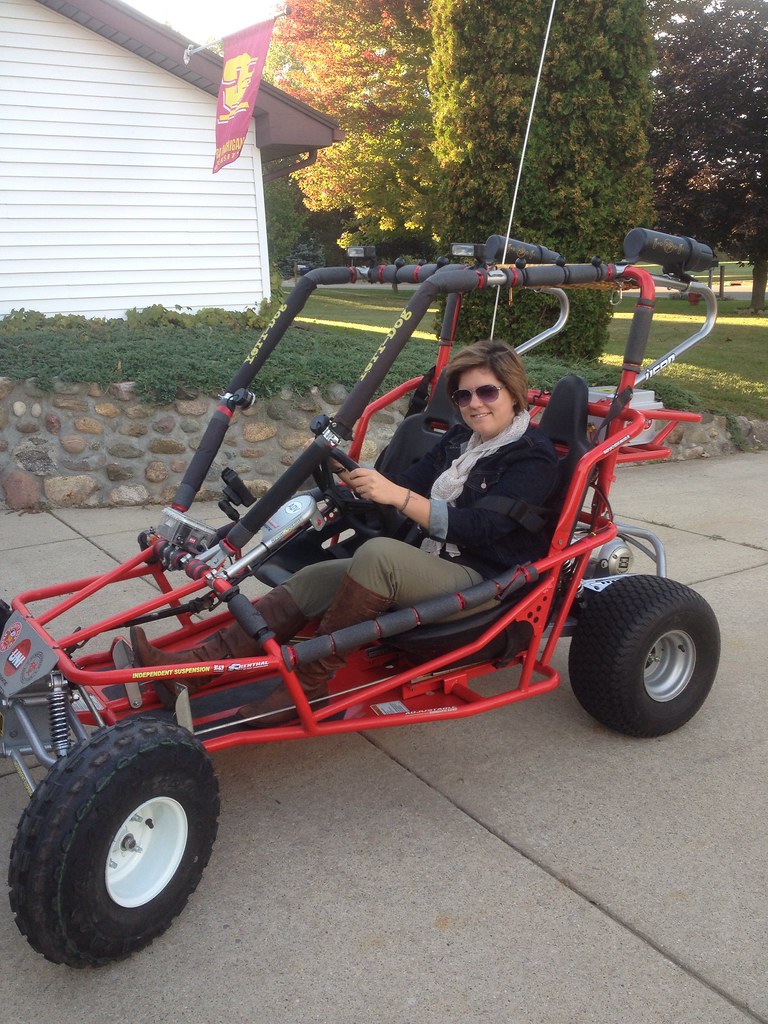 action shot! 
|
|
#8
|
||||
|
||||
|
Quote:
As for the noises, try taking pieces off and see what is making noise, I think mine made the same noise before I tore it down, but I wasn't concerned with it as I was doing an engine swap. P.S. look into better seat belts as well, the originals were a joke and you don't want to gamble with that area, 5 point harnesses are preferred, and the Yerf's already have the correct openings for them in the bottom.
__________________
ASE Master and Toyota Master Diagnostic Certified Buggy Building Trainee '04 Dazon Raider 150 'modded' Last edited by Masteryota; 09-25-2013 at 07:29 PM. Reason: Seat Belts!! |
|
#9
|
|||
|
|||
|
are the jets 4mm or 5mm?
|
|
#10
|
|||
|
|||
|
So, I just checked my plug and it was black. Which indicates a rich condition after running it with the UNI...what???
Also just adjusted the chain slack, it was over an 1". It quieted things down a lot.  Also want to adjust the idle. i feel like it was idling kind of high. The engine seems to run great, but it wants to move on its own, so I adjusted the idle down using the idle screw. How low should I go? Is there such thing as too low an idle as long as its running and going ok? I know with the sportster I was running, you couldn't run the idle too low or the oil wouldn't circulate properly. Are there any ill effects to having a low idle on a GY6? Would running the kart for a minute or two at a time with a high idle in my garage help account for the rich looking plug i checked? Last edited by mikesova@gmail.com; 09-26-2013 at 09:52 AM. |
|
#11
|
||||
|
||||
|
Quote:
Also, make sure you do a WOT(Wide Open Throttle)run and kill the engine and coast to a stop, then check the plug. A light chocolate brown on the porcelain is perfect for these, a little rich won't hurt anything and would help a bit with cold starts.
__________________
ASE Master and Toyota Master Diagnostic Certified Buggy Building Trainee '04 Dazon Raider 150 'modded' |
|
#12
|
|||
|
|||
|
Doh! I was doing a shake down ride after removing the chain guard. Sounds great, no more rattle. All of a sudden things got louder. Both of my exhaust nuts were gone and I was running with the exhaust disconnected. I limped it home and discovered that the exhaust gasket was all screwed up too. So I ordered a new gasket/nut kit.
In the meantime, I want to have a jet coming so I can be ready to rock. Can somebody link me to a 120-22 jet that will work for my Yerf Dog? Thanks. 
|
|
#13
|
||||
|
||||
|
Looks very nice. I would also suggest fenders.
__________________
Growing old is mandatory  Growing up is optional  https://www.youtube.com/watch?v=NEXoa-8d7qE |
|
#14
|
||||
|
||||
|
Looks very nice. I would also suggest fenders.
__________________
Growing old is mandatory  Growing up is optional  https://www.youtube.com/watch?v=NEXoa-8d7qE |
|
#15
|
||||
|
||||
|
You know what the best part of the build is? Its wife approved
 . Right now, my wife really doesn't see the fun of the little buggies. She has her dirt bike and that is fine for her. But, I am feeling the aches and pains that are telling me that my dirt bike days are getting numbered. However, I refuse to go into the night gently. So I know I will have to hang up the two wheels in the future, but I will be drifting in style on four. . Right now, my wife really doesn't see the fun of the little buggies. She has her dirt bike and that is fine for her. But, I am feeling the aches and pains that are telling me that my dirt bike days are getting numbered. However, I refuse to go into the night gently. So I know I will have to hang up the two wheels in the future, but I will be drifting in style on four.Beautiful buggy you got there. It is in really great shape, and you are doing a great job. Also, if you can figure out how to mount some front fenders on it, it will really help to keep the wife happy.
__________________
2005 Hammerhead 150 170cc BBK, PnP Big valve Head, A12 Cam, Uni Filter, Custom Exhaust, 10G rollers, 1500 Contra Spring, 2000 Clutch Springs Just added - 2007 Joyner 250 SV - Let the fun begin 4-Dirt Bikes, Baja Bug and enough toys to keep me in the garage and out of trouble. |
|
#16
|
||||
|
||||
|
Nice looking buggy
|
|
#17
|
|||
|
|||
|
Can anybody help me find a bigger jet? Most places list two sizes for the gy6. 4 or 5mm. Which one does the Yerf use?
|
|
#18
|
|||
|
|||
|
Made a temporary exhaust gasket by twisting aluminum foil into an o ring. I was riding it a little bit and the exhaust was popping on deceleration. Plug check indicated lean condition. I needs a bigger main jet.
|
|
#19
|
||||
|
||||
|
Well, I had a spare Yerf carb apart in a bag and the main jet threads measured out to 4.67mm, so it should be a 5mm jet.
__________________
2005 Hammerhead 150 170cc BBK, PnP Big valve Head, A12 Cam, Uni Filter, Custom Exhaust, 10G rollers, 1500 Contra Spring, 2000 Clutch Springs Just added - 2007 Joyner 250 SV - Let the fun begin 4-Dirt Bikes, Baja Bug and enough toys to keep me in the garage and out of trouble. |
|
#20
|
|||
|
|||
|
Should I be able to get the jet at most powersports shops? I'm debating on whether I should order one or just cruise down to the local suzuki/honda shop on Monday.
I pulled it out, it's a 114. I just have the uni filter mod, so 120-22 should be good? |
|
#21
|
||||
|
||||
|
I really don't have an answer for you on the physical size of the jet, but 120-122 should get you pretty close. If you decide to change or gut the exhaust, you will need bigger as well, so might want to keep that in mind, maybe order some in advance....
I doubt any power sport shop is going to have that jet, or any jet for that matter. Most of the bike shops only carry accessories and oil filters, the rest you would have to order anyways. If there is a scooter shop nearby, you might have better luck there. That gasket blew on my yerf as well, and the service guy at our local scooter place said they had a few sizes but plenty in stock. I decided to swap it out before I had a chance to purchase a new gasket. They may have a jet for you as well.
__________________
ASE Master and Toyota Master Diagnostic Certified Buggy Building Trainee '04 Dazon Raider 150 'modded' |
|
#22
|
|||
|
|||
|
I don't really plan on changing the exhaust. I only changed the airbox out because the filter wasn't exactly easy to find.
So, would you guys say this one should fit? http://www.ebay.com/itm/GENUINE-KEIH...36d632&vxp=mtr |
|
#23
|
||||
|
||||
|
http://www.buggy depot.com/buggy-tech-center/read/150cc/0/18/properly-selecting-and-installing-carburetor-jets.html
cut and paste in to web address at top. buggy and depot are separated by a space. so fix that and there is some good info here about jetting
__________________
Growing old is mandatory  Growing up is optional  https://www.youtube.com/watch?v=NEXoa-8d7qE |
|
#24
|
|||
|
|||
|
I understand that, I just need to make sure the jet I'm looking at will fit the carb.
|
|
#25
|
|||
|
|||
|
delete. my mistake. I posted the wrong drills.
__________________
MAXXIM 150 yellow clutch springs, 10g. rollers, filter mod, goat gears, 39t sprocket, A12 cam. Last edited by jimmymc2286; 09-29-2013 at 11:00 AM. Reason: oops. |
|
#26
|
|||
|
|||
|
Looks like you are well on your way! I fixed up a Spiderbox for my daughter that was in MUCH worse shape than yours was, I also worked with BDX and they were fairly good to deal with, I am not that impressed with their welding skills though.
Coating the top and bottom sides of the floor pans with thick bed-liner really makes a difference. I did that to ours. Used the Raptor kit from eBay, I also have it on my truck bed and it is decent stuff. I used 2.5 bottles which is a bunch but I put it on thick! I got hubs and rims/tires from a Carter Talon, it really helped the buggy out and I like the aluminum wheels! I am going to graft the axle from the Carter on this thing next. My daughter loves hers but they do need some sort of fender, she complains about all the dirt that gets into the seat so that is one of my next projects! One last thing, reverse is sure a nice feature! You may want to think about adding it. I got ours from the same Carter Talon parts buggy I picked up.  
|
|
#27
|
|||
|
|||
|
Nice buggy.
I went ahead and ordered a kit of 4 jets ranging from 120-135 from ebay that are supposed to fit the gy6 carb. Should be here in a week. No riding it until then. I don't need to hole the piston. |
|
#28
|
||||
|
||||
|
One thing you can check while you are waiting for you jets is the auto choke / enricher. You want to make sure that it is working properly or you will never get the jetting right. Just remove it from the carb and connect it to a 12V source. After a little bit it should feel warm and the needle plunger should extend out a further distance from the body. If they fail, and they do, you will be running rich all of the time. When mine failed, I did the redneck manual choke conversion (Nut & Bolt).
__________________
2005 Hammerhead 150 170cc BBK, PnP Big valve Head, A12 Cam, Uni Filter, Custom Exhaust, 10G rollers, 1500 Contra Spring, 2000 Clutch Springs Just added - 2007 Joyner 250 SV - Let the fun begin 4-Dirt Bikes, Baja Bug and enough toys to keep me in the garage and out of trouble. |
|
#29
|
|||
|
|||
|
|
|
#30
|
||||
|
||||
|
Not much spider left in the box there.
__________________
2005 Hammerhead 150 170cc BBK, PnP Big valve Head, A12 Cam, Uni Filter, Custom Exhaust, 10G rollers, 1500 Contra Spring, 2000 Clutch Springs Just added - 2007 Joyner 250 SV - Let the fun begin 4-Dirt Bikes, Baja Bug and enough toys to keep me in the garage and out of trouble. |
|
#31
|
||||
|
||||
|
Quote:
__________________
Growing old is mandatory  Growing up is optional  https://www.youtube.com/watch?v=NEXoa-8d7qE |
|
#32
|
||||
|
||||
|
"since I have a DC system ( lights work with just key turned) shouldn't I be able to just remove auto choke from carb and turn key for a check? "
Yes, you should be able to check it that way.
__________________
2005 Hammerhead 150 170cc BBK, PnP Big valve Head, A12 Cam, Uni Filter, Custom Exhaust, 10G rollers, 1500 Contra Spring, 2000 Clutch Springs Just added - 2007 Joyner 250 SV - Let the fun begin 4-Dirt Bikes, Baja Bug and enough toys to keep me in the garage and out of trouble. |
|
#33
|
||||
|
||||
|
Damn it. I am guessing mine is bad then.... Removed from carb turned key ( not engine running) and ..... Nothing. Maybe that is why I am bogging and running rich with a 124 main jet uni and gutted exhaust
__________________
Growing old is mandatory  Growing up is optional  https://www.youtube.com/watch?v=NEXoa-8d7qE |
|
#34
|
||||
|
||||
|
They are a very cheaply made part. They have a heating element that heats a wax like substance. The wax then expands, pushes the needle down which closes of the enrichment circuit. When I bought my HH it was bad and the one that I replaced it with died in a very short time. So I took it apart and drilled and tapped a hole in the top. Now I use a bolt and lock nut to turn the choke on and off. Of course I have to do it from the back of the buggy, but I have found that I only have to do it for the first start of the day. Well worth the effort IMHO. Because now I know that my choke is fully closed and I can jet it accordingly.
__________________
2005 Hammerhead 150 170cc BBK, PnP Big valve Head, A12 Cam, Uni Filter, Custom Exhaust, 10G rollers, 1500 Contra Spring, 2000 Clutch Springs Just added - 2007 Joyner 250 SV - Let the fun begin 4-Dirt Bikes, Baja Bug and enough toys to keep me in the garage and out of trouble. |
|
#35
|
||||
|
||||
|
http://www.rc-trucks.org/gy6-engine-performance.htm
thinking about doing this.
__________________
Growing old is mandatory  Growing up is optional  https://www.youtube.com/watch?v=NEXoa-8d7qE |
|
#36
|
||||
|
||||
|
Thanks toomany. I would like to do that but need more instructions. Cut wires? Leave attached? More details and I might do that tomorrow, thanks .
__________________
Growing old is mandatory  Growing up is optional  https://www.youtube.com/watch?v=NEXoa-8d7qE |
|
#37
|
||||
|
||||
|
Can't claim credit for the idea, but it works great. Just remember that you do not use any tools when you are turning the choke on and off, even the lock nut. Choke is off with the bolt screwed in until it stops. Choke is on when you screw the bolt out a few turns (you don't take the bolt out).
Unscrew the choke assembly. Be careful not to damage the O-ring. Both of mine were easy to take apart. (PIC 1) Next you will have to remove the electrical connector. It will come out without cutting. You will need to lift the lower one up a little to miss the catch when pulling it out. (PIC 2) This is what it will look like apart. (PIC 3) Now drill a hole thru the top of the housing. I used a 5/16 NF, to get the most threads in the plastic. Then just tap it so the threads are nice. (PIC 4) This is what it looks like with the bolt installed. I added a lock nut to hold the bolt. (PIC 5) This is the completed manual choke (PIC 6)
__________________
2005 Hammerhead 150 170cc BBK, PnP Big valve Head, A12 Cam, Uni Filter, Custom Exhaust, 10G rollers, 1500 Contra Spring, 2000 Clutch Springs Just added - 2007 Joyner 250 SV - Let the fun begin 4-Dirt Bikes, Baja Bug and enough toys to keep me in the garage and out of trouble. |
|
#38
|
||||
|
||||
|
Thanks you very much. I will attempt this tomorrow.
__________________
Growing old is mandatory  Growing up is optional  https://www.youtube.com/watch?v=NEXoa-8d7qE |
|
#39
|
|||
|
|||
|
Maybe instead of using a regular bolt, you could use a bolt with a molded knob so you could use your fingers.

|
|
#40
|
||||
|
||||
|
I was thinking the same thing with a cable attachment and locate it somewhere easily accessible.
Googled it and found this, I'm sure there others.
__________________
ASE Master and Toyota Master Diagnostic Certified Buggy Building Trainee '04 Dazon Raider 150 'modded' |
|
#41
|
||||
|
||||
|
Actually the bolt will screw in and out of the assembly with just using the fingers. Even the lock nut will tighten enough with just the fingers. I ran it this way for a week in the desert last Easter, with a lot of people driving it, and it never vibrated loose. One thing though, you have to acquire a feel for how much to unscrew it to activate the choke. I went too far a couple of times and screwed the bolt out. No big deal, but it is hard to get back in with the engine running and vibrating.
__________________
2005 Hammerhead 150 170cc BBK, PnP Big valve Head, A12 Cam, Uni Filter, Custom Exhaust, 10G rollers, 1500 Contra Spring, 2000 Clutch Springs Just added - 2007 Joyner 250 SV - Let the fun begin 4-Dirt Bikes, Baja Bug and enough toys to keep me in the garage and out of trouble. |
|
#42
|
||||
|
||||
|
I did it, but I used epoxy and meshed a nut to the housing.
It works fine but I now have a sound if air pumping near my uni filter; weird.
__________________
Growing old is mandatory  Growing up is optional  https://www.youtube.com/watch?v=NEXoa-8d7qE |
|
#43
|
||||
|
||||
|
Neck. Not. Flexible. Enough.
That is an odd looking choke for a gy6....
__________________
ASE Master and Toyota Master Diagnostic Certified Buggy Building Trainee '04 Dazon Raider 150 'modded' |
|
#44
|
|||
|
|||
|
I had an extra universal folding mirror laying around, so I found a spot for it. I just removed the bolt that attaches the rollbar to the kart in the front and replaced it with the stem and nut of the mirror. The oblong hole on the kart just required a tiny little reaming to fit the mirror.
  I have been running the EMGO's on my KLX250s, but I'm not super happy about how they work on the bike. So I ordered one of the Ken Sean/Bikemaster folding mirrors for the left side. I pulled the left emgo off and put it on the buggy. Still waiting for jets. Last edited by mikesova@gmail.com; 10-03-2013 at 10:13 PM. |
|
#45
|
||||
|
||||
|
Nice to see what is behind you as well as in front of you.
__________________
Growing old is mandatory  Growing up is optional  https://www.youtube.com/watch?v=NEXoa-8d7qE |
|
#46
|
||||
|
||||
|
Nice touch with the mirror I need to get one for mine as well
|
|
#47
|
|||
|
|||
|
When I took the mirror for a test drive, it didn't work well. Not long enough.
|
|
#48
|
||||
|
||||
|
Aw... Shame. Looked really good. If you're using a mirror now, could you tell us which one? I purchased a small, round one, and it won't fit and I think I need to fabricate an arm to hold it... It would be much easier just to buy one, so let's hear it!

__________________
Yerf-Dog Spiderbox  Reverse Gearbox Heavy Duty Ball Joints Heavy Duty Chain Tensioner Canvas Roof/Netting Key Start LED Brake Lights Headlights SOLD! |
|
#49
|
|||
|
|||
|
Before:
 After:  Worked amazingly well in the snow. Over a week ago, I was sliding around and spinning the tires without any traction in barely any snow. It has since snowed a lot more and with the chains, I was hooking up great. I can't wait to take this out on the lake or something. 
|
|
#50
|
||||
|
||||
|
As a native floridian, I say screw snow, but I also hate the heat. Hate to break it to you, but those tires don't grip all that well on anything, let alone snow and ice. Might look at upgrading and you might not need the chains.
__________________
ASE Master and Toyota Master Diagnostic Certified Buggy Building Trainee '04 Dazon Raider 150 'modded' |
|
#51
|
|||
|
|||
|
I understand that they are turf tires. They are actually fine for what I plan on using the buggy for (2 tracks, dirt roads, and my yard).
|
|
#52
|
||||
|
||||
|
They're real fun when it's wet grass! I kept a set of those just to swap on when i felt like playing drift buggy. Mike, you may want to make a set of screw studded tires for the fronts if you run on any hard pack snow/ice.
|
|
#53
|
|||
|
|||
 I turned down some blaster shocks last night for the rear, but now I have clearance issues with the chains. I ordered a set of wheel spacers last night, so that should take care of it . Here's the spacers I ordered: http://www.ebay.com/itm/170289416209...S:3160&vxp=mtr Hopefully it won't be too stressful on the axle. |
|
#54
|
|||
|
|||
|
So,
I want a set of shocks for the front that will actually do something. I want a shock that will bolt in. So, what will work well? It's 10" eye to eye. |
|
#55
|
||||
|
||||
|
Quote:
I don't see too many companies getting on board with doing a set for the spider's seeing as they are pretty much either heavily modded or driven too lightly to warrant better shocks. Not sure if you have seen on here, but the rear shocks are much easier to mate up to quad size shocks. The yamaha blaster front shocks are the better close to bolt in upgrade.
__________________
ASE Master and Toyota Master Diagnostic Certified Buggy Building Trainee '04 Dazon Raider 150 'modded' |
|
#56
|
|||
|
|||
|
When you find something worthy please let us know. I have looked around and really about all I have found is the BD units or the air shocks on eBay. IMO neither seems to be a lot better than the stock pogo sticks. Finding something with actual hydraulic damping would be a vast improvement.
|
|
#57
|
||||
|
||||
|
about a year or so ago, *************.com had shocks that were bolt in and worked well for the spiderbox fronts. pretty popular, then the supply dried up. Metalstudman and several others used them and apparently they worked well and as far as I can remember, there were no failures reported. Recently i spotted the same ones. Call or e-mail Protodie, they have them on one of their junior size buggies. they may have bought out surplus center's inventory. definitely the same shock, they were pretty unique looking. Don't know if they have any to spare/sell, they might. You won't see them pictured or listed on their website, but i know there was a set on a chassis under construction that was shown on one of the forums. Black body, black springs with a yellow section around the top spring cup.
Post #34, soapkart's picture of them. http://buggymasters.com/forum/showth...+center+shocks Last edited by x-bird; 12-24-2013 at 01:36 AM. |
|
#58
|
||||
|
||||
|
Nice clean looking Yerf.
|
|
#59
|
|||
|
|||
|
Thanks. Wheels spacers should be in today as well as the ebay shocks I bought to try. Yesterday I went to Harbor Freight and picked up this little beauty:
  It was like 27$ and is good for up to 900 lbs. It has a ratchet instead of a crank, so it is pretty versatile when it comes to mounting. I'll keep you updated on how it works. I plan on getting stuck on purpose to try it out. |
|
#60
|
||||
|
||||
|
Nice.. How long is the strap?
|
|
#61
|
|||
|
|||
|
20 feet.
|
|
#62
|
|||
|
|||
|
4" wider rear stance
 Much softer shocks in the front. Not sure if that's going to be good or bad. The stock ones might as well have been rigid rods. These ones allow more movement of the suspension.  The snow is too deep in my backyard, now, though.  
|
|
#63
|
||||
|
||||
|
Keep us posted on the shocks. We are all waiting, lol. BTW, what did they come off of?
__________________
ASE Master and Toyota Master Diagnostic Certified Buggy Building Trainee '04 Dazon Raider 150 'modded' |
|
#64
|
|||
|
|||
|
They are just cheap generic ebay shocks:
http://www.ebay.com/itm/400247136828...84.m1497.l2649 I can push on the frame and actually see the springs compress and the suspension move. I have them set on the stiffest preload. They are slightly longer than stock, so I had to adjust the tie-rod ends a little to get the wheels straight again. |
|
#65
|
||||
|
||||
|
Nice! Are those rears blasters? I can't tell because I don't see a bracket (?).
Also, let us know about the fronts! I want to get some replacements in for my yerf as the chrome things are a joke (imo).
__________________
Yerf-Dog Spiderbox  Reverse Gearbox Heavy Duty Ball Joints Heavy Duty Chain Tensioner Canvas Roof/Netting Key Start LED Brake Lights Headlights SOLD! |
|
#66
|
|||
|
|||
|
Yeah, they are blaster shocks. I didn't build a bracket. I'm just using the factory mounts. It seems to work fine.
|
|
#67
|
||||
|
||||
|
Good to know! Everyone keeps saying that it will ride too high, but in my mind, that extra ride height just computes out to more ground clearance! So the blasters are working out well, then?
About how much did the blasters improve the ride when you had them in the rear and the stocks in the front?
__________________
Yerf-Dog Spiderbox  Reverse Gearbox Heavy Duty Ball Joints Heavy Duty Chain Tensioner Canvas Roof/Netting Key Start LED Brake Lights Headlights SOLD! |
|
#68
|
|||
|
|||
|
They are fine, I've just taken it for a cold cruise around the neighborhood. It seemed to ride nice. I'd like to try it on some bumpy stuff, though.
|
|
#69
|
|||
|
|||
|
I want to get those spacers for the rear also. The tires are way to in. Should there be any worry of stock axle breakage?
|
|
#70
|
|||
|
|||
|
I would imagine that the spacers put a little more stress on the hubs/axle, which is why I went with the 2" ones.
|
|
#71
|
||||
|
||||
|
The stock yerf axle is prone to failure with just the stock tire/wheel set up, so be careful about putting more leverage on it with the spacers. I know money is likely tight after the holidays, but the real way to upgrade the axle and get the width you want, is to replace it, like almost all of us did, with a kart type axle and additional hangers to prevent the flexing that causes them to snap.
__________________
ASE Master and Toyota Master Diagnostic Certified Buggy Building Trainee '04 Dazon Raider 150 'modded' |
|
#72
|
|||
|
|||
|
Quote:
|
|
#73
|
||||
|
||||
|
Looks like they're just the "pogo sticks" that come with other chinese karts, but let's be honest, they MUST be better than the curled up hunks of metal YD shipped the spider boxes with.
__________________
Yerf-Dog Spiderbox  Reverse Gearbox Heavy Duty Ball Joints Heavy Duty Chain Tensioner Canvas Roof/Netting Key Start LED Brake Lights Headlights SOLD! |
|
#74
|
|||
|
|||
|
Schools closed tomorrow due to extreme weather. I think I'm going to try my hand at building a windshield.
|
|
#75
|
|||
|
|||
 zip tied together 2 motorcycle cargo nets to make a rear safety net. 
|
|
#76
|
||||
|
||||
|
I like the cargo net idea
|
|
#77
|
||||
|
||||
|
I think I'm gonna copy your cargo net idea, looks great, and if something comes flying that should stop it!
__________________
Yerf-Dog Spiderbox  Reverse Gearbox Heavy Duty Ball Joints Heavy Duty Chain Tensioner Canvas Roof/Netting Key Start LED Brake Lights Headlights SOLD! |
|
#78
|
|||
|
|||
|
Quote:

|
|
#79
|
|||
|
|||
|
flexin'

|
|
#80
|
|||
|
|||
|
Windshield:
  Front piece: 
|
|
#81
|
|||
|
|||
 Took it out to test the windshield today in 14 degree weather. It didn't help. 
|
|
#82
|
||||
|
||||
|
Those arms look like the kayak rack on my mom's suv? Is that an actual rack? If so, looks sweet. I can just imagine this thing puttin down a trail with two kayaks on top, a tent and cooler in the back rack...oh yea...sweet camping paradise. LOL
__________________
Yerf-Dog Spiderbox  Reverse Gearbox Heavy Duty Ball Joints Heavy Duty Chain Tensioner Canvas Roof/Netting Key Start LED Brake Lights Headlights SOLD! |
|
#83
|
|||
|
|||
|
They are Thule J-hooks. The crossbars are 1" emt conduit that I attached with U-bolts. I am planning on being able to haul kayaks on the buggy while on the trailer. If I could drive it down to the river from my house, I would LOVE that, but at the moment, it's not legal.

|
|
#84
|
||||
|
||||
|
That's pretty neat! And I hope you realize that all of those "go faster" stickers don't do anything
 WOW those are a lot of stickers. LOL PRODUCT RED. Go Apple!  and talk about a great pic of the buggy on the trailer with kayaks on top!!! omg I just had a campergasm. 
__________________
Yerf-Dog Spiderbox  Reverse Gearbox Heavy Duty Ball Joints Heavy Duty Chain Tensioner Canvas Roof/Netting Key Start LED Brake Lights Headlights SOLD! |
|
#85
|
|||
|
|||
|
Nope, I'm pretty sure the Founders Brewing company stickers will make me go faster.
|
|
#86
|
||||
|
||||
|
Quote:

__________________
Yerf-Dog Spiderbox  Reverse Gearbox Heavy Duty Ball Joints Heavy Duty Chain Tensioner Canvas Roof/Netting Key Start LED Brake Lights Headlights SOLD! |
|
#87
|
||||
|
||||
|
Quote:

__________________
ASE Master and Toyota Master Diagnostic Certified Buggy Building Trainee '04 Dazon Raider 150 'modded' |
|
#88
|
||||
|
||||
|
I pretty much fully cladded out my front end, still have 2 small rectangular openings where the steering column passes through to close off--those little openings are enough to frost my feet in the cold. Cartharts, 3x layers, ski gloves, face mask, goggles and the lid are must-haves.
|
|
#89
|
||||
|
||||
|
Quote:
 Although the snow looks like a blast, I am glad we don't get it down here.
__________________
ASE Master and Toyota Master Diagnostic Certified Buggy Building Trainee '04 Dazon Raider 150 'modded' |
|
#90
|
||||
|
||||
|
Quote:

__________________
Yerf-Dog Spiderbox  Reverse Gearbox Heavy Duty Ball Joints Heavy Duty Chain Tensioner Canvas Roof/Netting Key Start LED Brake Lights Headlights SOLD! |
|
#91
|
||||
|
||||
|
I saw snow here in '89, and I don't see it coming back. I live in a coastal city, so not likely unless it gets mid 20's then rains. The warm ocean water insulates with any cloud cover, thats why it almost never snows here. Atlanta went full tilt with an hours worth of snow, hate to see what they do here, lol.
__________________
ASE Master and Toyota Master Diagnostic Certified Buggy Building Trainee '04 Dazon Raider 150 'modded' |
|
#92
|
||||
|
||||
|
Haha. I was stuck at school until 5:30...the city made last minute freak out plans and dismissed us early at 1:30 because they didn't foresee the snow going this far north. I was waiting for my bus for more than 5 hours before I had MY MOM come get me. I heard the bus pass my house around 7:30... LOL. There were over 500 kids staying last night at school because of 2 in of snow and sleet. Woooo go Atlanta. The least prepared city in the US. lol
__________________
Yerf-Dog Spiderbox  Reverse Gearbox Heavy Duty Ball Joints Heavy Duty Chain Tensioner Canvas Roof/Netting Key Start LED Brake Lights Headlights SOLD! |
|
#93
|
|||
|
|||
|
|
|
#94
|
||||
|
||||
|
Need to change permission setting.
__________________
ASE Master and Toyota Master Diagnostic Certified Buggy Building Trainee '04 Dazon Raider 150 'modded' |
|
#95
|
|||
|
|||
|
I changed it to "public", does it work now? if not, you can always join the "Yerf Dog Go Karts and Buggies" facebook group.
|
|
#96
|
|||
|
|||
   Pulled some mirrors off one of my project bikes and fit them to the windshield. Looks good and works well! |
|
#97
|
|||
|
|||
 This buggy is for sale. $1500 Firm. Runs perfect and has all the beefed up goodies you'll end up buying after you buy a Spiderbox. mikesova@gmail.com |
|
#98
|
||||
|
||||
|
Wow! Looks nice, but why are you selling it?
__________________
Yerf-Dog Spiderbox  Reverse Gearbox Heavy Duty Ball Joints Heavy Duty Chain Tensioner Canvas Roof/Netting Key Start LED Brake Lights Headlights SOLD! |
|
#99
|
|||
|
|||
|
Looks good man. I kinda miss my yerfie after selling it.
|
|
#100
|
|||
|
|||
|
I don't really use it very much. I have other toys that get used more often. This is what I did today:

|
|
|