|
|
|
|||||||
| Mini Buggy General Discussion General Discussion forum for Mini Buggies. (American Sportworks, HammerHead, Carter, etc) |

 |
|
|
Thread Tools |
|
#1
 09-20-2012, 12:23 PM
|
|||
|
|||
|
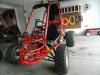
Long story how this happened but I was looking for a project and found a guy wanting to get rid of 2 non running buggies. We agreed to swap the 2 buggies and an interarms .38 special for a $425 treadmill. Seeing how the gun is worth 200-250 I am into these things for $200-225. Here goes.
First is a Baja motorsports Raider mini 90cc. Guy bought it new and when it stopped running he decided he was going to fix it. Being an idiot, he took a part off, didnt know what to do and parked it. Turns out he took off the generator cover and undid some wires. Buggy has been out in the sun for a while so it is not perfect. Hooked a car battery to it. Wiring all intact. Ignition works (came with a key) but no power past the starter relay. Ordered the part and will go from there. The generator may be shot after sitting out in the open for so long. I dont want to order it though if the engine wont run. Question: Engine should start and run with this cover off correct? Only thing under it is the generator and a chain assembly that I assume runs dry. If the chain had grease on it, the grease would get onto the generator under normal conditions. Second buggy is a 150cc. He bought this used from a guy who said it need ignition rewired. Luckily he never touched this one as nothing was taken apart. Seems all there. Sun baked also, seats chewed up by his dog. Hooked battery up, power to the ignition but not from the ignition to the electrical box. Decided to order some parts: ignition with key (I didnt get one with this), cdi box/starter relay/ignition coil combo. It was cheap, and since it was out in the open figured might as well change them. Throttle cable missing, reverse cable missing. Ordered both from the bay. Have about $90 in parts coming. questions: the second buggy is unknown model. There is no data plate anywhere that I can find, and as the seats are chewed up it isnt hard to look under them. I found a faded sticker that says roketa on it and the parts match the GY6 parts I found on ebay. I know ebay parts are hit and miss from china but I dont want to sink a ton in until I know they can at least turn over. The little buggy engine is not stuck. The big looks to be in decent shape. It had bad gas in the tank but not to old as it smelled like old gas and not turpentine. There was oil in it although it was a bit low. I am attaching a picture to see if anyone can identify. Final thoughts. Ill try and update this thread as I move along. Likely a winter project for me as I am in school doing clinical rotations for the next 13 months (physician assistant). Think I made out ok in this deal or did I give up to much? Any thoughts appreciated. Thanks 
|
|
#2
09-24-2012, 03:26 PM
|
|||
|
|||
|
Started working on the pair this past weekend so update to previous post.
Hosed the big dust off both of them. Used a compressor to blow out the rest and they both cleaned up ok. Certainly not pristine garage kept condition but for the price, I cant complain. I started with the roketa. I searched for the vin. After reading some posts on here I suspected it would be under the seats. As the seats were mostly gone on the bottom it was not hard to rule out the data plate being under the seats. After searching I found the VIN on the passenger side etched into the horizontal bar you step over as you get in. I thought with this it would be easy to narrow down the model of the buggy. I called a local dealer who sells chinese stuff and talked with him about the model. I suspected it was a GK-28 from the pics. The VIN however did not point to that. My VIN begins with A1Z. The model year appears to be a 2006. The first 3 digits of my VIN did not appear in his roketa stuff. As far as condition - the wiring wasnt all that bad. Some of it was brittle. I connected the battery and found the pos and neg cables were in tact. I had power to the starter relay, Fuse, and voltage regulator. When I checked the ignition switch I had no power so I suspected a broken wire between. Removing the plastic wire coil I did find a break in the wire. Simple twist connection and the ignition switch was live. Turned the screw driver and the starter turned easy!! Gas tank is off, carb looked like junk, but the engine turned so there is hope. As this one is complete I decided to go a bit further. Found some used tires at the same dealer earlier for the front. $25 each and I am good there. Not the best solution but I found tubes for the back for now at $20 each. Found a seat on craigslist I think is from a yerf for $35 in great shape. Will work for now once I get it mounted. Decided to replace the factory electrics from ebay. CDI, coil and wire, regulator. When the engine turns I have no spark from the spark plug at all. Tested around and found no voltage to or from the cdi. The blue/white wire appears to come from the magneto, I suspect it should have voltage when the engine cranks but I have nothing. I may need a stator but have not ordered yet. I am going to get the rest of my parts from ebay in (ignition, intake, cdi, etc) and replace those and see where I am at. At the dealer where I found my tires, I did notice he has a big wall of spare parts removed from other vehicles. Tons of GY6 stuff. I rummaged around and found a new looking carb he sold me for $10. Cleaned it and installed it. My intake is in terrible shape so waiting on that. Raider mini. At least the seats here are somewhat in tact. Not really sure why the previous owner did this but he removed the magneto cover and every peice of the electrics except the starter relay and ignition coil. No voltage regulator, no CDI, etc. Battery connected and the wiring seems intact. Found power at the ignition switch and starter relay. Turned the key and got nothing. Tested further and it appears the starter relay may be kaput. Jumped it with some 12 AWG wire and the engine turned. Good enough for now. Ordered a bunch of parts. Found a complete (except started relay) kit on ebay for 30 for the raider mini. Includes ignition coil and spark plug wire, CDI, regulator. From the pics, the coil is exactly like mine, the plugs look the same as to the plugs I have. Hoping it works for my setup. I need to replace the magneto which looks easy. Luckily it removes without removing the flywheel. Another 17 or so from the bay. Any advice from the experts on the roketa electrics would be appreciated. I am learning as I go, reading lots of stuff from the boards. Ill dig into the electrical forum on here and see what I come up with. bigger pics: roketa electricals roketa VIN raider mini electrical Last edited by Rechtien; 09-24-2012 at 03:33 PM. Reason: posting pics
|
|
#3
09-26-2012, 07:31 AM
|
||||
|
||||
|
Welcome to the addiction! Sounds like ur headed in the right direction on ur project. I dont know much about the Roketa in particular, but the wiring on these buggy's is pretty straight forward u just start at the stator n work ur way forward. As for ur parts, b4 u go all out on ebay id check with tom at syc powersports as a member of this forum u get a hugh discount with him and a treasure trove of knowledge and info he throws in for free and u cant beat that! keepem rollin
|
|
#4
09-27-2012, 10:58 AM
|
||||
|
||||
|
Your Roketa is an early model 2006-2008 made by Sunl which is out of business but there is sunlpartsonline who purchased the leftover parts from MaxiMoto who bought out Sunl. Once a part dries up no more are to be had. The biggest headach is if your buggy had the GY6 series B engine. This can usually be identified by the 2 bolt valvecover as the series A most common engine used was a 4 bolt cover. But Sunl started toward the eng using the 4 bolt valve cover on their series B engine. The only way to tell the series from a 4 boly cover is to measure the cylinder studs diagnally. If center to center is 3" you have the common A series, if 3 1/8" its the B series which can be a headach getting the hard engine parts.
The mini raider I will assume has the Honda CT series cloned engine. Post some pics of entire engine and the cover as well as the stator, I can determine from the pics which year model clone was used. Back to the 150, if you go to American Sport Works site you can download their service manual which gives step by step for checking the charging/ignition system complete with all values. All you will need is a good digital volt ohm meter and a puller if needed to pull the flywheel.
|
|
#5
09-28-2012, 07:23 PM
|
|||
|
|||
|
Thanks for the update. Was going to call you today and get some info but didnt make it home from work in time. Ill see if I can figure the engine. hopefully it will not need a rebuild to worry about internals for now. Pics to follow.
|
|
#6
09-28-2012, 07:54 PM
|
|||
|
|||
|
Pics from my current progress. Some parts have come in and been put on.
Dazon: got the electricals I ordered and put them on. Now I am not sure what I am missing as I have 3 other plugs left. I assume at least one is for lights and I suspect the other is for the gear light next to the key. The third I suspect is for the stator. Problem is the stator I took out does not have a plug. It has 5 wires. Pics of stator when I removed: Old stator New wiring diagram progress It now has the cdi and regulator installed. I have the starter relay, unknown if it is functional yet but I suspect it is not functional. The kit I bought came with a starter relay which is different than what I have. I knew this when I bought it but it was cheaper to buy the group then just the cdi and regulator separate. It appears as if the relay is the same from the roketta (sunl) so possibly a spare part. Now plugs I do not know Wiring diagram from owners manual shows 6 wires coming out of the stator. Obviously the stator I removed only has 5 wires. The stator I received has 6, but two were not connected to anything. One was green/red and the other black. In addition there is nowhere to plug these wires in (from the new or old). Judging by the dust and age of the old, and that it was still installed when I got it, it is the original stator. The old owner said he bought it new, not sure if that is true so I am assuming it has never been replaced. My thought is that there is another piece of the wiring with the appropriate connector. The connector at the base of my pinkie is a 4 wire connector with thick plugs. I am thinking this is a light plug. The next plug with one wire I suspect is for the gear light. the last plug is a 6 wire plug I suspect is for the stator connection. new stator with extra wires next to old dazon manual I am using with wiring diagram at the end Only updates for now, havent dont much work and no more parts. One last question. The dazon shows a gasket under the cover for the stator. The cover covers the chain and flywheel/stator assembly but this cant have oil in it as it would fry the stator I would assume. Is this gasket simply to keep dirt and duct out? Thanks again for the info. Last edited by Rechtien; 09-28-2012 at 07:57 PM. Reason: adding link
|
|
#7
09-29-2012, 09:59 AM
|
||||
|
||||
|
You are going to have to go by the schematic to wire it up to run. There were several different stators used on these buggies. It is a Honda setup. When consulting with the Honda manual it shaow 4 different stators all similar in looks but from different years. Many of these buggies had extra plugs for acessories. One is probably for the lights and one could be for a remote starter which was common on the smaller kids karts. I need to see the new stator next to the old showing as much detail as possible so that I can compare the two side by side and see where the extra wire comes from. It could be that the previous owner tried a used stator. I would also contact the prev. owner and get as much info from him as possible if thats possible. The schematic does not show any light circuits so if the kart does have lights you will have to trace down the wire colors, but I would assume it has no lights since the circuit is not included. A remote starter circuit would not be on the schematic since it was an add-on. send some better pics of the stators side by side focusing on the placement of the wires on the stators and hopefully we can get that figured out for you.
TOM
|
|
#8
09-29-2012, 10:41 AM
|
|||
|
|||
|
Ok here goes, first is just a big pic of both
old next to new Next, magnetic pic-up. Both old and new are same color. Green is grounded on both although in two different locations. Blue white from the magnetic pickup I assume goes to cdi. magnetic pickup wires single wire black coil thing. Not really sure what this thing is or does. It has a single wire black red wire on the new, and a black pink (faded red?) wire on the old. Both mount in same location. hard to get both in a photo, marked by tips of the pens. black red wire from black coil thing Bigger copper wire coil. I assume this is the actual generator. It is a two wire system. These wires are covered in a black plastic to protect the wires so hard to capture colors. Old uses a pink, and a yellow wire. New uses a yellow and a white. Odd thing is, and not sure this matters, is the mounting side for the yellow switched. Basically, from top down, on the new stator, white goes to the left side and yellow to the right side. On the old, yellow goes to the left side while pink goes to the right. Guessing one of these to regulator, one to cdi. Left side of coil - white on new, yellow on old, hard to see Right side of coil, yellow on new, pink on old Last pic just shows the ground. Done a bit different on the new. The green wire from the magnetic pick-up mounts to the right side of the coil. The green that comes out of the wire bundle grounds to the clamp for the wire bundle. On the old, both wires ground to the clamp. This last pic is the startor relay. I cannot find a part number or anything else for this part. This is the part I am going to call at some point to try and order from you. starter relay Hope this is enough info. I am going out with the kids in a bit and going to take a good look at wires to the cdi and such and track where they come from. Ill try and get pics online a bit later.
|
|
#10
09-29-2012, 09:22 PM
|
||||
|
||||
|
The stators look the same, not sure if it is the pic but the old one looks to have slightly larger coils but should be no problem just a lesser capacity.You mentioned the new has 6 wires, I can only see 5 wires on both stators, old p,y,g,b,&bl new r,g/w, y,w,bl/w. The bl/w should be the trigger the other wires just trace where they go on old stator and new then match the different colors. The relay looks correct it just has the rubber mounting isolator. I personally have never run across this type of relay, usually a solenoid switch is used. Relays are normally used for acessories such as lights and horn.
|
|
#11
09-30-2012, 09:02 AM
|
|||
|
|||
|
This relay is actually for the starter. The maintenance manual I posted a link to shows pics of it and discusses testing to see if it still works. I have to pick up a voltmeter, never needed one at home before. Going to try and install the new stator and cover today if I get the chance and see if I get power when the battery turns over. From there attempt to figure out where each wire goes. Should be a hoot. If I get it right I should have spark though and can then turn my attention to fuel (gas tank was full of bad gas and needs cleaning).
|
|
#12
09-30-2012, 06:01 PM
|
|||
|
|||
|
Progress from today:
Sunl/roketa - lots of good stuff here. Tires back on and now a rolling chassis which is much better than 4 flats or on jackstands. Rolls nice, steering is good and easy. Installed my replacement seat, not quite for this car but it bolted in well enough to sit on although I wouldnt trail ride on it. Going to look at doing something wit the old seat. I dont have a stator handy so I blew out the current one with my compressor, cleaned out all the dusted and connections. Buttoned it back up for now to give it a shot and see what happened. Surprisingly I had power from the stator, to the cdi, regulator and ignition coil. Still no spark though so I assume the ignition coil is bad. I have one already ordered so Ill wait for that to arrive and swap it out. The one I have on order is a stock unit. Wasnt expecting to see power but glad I did. Saves me from replacing the stator for now. ignition should come in this week so possibly might have spark before the week is out. I have the throttle cable and reverse cable ready to install, just didnt get to it today. Dazon: Stator back installed and cover installed. Turned it over and power from yellow and white wires. That is the good. Bad is I had no power to the cdi. the voltage regulator has power. Traced the wires around and turns out the picture I posted earlier with the 4 connections is for the stator. It has a blue/white wire that goes to cdi. Green for ground. Then it has yellow and white. Both of these go to the regulator. that leaves no hot AC wires going to the cdi. The CDI gets the blue white wire from the magnetic pick-up, and the black/red wire. The black/red wire as I can tell is not a "hot" wire when the engine turns. Not really sure what this wire does for the cdi. My stator came with 2 additional wires that were not connected to anything, might be optional wires to jump one of the hots leads to the cdi. Ran out of time today to experiment anymore.
|
|
#13
10-07-2012, 04:09 PM
|
|||
|
|||
|
Success, failure, success, and ultimately failure.
My ignition coil arrived finally. Have to make sure if I buy parts off ebay I order from US sellers rather than China. Installed the ignition coil and finally spark at the plug. Buttoned everything back together and still wouldn't start right away although you could tell it wanted to. Some sprays of carb cleaner and it lit. It ran like junk and I couldnt keep it running for long. Wasnt really sure what was going on. I had not checked the valves or timing so thought now was as good a time as any to give them a look. After watching the video I tried to check my timing, but my flywheel and cam chain didnt line up like the video. I sort of chalked that up to chinese tolerance, lined up the holes on the cam sprocket, and adjusted the valves to .004. Buttoned everything up and she started again but still ran like crap. I left her to idle for a few and she started kicking out smoke from the tail pipe. Eventually it died and would not restart. I took a look at the plug and it was soaked in gas and black. Running very rich. I decided the carb must be to blame. I removed it and went to clean it. This was the one I bought second hand from the dealer parts bin and assumed it was clean. Went to take off the bolts and rather than screws it has a fastener with a flat top that does not screw out. I looked at it puzzled for a bit and decided to use the old one. The old one was very dirty so I completely disassembled it. Now kids, try this at home at your own risk. I took the hose to it. It was full of dirt and grime from sitting outside. I had cleaned it with carb cleaner once but that didnt get everything. Out comes the hose. When I got done I blew it out with my complressor and went to work with the carb cleaner. Everything back together, onto the buggy, open the drain screw and turned the key. Wouldnt you know it started right up and idled great. Gave it some gas and it really wanted to go. Now I am excited. I get my throttle cable and start to put it on. Turns out it is about an inch to short. It works, but installed correctly it opens the carb enough to move the buggy which is no good. I turned around the cable bracket on the carb upside down and re-installed and it worked fine. Started the buggy, tried out the pedal and it worked great. Pull it out of the garage and it died. Tried to restart without luck. Checked the plug and no spark. Back to where I started. After tracing some wires my red/black wire has no voltage while cranking. Now I assume my stator did kick it. Not sure which one to order so Getting a flywheel puller and will get the flywheel off and check it out.
|
|
#14
10-19-2012, 12:15 PM
|
|||
|
|||
|
been 2 weeks since my last update. I ordered a flywheel pulley for a GY6 and sure enough it was the wrong one. With shipping each one is 15-20 each so I decided my garage just needed an entire set. I found a set on Amazon that seemed to include any possible combo I might need. Kit only cost $66 and comes with 10 separate pullers, some with 2 sides.
Got the kit in and pulled the flywheel today. The entire thing was full of dirt. It is a 6 pole stator, 5 wire. I am going to blow out all the dirt, re-install, and try it before I decide to order another. Hopefully the clean out will do the trick. Found a set of seats after much looking and getting quotes to redo the old seats. Cheapest redo I could find was quoted at 300 using a black vinyl. Found a set of new seats with a small tear from AJ's parts online via ebay. After a few emails decided on $180 shipped for the pair. Small tear shouldnt be a hard fix and if anything else, 180 shipped plus a piece of duct tape is better than 300 to redo mine. Budget update on the Sunl: Buggy - $125 Tires - $102 (2 used fronts, tube for one rear) CDI, ignition, starter relay - 18.88 reverse cable - 19.90 intake 9.47 used carb - 20 seats - 180 Total spend so far 475.25 with about 6-8 hours of labor involved. This does not include the 60 for the flywheel puller set as it gets added to my tool collection anyhow and will get used on other projects.
|
|
#15
10-19-2012, 04:23 PM
|
|||
|
|||
|
Funny how one project leads to another.
So I get the stator and flywheel cleaned up and buttoned back on. Turn the key and she fires right up. I had adjusted the valves 2 weeks ago but the chatter was a bit loud so I decided to readjust them. Got that finished, finished up some cleaning to get ready for new seats which should arrive saturday. Finished everything up and decided it was time for the maiden drive. Took her around the block nice and slow and noticed one wheel has to much play in the lower ball joint. Got back to the garage, up on jacks and proceeded to remove the ball joint. Turns out someone has tried this before, or at least tried to fix it before. Somehow they managed to weld a chunk of metal between where the A-arm and the spindle. Not really sure the purpose of this as the joint itself is firmly in the spindle. Not having a ball joint I put it back together. Back for another drive and now blowing some oil out the valve cover. Either I damaged the gasket or did not seat the bolts correctly. Either way didnt have time today to get to it. On a side note I noticed I have a 2 bolt valve cover. I guess this is variant B of these engines. Ill try and measure the head stud spacing when I take the cover off again as I keep forgetting. The way she is smoking I think she needs piston and rings. Need to know if I have the rare variant or not.
|
|
#17
10-19-2012, 10:13 PM
|
||||
|
||||
|
Hate to disagree but I have in my posession a damaged 2 bolt head that measures 3" and any 4 bolt cover head gasket matches up to. Some of the early Sunl with 2 bolt covers were series A engines.
|
|
#20
10-21-2012, 01:21 PM
|
||||
|
||||
|
Thanks for the kind words. The only reason I knew this is, the head I have and the problems at first with cams not working in some of the sunl engines. Blade had sold some cams to Sunl owners with 2 bolt covers and they worked but others did not. We figured the early ones with 2 bolt were actually the normal series GY6 and the later years were the odball series.
|
|
#21
11-04-2012, 05:13 PM
|
|||
|
|||
|
Been a while since my last update.
So my seats came in and I was excited. Got my rails mounted and went to put in the passenger seat and discovered the mounting points for the rails were off. This left me with two options, either moving the mounts or swapping the seat materials from the new seats to the old frames. I went with the second option. I thought about welding on new mounts but I assumed the chinese materials were not fire safe. I would have had to strip the seats to weld new mounts si I decided to swap to the old frames. It took longer than I thought it would but it was a learning experience as I had never done upholstery work before. About 6 hours later (mostly on the first seat, second went much faster) I have my seats back in the buggy looking brand new. After some cleaning of the stator I got the buggy running again only to have it die on our first real drive. Turns out the red/black wire from the stator to the CDI was not in good shape and was working loose. Fixed now. One issue it has left is smoke/oil. The vent hose from the valve cover is blowing smoke and oil when the engine runs. This gets oil onto the exhaust which makes more smoke. It isnt terrible, but certainly not normal or healthy. So with that buggy sort of sorted I went to work on the dazon. For the seats, new seat is not an option as the cheapest I can find is in the $300 range. It isnt terrible, but has some sun baked areas. I decided to try cheap and easy first. Picked up some leather/vinyl cleaner and conditioner and went to work. Then a can of vinyl/leather paint from autzone which matched perfectly and some tape. It didnt come out brand new, but it certainly looks 110% better. Total was about $20 and an hour or so. Next went to work on the electrics. I put in the ignition stuff I bought from ebay but didnt get spark. Today I got it all back together and give it a look. I didnt really do anything different and didnt expect much but today I had spark. I dont have a gas tank yet for this as the old is dirty. I used some carb cleaner and it fired for a few seconds. Next project is a gas tank cleaning. Ill get some updates when I get more progress to include pics of the seats and such.
|
|
#22
11-04-2012, 10:39 PM
|
|||
|
|||
|
Quote:
For wiring diagrams you can search google for electrical diagrams for you karts under images. This will return the best results. Also, you can easily bypass the ignition switch connecting the battery (live 12V ) cable to the ignition, and then touching those two to the starter motor. At least you will know if your engine turns and the starter is good. After, check for spark. I found some cheap and good ignition switches at a local Marine supply store $14. My 2 cents as a beginner.
|
|
|
|