|
|
|
#1
 10-18-2011, 06:10 PM
|
|||
|
|||
|
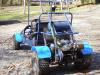
usual story, a 100 dollar find on craigslist & my 1st kart; it was kept inside but didnt run.
got it running on the oem 6.5 tec turd, tightened up bolts, replaced the cvt driven pulley, etc. engine was used up, so installed a 212cc predator. the buggy is insanely clanky and rattly, so... got some 1/8" oilite bronze thrust washers and installed one on each side of the spindle to take up the slop that'd worn in; the upper washer fitted itself into the (fairly severe) wear taper on top very well. aligned it best as i can get it; pulls left but is stable. got some 1/2"ID-3/4"OD flanged oilite bushings for the rear swingarm mounts. will drill the factory brackets to accept the bushings. strangely, i couldn't find any bushings in the oem bolt size of 9/16 and didnt want to sacrifice structural integrity of the brackets by drilling the holes larger then .75" so am going down to 1/2 "structural" shanked bolts. got a 5/8ID flanged bushing for the upper steering column hole; the column rattles worse than any other part on the cart; should have gotten a second for the lower mount too. the PO had the brake band hooked up assbackwards (pulling from the bottom) so it didnt work at all. having never paid a lick of mind to band brakes it took me some time to figure out what wasn't right. (i thought the cable tab was welded on at a really bad angle and was cursing mississippi labor quality  ) )the brake kinda sucks but is far better then before and some use should improve it, i hope. the pedal feels like it's made of cardboard and bends even easier; it'll get boxed or replaced. ordered a pair of the cheapie surplus center oil shocks to use in back; they're on the way. the front will eventually get hacked off and replaced by a widened quad front end with disc brakes unless i can find some suitable front shocks and bush the control arms so they're quiet and stay in alignment. watching the camber change so much as the suspension cycles is pretty amusing. the cart's real tippy; i think more track width up front will help enormously. it's becoming clear 6ish horsepower won't be enough to make me happy....if yanking the gov and a small cam dont help enough i'll stick an electric start suzuki 125 6 speed from an unused dirt bike in it. anyone have any suggestions as to how to get a seized rear wheel off? that SOB is stuck like a booger on the axle. i've banged, yanked and pried on it. it just laughs at me.  btw, kudos to mcmaster-carr & UPS for getting me the washers and bushes the very next day via regular ground after placing the order at 4pm! if anyone wants part numbers to dupe my work just ask. any and all suggestions or advice are welcomed; i'm new to go karting. thanks! 
|
|
#2
10-19-2011, 12:19 AM
|
||||
|
||||
|
Only thing I can suggest is several applications of penetrating oil- More power and speed will bring out the other rattling stuff!!! I had to sell ours because they just couldn't tolerate our trails-Every time I beefed up a part another would fail!!!! they were just as fast as our others just ify over the bumps and turns due to the single A-arms.
Last edited by metalstudman1; 10-19-2011 at 11:11 AM.
|
|
#3
10-19-2011, 01:44 AM
|
|||
|
|||
|
it's soaking in it, Marge.
(if you're old enough you'll get that and hopefully laugh). what did you need to beef up on yours, metal? i'll eventually weld some frame bracing in and the rollcage at it's bolted unions. there's nothing on the cart that doesn't rattle already! the various bushing installs will take care of the big majority, welding it up should handle the rest, i hope. a big noise source is the floorboards; they'll get seam welded or many spot welds and crossbraced from below. if i can dig up a high-speed 3/4" drill bit and get motivated enough to yank the motor i'll do the rear bushings tomorrow. do you know if the front arms are factory bushed? if they are i'll be very happy they're serviceable. if not, i reckon i'll seek some bronze sleeves to take up the wear slack for now.
|
|
#4
10-19-2011, 11:21 AM
|
||||
|
||||
|
Had to constantly re-weld the factory welds,adding gussets just seemed to move the cracking to the next connection!! I do believe there were bushing in the A-arms from the factory- I'd check BMI.com to see if he sells them, I know he sells the whole arm. I used bushings and sleeves from Spiderbox spare parts I had. I never got it to stop rattling!!!!Did GPS it @ 36mph with the stock Tecumseh engine just by changing to a 6" driven
|
|
#5
10-19-2011, 11:40 AM
|
|||
|
|||
|
that's what i figured, thanks.
gussets indeed just move the stress points to a new place; i'll be adding new frame rails and triangulated tubing braces; the frame flex it has is ridiculous. never getting it to stop rattling doesnt sound promising, though...it annoys me and my wife abjectly hates it and wont drive it till it's quiet.
|
|
#6
10-19-2011, 12:02 PM
|
||||
|
||||
|
You're working on pretty much the same deal as I am. No sleeves or bushings in the front A-arms, just a big bolt through the tube. If you can get your hands on some 1 1/8 OD DOM tubing, the bronze bearings fit inside perfectly snug and accept a 3/4 diameter rod for axles etc. Conver your pivo points to that, and no more worries (except for the next link in the stress chain lol) No matter what you put at the pivot point, if you use the factory "method" of a bolt through a mild steel hole, it's going to elongate and get sloppy.
|
|
#7
10-19-2011, 01:41 PM
|
|||
|
|||
|
awwww....CRAP!
metal, your post made me think about my new driven pulley...which is also 6", not 7 like the original! that 'splains it's added reluctance to climb big hills since swapping it. anyone wanna trade a 7" in perfect shape for my brand new 6"? i'd prefer the short gearing. i guess my formerly calibrated eyeballs need a tuneup...oops. and also means the belt i ordered last night will be too loose. guess i'm cutting the jackshaft plate after all to add tension. grrr
|
|
#8
10-19-2011, 05:14 PM
|
|||
|
|||
|
XB, that's what i assumed; these were definitely built to a price-point.
but, i like polishing turds so will keep after it anyway. anyone put skis on the front for snow yet?
|
|
#9
10-19-2011, 08:44 PM
|
||||
|
||||
|
Quote:
|
|
#10
10-20-2011, 03:18 PM
|
|||
|
|||
|
giving up the wife resolves the complaining - that's a win/win in my book.
 just ordered a big red tub from k-mart to make fenders from; getting spattered with deercrap by the tires is getting old. the dog likes it though. shipping was 6 bucks; cheaper than the gas to drive there. win!
|
|
#12
10-21-2011, 12:04 PM
|
||||
|
||||
|
Here's the link to it -if you read the posts it explains it! http://www.buggymasters.com/forum/showthread.php?t=1159
All the sound from the engine area is magnified with it!!! but all the mud and debris doesn't land on your head in big glops now!!!
|
|
#13
10-21-2011, 12:56 PM
|
|||
|
|||
|
good score on all that sheet plastic, metal.
your machine looks very good.
|
|
#14
10-24-2011, 02:52 PM
|
|||
|
|||
|
a 9 tooth sprocket will be here tomorrow from mcmaster carr, 13 bucks with hardened teeth.
the owner's manual i found online states it's #40 chain so i ordered accordingly; that'll negate most of my new driven pulley diameter screw up. while enjoying a night of insomnia last week i came up with what i think is an ingenious  design for a rear suspension setup that'll allow the live axle to articulate over single-wheel bumps while keeping the engine parallel to the axle so it doesn't toss the chain. design for a rear suspension setup that'll allow the live axle to articulate over single-wheel bumps while keeping the engine parallel to the axle so it doesn't toss the chain.ie, it'll work like a live axle on a car and should markedly improve ride quality and handling; no more 2-wheel-tip. it'll be easy to build and very cheap and will enable extending the wheelbase as much as desired (or not), and allow the use of coilovers in much longer lengths to add travel and ground clearance while the engine stays relatively level so the carb works as intended. oh yeah - reduced unsprung weight as well.
|
|
#15
10-24-2011, 09:49 PM
|
||||
|
||||
|
So you must definetely post pic's after the testing phase proves that it works!!!! I have a "Frankenbuggy" with a new concept rear suspension I'm hoping works out too.
|
|
#16
10-25-2011, 06:02 AM
|
||||
|
||||
|
IRS ideas... there should be a stickied thread where we can all toss our ideas. I was thinking about a pair of lower case "y" shaped arms with pillow-block style bearings at the ends for the hubs and a pair of john deere PTO/mower shafts (nice sliding splines on them with universals on either end) as the axles. It would allow the engine to either be raised or the chain sprocket to be moved up and rearward for more ground clearance.
|
|
#17
10-25-2011, 11:02 AM
|
||||
|
||||
 Every thread & posts are for doing exactly that!!!!! Tossing around idea's and getting comments/opinions from other points of view. All of us bring different aspects to the table based off our education and experience. The only reason I come to Buggymasters is to get information & entertaiment!! Every thread & posts are for doing exactly that!!!!! Tossing around idea's and getting comments/opinions from other points of view. All of us bring different aspects to the table based off our education and experience. The only reason I come to Buggymasters is to get information & entertaiment!!
|
|
#18
10-25-2011, 12:15 PM
|
|||
|
|||
|
thought about IRS; it's too delicate and i dont wanna spend real money.
my buggy is named Budget Boris and the wife says it better stay that way. the only things i'll have to buy for my design are two pillow block bearings; the rest is scrap tubing. meanwhile, my new rear shocks arrived today so i'm hanging them; very curious to see how much improvement's made, and if they'll work well on the front as well. another member here said they didn't bolt up in front but i'm confident they will after a bit of clearancing.
|
|
#19
10-25-2011, 07:06 PM
|
|||
|
|||
|
ms1, see x-bird's yerf thread for a description
|
|
#20
10-25-2011, 10:20 PM
|
|||
|
|||
|
must say i'm impressed with the surplus center shocks big time for the ultra cheap money they cost.
was very pleased to find proper removable collars to allow changing the springs. they're beefy, have good bushings and the damping feels reasonable by hand w/ a spring removed. they have a hard nylon spring bushing to ease preload adjustments. tomorrow i'll actually get to installing and driving on them. here's a question i have: my new clone predator needs it's gas tank yanked to allow full compression w/o banging it into the rear rails. i know jack**** about these little engines. i see them usually sold, modified, with a pulsed fuel pump running off a vacuum source. however, far as i know, mine is gravity feed - am i right? my hope is i can just unbolt the tank off the clone and move it up into the rack area and hang a line down to the carb. yay or nay? thank you
|
|
#21
10-25-2011, 11:31 PM
|
||||
|
||||
|
Yes you can remove the tank and gravity feed the carb- you may have to reduce the size of the line or install a shut-off valve to control flow as they flood pretty easily when the tank goes way up.The pulse fuel pump is run off the hose on the valve cover, they run them to ensure fuel flow while constantly turning- not needed for playing around in the yard!!!
|
|
#22
10-26-2011, 01:32 PM
|
|||
|
|||
|
very good, thanks, msm.
my HF has a shutoff built in; nice touch relative to the tec.
|
|
#23
10-26-2011, 10:21 PM
|
||||
|
||||
|
Quote:
when you say surplus center, where are you talking about? I'm going to be in the market for new fronts and wouldn't mind replacing the rears as well ...
|
|
#24
10-26-2011, 10:24 PM
|
|||
|
|||
|
|
|
#26
10-27-2011, 05:45 AM
|
||||
|
||||
|
I've got them on the front of the wife's Black Spiderbox- "Lotta" bang for the buck!!! with her driving style she'd have broke one by now if they were crap- Made a huge difference in the ride- they're not Works shocks but you could buy about 15+ of these for the same price!!!
|
|
#27
10-27-2011, 08:37 AM
|
||||
|
||||
|
I was comparing them to the BDX S2s, looks like the same overall length and travel amount. I do like the fact that the bdxs have progressive rate springs. Just discovered that the shaft on one of my rear shocks is bent and binding. (complete lock-up on the shaft one way, turn the shaft 180 and it hangs up a little.) no way to dismantle the stock ones, is there?
|
|
#28
10-27-2011, 12:20 PM
|
|||
|
|||
|
x-bird, you're welcome to my stocker "shocks" for free if you want 'em.
i've not swapped on the new ones yet but will asap; my bad back and other probs are keeping me from doing much at the moment.
|
|
#29
10-27-2011, 04:54 PM
|
|||
|
|||
|
new shocks hung.
no test drive yet but very scientific bounce test shows 34 million percent improvement. are the max file size for attachments (pics) on this forum ridiculously tiny or am i doing something wrong?
|
|
#30
10-27-2011, 04:54 PM
|
|||
|
|||
|
btw, the springs on the new shocks are actually beehives; nice
|
|
#31
10-27-2011, 07:29 PM
|
||||
|
||||
|
I haven't had a problem yet with the pics, i don't resize mine either. works the same way as PY forums, except you can do more than 3 at a time ...
Did you get this ... Fatal error: Out of memory (allocated 62914560) (tried to allocate 6514561 bytes) in /home/buggyman/public_html/forum/includes/class_image.php on line 2401 I think the site popped its server space cork .... must've been my 'bird pics ....that's what happens when you put too much pontiac torque in on spot... Last edited by x-bird; 10-27-2011 at 07:41 PM.
|
|
#32
10-27-2011, 08:52 PM
|
|||
|
|||
|
idk if this'll work but if so it's the before shot
|
|
#33
10-27-2011, 09:08 PM
|
|||
|
|||
|
ok, it's shrinking the pics on it's own to fit.
note swingarm angle in terms of static sack. here's after, on softest preload setting. old shocks were on 2 or 3, i dont recall. sorry for the crap picture, i was rushing. wearing 3D glasses may help.
|
|
#34
10-27-2011, 10:36 PM
|
||||
|
||||
|
i was wrong on the above, i have to resize mine (single pic file size from my nikon is usually 2-3MB) for some reason i didn't remember doing it before. Shocks look good, pic is getting me cross-eyed ... I take it these are direct bolt in, no washers or forcing needed at the mounts? pretty sweet deal, think you've got me sold on them.
here's an easy freebie tip for ya--if you have some of the memory foam mattress, cut a piece as wide as the seat and not quite as tall as the seat back, stuff it between the upholstery and the rear plate/tube. I zip tied it to hte tube in a few places then bulled the seatback flap over it. stops the shoulder blades from getting beat to hell ... Last edited by x-bird; 10-27-2011 at 10:45 PM.
|
|
#35
10-28-2011, 01:32 PM
|
|||
|
|||
|
so easy they almost installed themselves; zero mods needed.
i'm hurting bad today but am gonna try a quick test drive shortly. i used pipefoam on that seat bar to pad where you mentioned. the wife noticed my strange horizontal bruise and wondered what kinda weird **** i was up to when she's at work. my explanation about the hookers wasn't appreciated so much...
|
|
#36
10-28-2011, 06:19 PM
|
|||
|
|||
|
i'm shocked!
 the improvement in both ride and handling on my 1 lap around the yard was absolutely incredible. my back hurts no worse then before the ride. it's almost cadillac-esque now. i am totally amazed, it literally does feel like an entirely different turd then with the stocker legs on it. i can feel the caster loss but it's not a problem so far; i doubt i got past 20mph on this ride, though. if they make half this much improvement in front i'll very likely not bother with the quad front end swap, and it's so much better then it was i'm gonna go ahead and try just bushing the stock swingarm vs building control arms. there's nothing to lose and it's way less work. i might grab a set of blaster shocks off ebay and move the surplus centers to the front; even more travel in back plus addt'l ground clearance would be nice but i'm a mite sketchy about raising the CG that much
|
|
#37
10-28-2011, 09:56 PM
|
||||
|
||||
|
I hear you on the back --- got two discs in my lower that when they go, i've got several weeks of hell to pay -- just recuperated from a "shovel 2-tons of river rock out of the dump truck" job back in early september. maybe yerfs are therapeutic ---actually my firebird definitely is so are tilt-a-whirls --xcellent spine stretcher lol ... I've got a lot of limestone outcrops poking up in the woods here, I bottom out on them more and more as the trail cuts in from use. I want to get only a little wider with the fronts, but maybe up to 3 inches in front end height. the stock arms are already dinged pretty deep on the top of the bars from hitting the frame, the spindles are pretty trashed out too, so the sooner i have a few rainy days to work on the new arms, the better. at the back, I may make a new pair of axle plates to raise the rear another 2-3 inches and offset bend the originals to act as a support to weld them to. so far total investment is $10 for the cro-mo tubing and about $24 for the rear frame mounts (bronze bearings, 3/4 rod and a can of red crustoleum). remaining expenses are going to be shocks, tires, more bearings or heim joints and a rack & pinion of some sort) may hit one of the local yards to see what a manual rack from a tercel etc. might cost. everything else is just old "junk" i've got laying around. Have you checked the air pressure in your tires? I almost rolled mine several times the first day or two, found it was set at 25 all the way around. backed it off to 12 and 10 r/f and really cut down on the two-wheeling.
|
|
#38
10-28-2011, 11:00 PM
|
|||
|
|||
|
me too on bulging discs; it's like a fresh new hell every time.
the yerf's definitely been therapeutic for me; it got me outside of the house after a full year plus inside with my still broken leg (went down some stairs improperly). can't drive the gto bc it's a 4 speed, one f'bird's apart (pending a MT crossram with efi & hidden rails & 2 4V progressive TB's (the thread's on PY) and the '72 is too nice and kinda weirds me out to drive (and is for sale). i bought a new rack a couple years ago for my unbuilt sandrail; if i do the quad front it'll go on because the rail's also for sale, cheap CHEAP. SOMEONE BUY IT!!  this place has published rack dimensions: http://www.appletreeauto.com/VW-STEE...K-and-PINIONS/ i dont think a car unit will be fast enough ratio for a dirt machine.... i run 12 psi in back and 6 in front. one back tire's a fast leaker and i keep forgetting to get a can of snot so i put it to 40ish and when it's near flat i'm done. i'm right at 300 bucks so far, including the yerf, new predator, shocks, bushings, thrusts, etc. i wont be spending any more on it except for another pair of shocks, some valvesprings and a cam. (until i do the honda 400 twin swap maybe next season). got one of those 12 dollar digital tachs on the way from the land of tea and overpopulation, and still gotta make fenders. k-mart managed to send me someone else's order; instead of a big red tub to chop fenders from i got some gel shoe inserts.  those make very poor fenders as they're too floppy. perhaps i'll sit on them for added suspensory comfort.
|
|
#39
10-29-2011, 07:04 AM
|
||||
|
||||
|
I made a quickie pair of rear fenders from an old plastic chemical barrel, definitely stiff enough, i just zip-tied them to the frame , they need a metal plate bracket as the ties slip and the outside corner rubs on the tire after a bit of riding. If you're ever up this way (NJ or PA on route 78/22 or33,) lmk and they're yours. I've got enough Ping golf club racks to make front and rear for mine. As for that '72, you need to flog it!
|
|
#40
10-29-2011, 09:35 AM
|
|||
|
|||
|
i meant the gel shoe inserts were too floppy, but thank you for the offer.
the '72 is a stone stock (but for a nunzi mystery cam that behaves like a RA4) 455HO. stock is boring. it's not nearly as fast as my other one ('81 ex turbo ws6 w/ a 72 front end), a gnarly d-port 455 i built over 20 years ago...plus it's got 13" baer brakes, full suspension, etc. really though, the 72 is just too minty perfect for me to be comfortable driving with the all texting dipsh!ts infesting around my area everywhere. i've never in my life seen a 2nd gen this straight and true; body gaps are better than oem perfect, endura's the best i've seen, never hit, no filler, etc. i like beaters much better as drivers.
|
|
#41
10-29-2011, 09:41 AM
|
||||
|
||||
|
I hear you ... my sd as you can see from the pics is far from perfect ---but basically all there and #s match ... which is likely why i hammer it as hard as i do--- i make the oover-restored purists cringe ))) . were it finished, i'd probably be a lot more conservative with it ... though i do have the occasional worry when running it on the strip that i'm going to bust a shaft and tear it up or lunch the engine with the trans' 6 grand shift point. ever try to find a correct date code SD block? ... lol ...
|
|
#42
10-29-2011, 09:57 AM
|
|||
|
|||
|
an SD is fine at 6 grand with the forged rods.
didnt realize you had a real one - pretty cool! i was with ronny johnson not too long ago; his brew green '73 with under 7K miles is still for sale....for well over 100 grand! no, i've never tried to find a date-coded anything - i cant stand those anal guys with their correct paint marks and hose clamp alignment obsessions, but to each their own. to me, stock mostly sucks and is just a starting point to make it the way i want (hot rodded to hell baby!)
|
|
#43
10-29-2011, 11:40 AM
|
||||
|
||||
|
Tel Ron I said hello next time, (tell him Jim from HPP/hemmings of years ago lol) I've bought and sold with him a couple times over the years. Me, I go both ways on stock appearances. I'd like to eventually finish mine with everything pretty much correct to the original period but with mods like I have in it that allow any changes to be returned to stock. I intentionally did my engine bay with correct finishes but I also want it to look like a 30 year old original that's been well cared for--right now it's got 12 years of use and light grime on it ... reminds me of the way these things looked in the 80s ... back on topic for your buggy, i'd give some thought to the used spiderbox front ends that bmi sells on e-bay. the spindles on these 02-03s are soooo crappy. I added another rod to my long steering link because it was bending every ride within 5 minutes, now the spindle arm with the link post on it keep bending . it's getting weak from all the "repairs" ...
|
|
#44
10-29-2011, 05:15 PM
|
|||
|
|||
|
no offense meant, like i said, to each their own.
ron and i grew up very near each other but he's got about 7 years on me. i remember riding my bike past his parent's house where he lived (he was a wrench at the local exxon) and the green car was just sitting in the carport....for like 20 years. i shoulda done stole it! when i was about 17 or 18, truman fields, whose kid was a few younger than me but we went to same school, and i bought a 71 full size car to get the drivetrain outta. truman loved keeping piles of crap laying around. (he still loves it). i had my second 2nd gen at the time, a mint orange 81 ws6 turbo, fully loaded. i bought it w/ the 301 already blown up but still running enough to do about 30mph; i was still driving my 73 brewster 4 speed when i got the 2nd one. i had just moved outta my folk's house to a place where ya couldn't turn wrenches due to HOA stupidity. ronny did the swap for me at the exxon to the 455 from the car truman and i got. he got insulted when i laughed my butt off because he asked if i wanted the 301T back... he's so hardcore he even loves the stupid, hopelessly doggy stepchild of a real poncho! far as the buggy front end, i'm gonna see if i can't get the swingarms to work reasonably well. offroad the camber change isn't such a big deal and i don't plan on skying this thing 6 feet in the air; i gotta take it pretty easy or i get hurt more; it's really for yard/trail use. if i do swap it, i'll use my quad frontend because i've already got it, it's got disc brakes and good shocks, tons of travel, and it's night and day stronger than a stock spiderbox without it's bendable spindle problems, and the rack will be real easy to adapt to it. and i agree, the oem spindles on our swingarm karts are junk, but the thrust washers i installed made mine tight and quiet. the real reason i'd swap the front is to add both track and wheelbase and real wheel/tires and brakes. i got lucky in that my yerf was well used based on massive engine wear (or run w/o oil) but not beat up offroad; nothing was cracked or bent, no witness marks on front arms showing it'd bottomed out, etc. after last night's shock abosrber test drive after it rained my immediate next priority is fenders. it's just undignified to wear that much poop. 
|
|
#45
10-29-2011, 08:26 PM
|
||||
|
||||
|
None taken
 went for a fenderless (ran out of zip ties) snowing mud slush ride today, in the woods i found some traction, (muddy as all get out though) elsewhere was just roosting icy slop. went for a fenderless (ran out of zip ties) snowing mud slush ride today, in the woods i found some traction, (muddy as all get out though) elsewhere was just roosting icy slop.  got the carb/throttle linkages about as good as they'll get i think. shortened the lower spring so the pull on the governor arm is immediate. got the carb/throttle linkages about as good as they'll get i think. shortened the lower spring so the pull on the governor arm is immediate.
|
|
#46
10-29-2011, 11:01 PM
|
|||
|
|||
|
we had icy wet snow but nothing stuck.
i pretty much hibernate in the winter; all the worn out body parts really hurt in the cold. i'm thinking about getting some plastic and skinning it + lexan for a windshield. glad you got the carb worked out. i admit to having gotten fairly aggravated with the oem tec linkage then tore it all off to show it who was boss. have you thought about yanking the gov and throwing some valvesprings in it?
|
|
#47
10-30-2011, 09:58 PM
|
||||
|
||||
|
really don't want to put money into the engine. my brother has a minty fresh 9 hp robin with convertor drive, may buy that off of him. this cart had a previous owner as rough on it as me, looks like a new convertor belt and the engine plate shows different bolt witness marks, so no telling if anything has been done with it or how much run time is on it. Ran it again today with the snow/slush frozen, it definitely is faster. gotta find my old garmin gps and get a mph one of these days.
As far as plastic for panels goes, I bought some clear "stuff" that's about 1 millimeter thick at an auction last year. (if that). I wish i knew what it was, it is very flexible yet impact resistant and lightweight. you can cut it with scissors. i paneled the right side opening on the buggy with it after seeing my daughter's leg bouncing on the floorpan. I also added a closer foot brace bar for her. Haven't gotten around to finishing the rest of the areas I want to do. I just drilled holes in it (it doesn't crack at the edges) and zip tied it. As far as impact strength goes, i have no worries about it at all. I used a sheet of it to cover the windshield on the 1960s Piper cherokee target plane i put in the middle of our driving range. The old plexiglass blew out with the first hit it took. The new covering has taken dozens of hits at 175 yards (golf balls going 80-100+ mph at that distance) with no backing support and it hasn't even dimpled. If you want, I can cut a corner off that you could take to plastics suppliers in your area to see if they know what it is. It came in 4x6 sheets with protective cling on both sides. I think it was going to be used as a cover on each side of a portable lighted sign (the type with the large bend in letters).
|
|
#48
10-31-2011, 04:34 PM
|
|||
|
|||
|
a pair of valvesprings is under 10 bucks, but i'd go for the displacement too.
mine's "on the lift" now (sitting on my gravel and dirt floor but it's better than cold wet mud). pulling motor to slot jackshaft plate to add belt tension due to my 6 not 7" pulley screw up. i have the '72 at a friend's house for some stuff so i had a rare free garage spot to work in. while i was farting around in there i found all my sandrail accoutrement including the steering rack previously mentioned. that prompted me to observe our situation closely far as bumpsteer through travel. it aint good! so i went out and looked at the quad front end. first, holy crap, it probably weighs near what the whole yerf does! like, it'll notably affect power to weight ratio. gotta do some thinking on this... also checked my new 9 tooth for fit; it's too wide. milling off it's collar will make it fit. jim, since yours is apart, is the j'shaft sprocket floating between c-clips or collars or set screwed down like the axle sprocket is? thanks mine's all mungy and i didnt have anything handy to clean it with to see. i never thought of clear plastic; that'd be kinda neat and help avoid little critters too, great idea, thx. your material sounds perfect but i cant imagine wtf it could be. ps: target plane = 
|
|
#49
10-31-2011, 07:21 PM
|
|||
|
|||
|
grrrr, spent the afternoon staring at the jackshaft plate and swingarm.
it's not long enough to move the motor forward the 3/4" it needs to work w/ the 6" driven plus after doing some comparative memory sampling, it was tons quicker w/ the 7". so i can buy a shorter belt or a 7" driven. i want the gearing back of the larger driven; will still use the 9 tooth sprocket and rely on valvepsrings and no gov to give me top speed when needed. i just checked ebay, there arent any 7" listed i can find so wrote steve at BMI, where i got the 6". fingers crossed. meanwhile, i got nothing accomplished except pulling the motor.  so, for sale: one 6" driven comet 30 type pulley. has all of 15 minutes on it. $30
|
|
#50
10-31-2011, 07:31 PM
|
||||
|
||||
|
can't believe how far i can derail threads some times
targets set off 40 foot of led lighting and a 120 DB alarm siren. i just luuvvv my neighbors ))))) mine's been back together for a few days, can't recall how the sprocket is held in place--mine doesn't have the luxury of garage space. The 73 gets one side and isn't allowed to see any rain (primer) the other side is filled with a 62 mga that's in a few thousand pieces at the moment. I started making some room for the buggy in front of that this afternoon--shift cleaning time, don't know where to move the next piece of the puzzle. pm me an address and i'll mail you a piece of the plastic. can't be that expensive (not like lexan). weight ... been on my mind a lot lately. the mower blade spindles i might use for hubs are probably 5 pounds each, the spindles will be made of 1/4-in wall thickness 2x2 steel tube as will be the "box" for the other ends of the control arms. i'm probably going to be putting 30-40 pounds more up front. Even though hp to weight ratio is going to take a hit, i think it will actually smooth the ride out and help cornering by keeping the tires planted better in the turns and eliminate excess hop on the bumps. clipped a tree yesterday 1/2 way into the tire and it stuffed the steering arm end of the spindle about an inch into the tire. thankfully I only had maybe 1-2 pounds of air in the fronts because of running in the mud and slush, so no tire damage. It's getting to the point that my extra large channelocks are going to get bungied onto the rack ... 
Last edited by x-bird; 10-31-2011 at 07:36 PM.
|
|
#51
10-31-2011, 07:44 PM
|
|||
|
|||
|
bmi carries the part i need; let's see if they play nice on price.
if not, i guess i'll pull the spring outta the new 6" and try to true the old, battered driven's backplate and install the new spring. i don't too too much mind adding front end weight as it does need it, but adding all that unsprung weight is what's bugging me. aside from not having the right friggin pulley!!
|
|
#52
10-31-2011, 10:06 PM
|
|||
|
|||
|
i keep channelocks in the cart.
i dont have a socket big enough for the trailer castle nuts i'm using for back lugnuts so it's all i can get in there, and one side comes loose every ride. im gotta paint them safety orange so i can spot it when i lose one.
|
|
#53
10-31-2011, 10:23 PM
|
|||
|
|||
|
do you have a pic of how you mounted the front and back fenders?
there's lotsa ways to skin this cat but i like zipties.... i noticed today while contemplating the surplus center shocks in front that there's not much travel to be gained there because the tie rod already rests on a frame tube; it aint going any lower then current full droop. no biggie, but blew my hope of getting really good front ground clearance without going to taller tires, which won't fit and retain full lock to lock travel.
|
|
#54
11-01-2011, 06:35 AM
|
||||
|
||||
|
i haven't done fronts yet ...the back ones are made from a single tub that is cut in half down the sides and through the center of the bottom. Imagine the shape of a 2nd gen rear inner wheelhouse by the shock, the bottom of the tub is almost identical with a shock cutout. That area is zip-tied to the lower rack tube (2 holes per zip tie, 3 ties total). Another 3 ties hold it to the vertical tube behind the seat. The tub's side curve means that it doesn't sit flat against the tube. It holds it fairly well, but there is some slippage and the outer edge of the "fender" will start rubbing the tire after bouncing through the rough stuff a few times. The video i posted up in my yerf upgrades thread is the only shot i have of the fenders on atm. it really needs a mount made for it, but ' going to use the golf club racks instead. Not going to make the fronts until i do the new front end.
|
|
#55
11-01-2011, 10:59 AM
|
|||
|
|||
|
thanks, X.
it's the front tires that puke on me the most by far. re: a 7" driven, bmi just nicely told me to suck it....disappointing. i guess i'll try repairing the old driven....it's interesting and sad that the chinese steel of the new 6" unit is FAR stronger then the tinfoil comet made the pulley sheave from. china - 1. usa - 0. how disturbing. we're doomed.
|
|
#56
11-01-2011, 08:07 PM
|
|||
|
|||
|
today i moved the back shocks from surplus center to the front.
they're WAY too stiff based on bouncing it. i had to install them in the inside hole; after some bracket grinding they will fit in the outer holes and hopefully be soft enough to work. i also hung shocks from the quad front end (kawa ksf250) on back of the yerf. also way too stiff and likely well overdamped; i weigh almost 200 and climbed up on the cargo basket and tried to bounce it; it hardly moved. no test drive yet as the motor's out. it looks gnarly cool all jacked the heck up and has almost 11" ground clearance in front and nearly 14" in back. the right hand tie rod is hard into the frame tube and preventing that side from drooping as far as the left. i checked curb weight of the kawasaki relative to the popular yamaha blaster shocks; they're close enough i hoped for a useful shock but tis not to be, even with the progressive springs they have. i even wasted precious spray paint making 'em purty first....  should be 100% awesome for jumping it though! the front shocks aren't broken in yet and the backs have sat for 5 plus years without moving, so perhaps things will loosen up a bit after some seat time. Last edited by speedshopmike; 11-01-2011 at 08:13 PM.
|
|
#57
11-01-2011, 09:06 PM
|
||||
|
||||
|
couple of good bumps and the steering rod will get an "S" bend and will soon bend on every bump you hit in a corner. Mine got so weak I doubled it with another rod up top and moved the shock back to the middle position. If you stick with the stock front end, give some thought to reversing the spindles and setting it up as front steer. would need to lengthen and relocate the steering shaft, but it would cure several ills. any hits would also bend the spindle arm away from the tire and not into it.
|
|
#58
11-01-2011, 09:32 PM
|
|||
|
|||
|
i'm gonna slot the hole on the column flange where the two tie rods meet and move it up much as it'll tolerate for now.
it'll slow down the steering too, which i'd like. tomorrow i'll trim the lower shock mounts so i can change to the outboard holes. over the winter i'll very likely weld on the quad front end. as i was deshocking it today i realized it's not as heavy as i'd remembered. since i found the steering rack and the two nice new tires i bought already there's no reason not to, especially since it's shocks are too stiff for the back. i gotta see if i have a spanner in any of my cycle toolkits that'll fit them; they're 1 click away from full soft now; hoping the last click will help more than i know it will, but it's something at least Last edited by speedshopmike; 11-01-2011 at 09:35 PM.
|
|
#59
11-02-2011, 04:15 PM
|
|||
|
|||
|
ok, some good stuff, some bad.
discovered my dog already has a 9 tooth sprocket, so 1 brand new 9 tooth sprocket for sale! clearanced out the center of the lower shock mounts to allow the SC shocks to go in the outside hole. MAJOR improvement; i can actually bounce it now. it no longer rests at full droop and the tie rod's safely clear of the frame tube. oddly, between the tall back shocks moving weight forward and the stiffer fronts, steering effort at rest has gone up an enormous amount. still no test drive but i think that alone will be a huge improvement. tightened up and added washers to all the rollcage mounts. 90% of the clanks are gone. all that appears to be left making noise, again just bouncing it around the garage, are the swingarm hinges; they're quite loose. for now i'm gonna go ahead and bush them. put my biggest channellocks on the rear shock preload collars to try to go full soft; scraped off a buncha fresh paint for my efforts but unable to change preload. must find spanner. think i'm gonna cut a 2x4 to use as an engine spacer to tension the belt adequately for now. spent 30 minutes looking for a die grinder bit to slot the j'shaft holes, no joy. speaking of, found the jshaft bearings are crunchy and hard to turn; probably eating 1/2 HP just in spinning the shaft. still wanna find a cheap 7" driven pulley since an 8 tooth sprocket wouldn't last long if anyone even makes one.
|
|
#60
11-02-2011, 04:17 PM
|
|||
|
|||
|
XB, the tires i found are 20x8x10.
plopping them next to the kart's stocker fronts they don't seem excessively tall to me; i think they'd be a very nice size...plus, the taller they are the better they'll ride.
|
|
#62
11-02-2011, 05:25 PM
|
|||
|
|||
|
heer iz sum peechers.
you cant really see the tape in the one pic, but that's 14" of rear ground clearance
|
|
#63
11-02-2011, 05:26 PM
|
|||
|
|||
|
previously mentioned tire for comparison
|
|
#64
11-02-2011, 05:31 PM
|
|||
|
|||
|
jetasen, the larger the driven pulley (or sprocket, or gear) the better it is for climbing.
in other words, you'll be turning more rpm at the same speed but have greater mechanical advantage.
|
|
#66
11-02-2011, 05:48 PM
|
|||
|
|||
|
no prob.
i dont think there's an 8" driven for a comet 30 cvt; i've never seen one, anyway. 7" is big as they come. i have a brand new 6 if youre interested; 30 bux plus ship. gives ya more top speed but loses some acceleration. what are you doing to upgrade yours? see x-bird's yerf thread for more info. i also have brand new 9 tooth sprocket; mine already had one. that'd be a big help in climbing. $13 plus the ride in an envelope.
|
|
#68
11-02-2011, 06:14 PM
|
||||
|
||||
|
i just built a dual wishbone suspension on the front and had previously rebuilt the rear but no i just finished streching the rear for more travel,also building a custom gas tank out of an old dewalt air compressor tank.i will post some pics later.
|
|
#71
11-02-2011, 08:02 PM
|
|||
|
|||
|
sweet!
i was thinking about expanded metal; it looks really good. with your big motor and 40 series it should go up damn near anything. that 11hp really takes up some space. you should start your own thread about what you've done. i'd enjoy seeing more on your front suspension. put some real shocks on it; you won't believe the difference. surplus center's are only 11ish dollars/per.
|
|
#73
11-02-2011, 09:28 PM
|
||||
|
||||
|
I've got a 20x7x8 waiting for me to try on my rims--called my bro to see if he had any and literally stopped it from hitting the dumpster by 5 minutes. it's worn out, but i want to keep the front tire on the narrow side. tires and steering rack are going to be the biggest expense. i figure i can speed up a manual car rack by making a shorter arm on the spindle. of course, kick back will increase as will effort. i like things on the sketchy twitchy side anyway.... hmmm wonder if i still have that old (late 70s) rancho steering damper in the basement ... lol
|
|
#74
11-03-2011, 10:39 PM
|
|||
|
|||
|
fenders made.
1 tub gave me both rears and enough for the fronts also. i'd like to congratulate kmart for selling made in usa tubs. they look surprisingly decent considering i freehand cut 'em with a bodysaw with the dullest blade in history. still needs some outer edge final shaping but they sit very tightly in place; i laid several pounds on top and they didnt shift. hopefullu i left enough room for future 22" shoes; i think so. used a heat gun to flatten both outer sides for a surprisingly good fit. i'd like to have done better but they'll work great and look good enough for me. pic later.
|
|
#75
11-04-2011, 09:55 PM
|
|||
|
|||
|
spent a fun 5 hours machining (and handing) slots in the j'shaft plate.
my big air compressor blew up last year. the pets got me a new one for father's day. however, they can't read, and 1.5HP ain't nearly enough to keep up with a whiz wheel or die grinder trying to go through thick steel; air tools were no help but for...... completely ate SEVEN blades in the bodysaw just cutting the two end holes. this was well worth it! my poor dremel did over half of the work slotting the inside ones; it had smoke coming out but kept on spinning. a harbor freight special woulda puked then seized forever under that much side load. that is some brutal caca going through 1/4" steel. but, i saved 30 bucks on a short belt. kathy lee gifford couldn't have found underage asian sweat shop labor to do that for only 6 bucks/hour!
|
|
#77
11-04-2011, 10:14 PM
|
|||
|
|||
|
grrrrr.....it's MIA!
i killed 45 minutes looking for it in between overheating the dremel. i found all my spare discs but no grinder. god loves to laugh at me. it woulda saved me hours of hideous screeching in my ears at 200dB. on the flip side, i have a strange sense of notable accomplishment for getting it done the Amish way. (the dremel was horse-powered; you shoulda seen him run)
|
|
#79
11-05-2011, 05:06 PM
|
|||
|
|||
|
in the current teenage vernacular: OMFG.
i drop my beautifully slotted jackplate into place to find.....the swingarm slots aren't long enough. this was just after getting about 48 million metal splinters in my hands from putting on yesterday's gloves. good news is i realized i had converted an angle grinder into a belt sander long ago and actually found the crap to convert it back and it has been made so. after a beer or five i'm going back out to cut the swingarm. i was going to do the swingarm bushing conversion today but, naturally, can't find my 3/4" drill bit. glug glug 
|
|
#81
11-06-2011, 09:56 PM
|
|||
|
|||
|
bleh, i had my panties all wadded up but they're extracted now.
i wish all the friggin' splinters were too. slotted the swingarm in about 5 minutes with the angle grinder. stuffed the motor. i'm 1/16" shy of the minimum belt tolerance. that's close enough for gov't work but gonna yank the mill and open the slots a few ch's more so i can add tension if it stretches through it's life. anyone know how far off level a clone can sit and have the carb stay happy? my swingarm's gone well off the horizon since the stiff 14's went in. not being too happy thinking about oil drainback, either.... gonna have to make a wedge but spot-facing the block's gonna be a pain in the ass so will make angled spacers for the nuts underneath. test drive tomorrow; still a few things left to do. here's some pics of the fenders, jet. red zips will replace black ones someday. the fronts are just what was left of the tub stuffed into place to see where to cut; haven't touched them yet though. Last edited by speedshopmike; 11-06-2011 at 10:00 PM.
|
|
#82
11-07-2011, 04:35 PM
|
|||
|
|||
|
ok, fully assembled and driven.
tach arrived today from china. it actually works; not bad for 12 bucks shipped. it's got a bit of response lag but who cares. idling around 1450. wound out to 3800 downhill; wont go higher even tho gov screw is all the way out. engine feels sluggish compared to before....wonder if the jetting's not off due to the swingarm angle/carb fuel level. atv shocks installed in rear definitely about 300% too stiff. SC shocks up front in outside hole actually worked pretty well; could be softer but some break in will probly help. they're very smooth though, and i'll keep them there until the atv front end goes on. fenders worked great; was sliding the cart sideways all over the grass and their underside is covered in deercrap and slime but i'm dry as a bone in the desert. they stayed put perfectly despite some pretty crazy bouncing around. the wicked stiff rears have definitely brought on some serious oversteer and/or the front working so much better than before now bites well. whatever did it i like being sideways. it had a very very low left front tire; after airing it up 90% of the left pull went away. i was mistaken about having conquered the clanks. it's almost noisy as ever; the backs are so stiff i think most of the rear articulation is in the hinges, lol. haven't bushed the steer column yet and the seat hardware could probly use some torquing. CLANK CLANK CLANK i found an 8 tooth sprocket from GTC; they're a massive ripoff but i'm gonna give it a shot if i can't find another vendor. it also looks like a serious piece of crap in the picture on their site....or cave and spend money on a 7" driven. the jackshaft very very quickly got too hot to touch; it's only a matter of time before a bearing seizes. i really hope it gets notably perkier after they're replaced from reduced drag. i plan to use two sets of bearings side by side if they're cheap enough. took it up the street to where someone knocked down enough barrier to get onto power company land via a nearly vertical 7 or so foot climb. i was stunned to find boris cruised right up it, front wheels in the air; i was positive i was going over backwards. coming back down the same bit was drama free once i worked up the nerve to take the dive; front shocks beautifully cushioned the hit and i barely felt it. i drove right through our herd of yard deer at low speed/quietly; they weren't scared but gave me weird looks. when i came back through at top speed clanking like there's no tomorrow they scattered lickety split. turns out the cart's as fast as an adult deer running in full "oh sh!t!" mode. Last edited by speedshopmike; 11-07-2011 at 04:38 PM.
|
|
#83
11-08-2011, 01:35 PM
|
||||
|
||||
|
sorry to hear about the noise but i like those fenders. i just happen to have a 55 gal (plastic) drum i will do the same with. its been raining for three days now it make it hard to gt ant thing done. i did however get the dog assembled the steering is kinda hard when it is not moving, i would like to put on a spiderbox rack and pinion. still need to make a bracket for my sediment/fuel cut off.
|
|
#84
11-08-2011, 01:40 PM
|
||||
|
||||
|
|
|
#87
11-08-2011, 06:38 PM
|
|||
|
|||
|
thanks, jet - i found that same sprocket just the other day.
i got the 40 series belt i needed for my neighbor's cart off ebay; only one seller had it listed for the size needed; it was $32 shipped. the tachs are all over ebay; an example: http://www.ebay.com/itm/Hour-meter-t...52735351531225 easiest install of anything in history. step one: - wrap wire around spark plug wire. step two: read tach
|
|
#88
11-08-2011, 07:38 PM
|
|||
|
|||
|
found a set of jshaft bearings on ebay cheap; a post on DIY Karts provided the dimensional info (5/8 x 1-3/8 with a snapring).
gonna order two more SC shocks for the back. even with 2 people in the kart today the 'saki shocks are too stiff, though they behaved nicer then solo. don't wanna chance spending dough on blaster shocks to find they're too stiff also. losing the extra ground clearance isn't cool but ya can't have it all; can always move the mounts to get it back, and the SC's ride like a dream. for sale: one pair 'saki shocks, painted epoxy black.
|
|
#89
11-14-2011, 09:04 PM
|
|||
|
|||
|
welp, i assumed seein's how the bearing shop's called USA Bearings they woulda been 'murican, but they be hecho en china.
ce la vie; better than what's crunching around in there now. new sprocket came from msg, along w/ some snazzy blue fuel line so's i can move the tank up to the rack (and replumb the suzie dirt bike) i hope clones use 1/4"; anyone know if i chose wisely? ran the gearing numbers the other night. going to the 6" from 7" driven took initial overall ratio from 21:1 down to 18:1, a significant reduction and why it feels doggy (ok, pun intended, deal with it). 8 tooth will get me back to 20:1; should restore adequate yankage to the little guy. tomorrow is jackshaft fun day. gotta cut the hub off the sprocket prior to install with the angle grinder; that aint gonna be fun because the cog is TINY. i can't get the left wheel off so's to have room to beat the shaft outta the housing so gotta pull the motor again...i'm giving those crappy nylock nuts a real workout.
|
|
#90
11-14-2011, 10:46 PM
|
||||
|
||||
|
Quote:
|
|
#91
11-15-2011, 02:55 PM
|
|||
|
|||
|
so far so good, i'm almost scared to say.
with the aid of my trusty and favorite tool, the BFH, i beat the jackshaft out with the wheel still stuck in place. passenger side bearing was fine. the other one was TRASHED. the balls had seized, worn flat on both support sides, and the race tore up the jackshaft. i cleaned it up just a bit and it's in the freezer to aid the new bearing install. thinking real hard about ordering one more bearing to put on the drive side to halve their respective load. will have to shorten the internal j'shaft spacer to accommodate that. follow up to an earlier statement i made: jim, my control arms do indeed have a little dimple where they've bottomed at some point; it's small but present. sorry for the bad reporting. my next job is w/ the National Enquirer. jet, i passed along your axle link to a grateful friend whose son's street kart hopelessly understeers; thank you.
|
|
#93
11-15-2011, 04:54 PM
|
|||
|
|||
|
40-50 grit might be better for the grooves its got!
|
|
#94
11-15-2011, 07:21 PM
|
||||
|
||||
|
Quote:
|
|
#95
11-17-2011, 04:02 PM
|
|||
|
|||
|
got it back together.
should have bought the sprocket with a hub on each side. problem is the new sprocket's so small i cant find any washers with a small enough OD to use to space the driven pulley off the sprocket. did cut the one hub's excess off semi-cleanly freehand w/ the grinder. gonna have to find a piece of 5/8 pipe to cut as a spacer. chain was loose after reassembly since the 8 tooth is smaller. i was sick of turning wrenches so decided, very intelligently, to have a test drive. it tossed the chain off before i made it 1 lap of the yard. i found it in the grass, at least; if it had a master link before it doesn't any more. new SC shocks came; i hung those on back. ride is now very nice aside from the omnipresent clanking w/ sc's on all four. lost 2.75" ground clearance in back though but worth it for the Buick ride quality. sadly, in the 1 minute or so i drove it, it didn't seem to pull much harder or climb much better then before the sprocket & bearing change, and now the motor's adequately level w/o the long shocks installed, too, taking carb float level out of the mystery. wtf?? this is becoming less fun than previously indicated. i'll hit my pal's cycle shop tomorrow for a new link and r&r the driven/sprocket to see what i can do to help that, and add chain tension. or, pull everything and bush the swingarm; it's unbearable. on the plus side, it's pretty chilly today and the motor fired on the 1st pull after not being run in some time, and idled happily w/o the choke on. anyone else w/ a HF clone notice w/ the choke on fully it *barely* runs & sits there shaking and banging? Last edited by speedshopmike; 11-17-2011 at 07:59 PM.
|
|
#96
11-17-2011, 07:23 PM
|
||||
|
||||
|
My brother has one of these, and he had one of the Harborfreight Predators installed, he had a 7" driven and had an Asymmetrical belt installed... Too bad the driver and the driven were from different series... a 30 series driver (asymmetrical) and a 20 series symmetrical driven. After a couple days of riding the belt was in peaces! but while it was working he had great power and good speed, I think he had a 13T sprocket installed, I'm not sure.
Now he has a 6" driven on it and with the 13T sprocket it was lacking power, also he swapped out the motors to the stock 6.5hp Tecumseh and it just was not running right and producing the power he wanted so he's gonna go back to the Predator (He took it back to HF after using it, he just wanted to test it out over the Tecumseh). He also got a new jack-shaft/motor mount and it came with a smaller sprocket, I think 9t so he is gonna run that instead of the 13t for more power for trails.
|
|
#97
11-18-2011, 04:39 PM
|
|||
|
|||
|
since i needed a master link anyway, courtesy of jim's helpful info i ordered up some bronze bushings for the stock arms to quiet them down; will use 1/2" hardware instead of stock.
if they work well i'll extend and reinforce the stocker arms for now with relocated shock mounts.
|
|
#100
11-22-2011, 09:41 PM
|
||||
|
||||
|
For torque- Smaller on the drive end and bigger on the axle- so from the engine small, then same or smaller on jackshaft engine side,same or smaller on the output/axle side to large axle sprocket. So the 10 tooth makes more torque.
|
 |
|
|