|
|
|
|||||||
| Mini Buggy General Discussion General Discussion forum for Mini Buggies. (American Sportworks, HammerHead, Carter, etc) |

 |
|
|
Thread Tools |
|
#1
 06-06-2012, 07:40 AM
|
|||
|
|||
|
Last weekend I put fresh gas in my Lincoln welder. After 5 years it fired right up and run well. I have been gathering materials for a buggy build but yesterday I seen a craigslist listing for a gocart frame with suspension and went to check it out. It was a surprisingly well built single seat frame with roll cage. Not having to build the frame definitely saves me time and money. I don't know what make it is. When I find the charger for my camera, I'll take some pics and see if any of you guys can ID it. I got a 8hp Briggs in good shape I might put on it unless I run across a cycle/ATV engine. It even came with 8 wheels and tires for 70 bucks. It needs a seat, tie rod ends, and engine/drive train. I'll be out of town this weekend but I'll start working on it asap.

|
|
#2
06-06-2012, 01:13 PM
|
||||
|
||||
|
Can't wait to see it! It's so much easier to build off something already designed. Glad your welder runs!! probably the most valueable tool I own (my pencil is the most important one!) I love having spare parts, that a few tires/wheels.
|
|
#3
06-11-2012, 11:46 AM
|
|||
|
|||
|
I pulled the carb off the 8hp Briggs and cleaned out the hardened varnish and made a new bowl gasket and its running good. Just have to find a new plastic tank...its leaking from small cracks at the outlet. It came off a chipper and has a 3/4 shaft so I might canniblize the Carter for the torque converter. Those things are expensive. The axle has been beat with a hammer by the previous owner trying to get the wheel off and is mushroomed badly. I believe I can still salvage it by torching off the wheel and grinding the end back to round. There is still enough threaded end to work. I'll make a trip to Northern Tool and get an axle bearing set and flanges along with a brake drum and sprocket with hub. I think I will get the 54 tooth and see how it does. I will also need to put a jackshaft on it. The Carter has a 60 tooth sprocket and it has plenty of torque and OK top end with the 212cc Predator. I think an 8hp (319cc) with 54 tooth should give me enough torque and better top end.
|
|
#4
06-13-2012, 08:49 PM
|
|||
|
|||
|
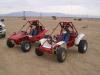
Here are a couple of pics to see if anyone can ID it. It may have started as something else but if so, the welds and bends are really nice.
|
|
#5
06-13-2012, 09:55 PM
|
||||
|
||||
|
That's a home built!!! Looks promising!!!
|
|
#8
06-15-2012, 08:11 PM
|
|||
|
|||
|
I took the axle with the rim still on it to work and put it in a press. Even with 15 tons of pressure and heating it would not budge. It just bent the shaft end. We have a milling machine and lathe so I'm going to pick-up a 36" shaft and turn it to fit the hubs I have. (ATV hubs) I have several sets of ATV tires & rims I've collected over the years. I put 18" tall tires up against it and they looked too small for it. 22" looked like the right size. I will have to go with at least a 60 tooth sprocket with those tall tires. I will have to see what front tires and hubs will work best.
|
|
#9
06-16-2012, 06:07 AM
|
||||
|
||||
|
With the bearing hangers that thing has in the rear, standard go-kart bearings, and reatiners, along with a 1" kart axle will all bolt up. I don't know if this site has a vendor for ole skool kart stuff, but American Powersports is a good vendor for Azusa axles, bearings, retainers, and hardware such as that...
The azusa "flex proof" axle is at the top of it's class for an installation like that. There are cheaper axleas, but I've never had any last through the abuse a flex proof will...
__________________
kliff
|
|
#10
06-16-2012, 06:34 AM
|
|||
|
|||
|
If your going into machine mode, why not do an irs set up? You could pick up a polaris 400 for under a 1000. Use engine, trans, front chain drive diff and front axles. If you can figure how to solid mount the struts and weld the hubs you would have basicly the whole drive line from the key to the wheel. Then sale off the rest and get 500 bucks back
|
|
#11
06-18-2012, 08:12 AM
|
|||
|
|||
|
IRS would be nice. I found BMI Karts to have good prices but I've never dealt with them. I can get some stuff at Northern Tool and Tractor Supply. I will probably go with 4 on 4 hubs because one of my 9" ATV rims rusted out around the bead. 10" 4 on 4 rims are easy to get and BMI has tire & rim combos for a reasonable price...not sure about the shipping though. I will pic up a 3/4 by 8" jack shaft with pillow blocks this afternoon. I laid everything out yesterday and took some measurements. I robbed the torque converter off the Carter Kart to see how everything would fit. I measured 8 1/4" from engine shaft to jackshaft(centers).
|
|
#12
06-18-2012, 08:32 PM
|
|||
|
|||
|
I got the pillow blocks and aligned them where they should go and there were already bolt holes in the plate. A previous owner had the same setup. There are so many holes and slots (sloppy ones) its unbelievable. I thought about replacing it but it is still sturdy...just looks bad. I will have to get the jackshaft tomorrow or sometime this week. Also need a 10 tooth #40 sprocket. Those pillow blocks aren't cheap and the bearings are sold separately, but the Tractor Supply is just up the road so I probably broke-even on the gas savings. I also rummaged through my barn and found some rods to thread the ends for tie-rods. They were unused push-mower axles so they should hold up pretty well. Also got some steel rods from flower stands for the throttle and brake linkages. I'll run straight rods to the pivot point in frame and attach short cables with springs...basically duplicating the Carter setup. I also ran across a golf cart hub with 3/4 shaft but darn if I could find the others I know I have. I'll find them right after I buy new hubs.
|
|
#13
06-25-2012, 09:54 AM
|
|||
|
|||
|
I cut the wheel off the axle and now I'm getting the atv hubs turned down and keyed to fit the ends. This way I can use the several sets of 110mm rims/tires I have. I picked up the bearings and mounted the engine and jackshaft. I will the use the Predator 212cc at first since it has a gas tank (that don't leak). I have been doing several calculations with both 18" and 22" tires and will try them out with the 12t and 48t sprockets I already have. I suspect I will need to get a 10t to get the ratio to 4.8 instead of 4. I gestemated 3130RPM at the jackshaft from the Comet converter at top speed and 56.52 inches of travel per tire rotation. 1056 inches per minute equals 1mph, divided by 56.52 equals 18.68. Then I took the 3130 rpm and divided by 4 equals 782.5 then divided by 18.68 and got 41.88 MPH at top speed not including the loss from friction and drag. A 10t sprocket will give me 34.91 mph which is probably what I'll go with so I have more climbing power and should be able to use the 22" tires. That is if I did my 'figuring' right.
|
|
#14
06-25-2012, 12:36 PM
|
|||
|
|||
|
Well it looks like I did make an error. The torque converter it 1.15:1 so speed at jackshaft is 4140 rpm. I figured the ratio backward. I definitely need larger gear on axle. I will wait and see just how it does with what I got but I doubt it will have much take-off power. I purchased 10' of chain and an extra m-link and half-link just for this reason.
|
|
#15
06-26-2012, 06:37 AM
|
|||
|
|||
|
Well it looks like my first ratio figures were correct. Hi speed is 1.15 (engine) to 1 (driven) and low speed is 2.68 (engine) to 1 (driven). I'm back to 3130 rpm at jackshaft with engine at 3600 rpm.
|
|
#16
07-06-2012, 10:40 AM
|
|||
|
|||
|
My project is slowly coming along. I got the rear ATV hubs turned and keyed for the 1" axle. A work buddy had a seat that worked out nice. The 212cc Predator pushes it pretty well with the 12t - 48t setup. The 22" tires were a bit too much so I have the 18" tires on it. I need to finish the throttle setup and put some brakes on it. Also need to make some new front spindles that aren't angled so the front tires sit level. The rear wheels and front hubs from the Carter kart seem to work and look nice on it. I will go ahead and find a cylinder gas tank and put the 8hp Briggs on it as well as a new mounting plate for engine and jackshaft. Here are some pics I took yesterday. When I get it set up the way I like it I will start with the cosmetics.
|
|
#18
07-06-2012, 09:28 PM
|
|||
|
|||
|
I'm really surprised how well it rides. It feels like riding the Odyssey I had years ago but it doesn't have the take-off power that the 2-stroke had. I rode it earlier today and the right front tire starting coming off. Outside bearing went out and the rim/hub came off leaving the inner bearing on the spindle. A quick trip to Tractor Supply and 7 dollars later it's back in action. I replaced the rear-end pivot bolts and that took care of alot of play which made the thing a real rattle-trap. Now it rides real quiet over bumps. Who-ever built it used all-thread for bolts. I put some good grade bolts in it and tightened the PI$$ out of them. It still pivots freely and is now quiet. Someone put two shocks on the front (each side) for some reason. Maybe it looked cool. The front seems to work OK as is, but I will try it with one shock one each side and see how it rides. It doesn't quite have the power to do donuts and has a high center of gravity. I will definitely have to do something about that. If you cain't cut a donut with it, it just ain't worth having....hahaha. Later all.
|
|
#19
07-06-2012, 10:04 PM
|
||||
|
||||
|
Your shocks being almost vertical and so far in-board should make for a cushy ride. I don't see much caster on the spindle or A-arm for making a turn really dig in. Does it scrub even with the aggressive tires? Too bad it doesn't do donuts!!! Those tires in the rear should break loose pretty easily.
After seeing your pic's - the floor pan looks like an older Manco with a custom roll cage and rear swingarm added. I like the style. The front hubs are heavy duty!! Glad you're getting some ride time in it.
|
|
#20
07-11-2012, 03:20 AM
|
||||
|
||||
|
Wow...looks good put together. Kinda simple and close to what I'd like to do. Question....do you think you will add a rack to the steering? Or leave it they way it is? What size are or height of those shocks? I wasn't sure if you listed it.
Get some video and post it up when you get a chance, would like to see it in action. Again thanks for sharing. GDA
|
|
#21
07-12-2012, 09:37 AM
|
|||
|
|||
|
I'm going to leave the steering like it is. It turns easily. The shocks measure 12". The spindles are from a Carter kart and are angled downward. I took the original spindles and welded a 5/8 bolt (had 3/4) to match the 5/8 hubs. I welded it straight (not angled) and the front tires with the single A-Arm design were horribly angled. Thats why the previous owner/builder had 2 sets of shocks on front. I will have to cut off the spindle bolts and weld them at the same angle as the Carter spindles or cut off the spindle bracket and angle it downward. I highly recommend going with double A-Arm design to keep the front tires level. When accelerating the tires ride on the outside and when slowing down they ride on the inside. They are level when cruising. I'm going to leave it as is for now because adding an upper A-Arm will require some frame modification. It is a blast to ride. I will take a video and post it when I get a chance. With the current gearing it don't climb too well but it really flys. I will take my Garmin with me and see how fast. I estimate about 40mph but its hard to judge so close to the ground. If you like, I can take some measurements. There are a few things I would change if I were building it.
|
|
#22
07-13-2012, 01:28 PM
|
|||
|
|||
|
Today I cut off the spindle axle bolts and rewelded new ones at a 75 degree angle (downwards) to match the Carter spindles. I will give them a try tonight and see if the tires are level with me on it. I will probably make new shock mount brackets that have more mounting holes at different heights to give more flexibility.
|
|
#23
07-13-2012, 01:50 PM
|
|||
|
|||
|
Some thoughts on design. First and formost it should have been designed with double A-Arms in the front. The side vertical bars are too far back making getting in and out a hassle. They need to be further forward. I like the steering wheel support which comes down from the top instead of up from the floor. It makes installation of a dashboard easy and gives you more leg room. The rear swing-arm/engine mount needs to be about 6 inches longer to give more room for torque converter and jackshaft mounting. Also the rear part of the rollcage should be made to allow more room for taller, wider engines so it doesn't hit. The 8hp I plan to put on it will be close. Anything bigger won't work without modifying. But considering I don't have much money invested in it I'm happy.
|
|
#26
07-16-2012, 10:14 AM
|
|||
|
|||
|
I put the spindles with angled stub-axles on and they sit level enough to ride. If I adjust the toe-in to 1/8 inch the tires ride on outside on pavement and no toe-in they ride level on pavement. Single A-Arm just won't cut it. When time allows, I will remove the 2 bars that are in the way and put dual A-Arms on it. I have A-Arms, hubs, and aluminum wheels off a Yamaha Blaster. I will use the hubs and make a upper arm thats as long as the Kart's lower arm and find some ball joints that work. I currently have too many irons in the fire but will eventually get to it. For the time being it is usable.
|
|
#27
07-16-2012, 03:21 PM
|
||||
|
||||
|
The tires should lean at the top 3 deg,so it will turn good.How much rake does it have on the front end?Having rake, and caster on the spindles will make the wheels change camber as they turn from left to right,like a motorcycle in a turn and thats what you want it to do.BUT if all this is not right then its no good. If you dont have a lot of travel a single aarm can be a good set up.The single aarm i just built turned out good,(have you looked at QUICK BUILD)and i went over how to set it up right. good luck with how ever you set it up.
__________________
http://www.youtube.com/watch?v=IUgir...ature=g-t=2668 FABRICATION ITS HARDER THAN YOU THINK
|
|
#28
07-16-2012, 03:23 PM
|
||||
|
||||
|
Here is a link to my build.
http://buggymasters.com/forum/showthread.php?t=3181
__________________
http://www.youtube.com/watch?v=IUgir...ature=g-t=2668 FABRICATION ITS HARDER THAN YOU THINK
|
|
#29
07-16-2012, 09:00 PM
|
|||
|
|||
|
Thanks for the link. Thats an interesting build. My spindles lean back (top toward rear) about 10 degrees. The tires lean all over the place depending on acceleration and deceleration. With a little toe-in on the pavement (does fine in dirt) the tires lean top in. I turned the shock ring adjustors (all 4 front shocks) to the stiffest setting and it made a lot of difference (limiting travel). Its usable but I dread putting a new set of rubber on it and watching them wear out as fast as I expect they will.
Last edited by FloridaCracker; 07-16-2012 at 09:04 PM.
|
|
#30
07-16-2012, 10:41 PM
|
||||
|
||||
|
So the toe changes when the tires go up and down.That is because of the steering pivots for the ti rods are not in line with the aarm mounts.This will be the same with duel aarms,you will need to get a steering rack to fix that.For the way its set up it will have to be a center load rack.
__________________
http://www.youtube.com/watch?v=IUgir...ature=g-t=2668 FABRICATION ITS HARDER THAN YOU THINK
|
|
#31
07-16-2012, 10:48 PM
|
||||
|
||||
|
If you get a rack thats to long it will do the same thing.The mounts were the ti rods are have to be in line with the aarm,unless the steer tabs on the spindles are not in line with the spindle.So say if the tabs are in closer to the frame by 3'' then the ti rod mount on the rack should be inside the aarm mount by 3'' and the other way around if the tabs are closer to the wheel.Also if the tabs are in line with the spindle than the ti rod should be in line with the aarm mount.
Welcome to bump steer!
__________________
http://www.youtube.com/watch?v=IUgir...ature=g-t=2668 FABRICATION ITS HARDER THAN YOU THINK
|
|
#32
07-17-2012, 07:43 AM
|
|||
|
|||
|
Actually the toe-in doesn't change much. Its the camber that changes drastically. With toe-in the tires pull to the center and raises the kart and the tires ride on the outside edge. With toe-out the tires pull away from kart and causes the kart to lower and the tires ride on the inside edge. The stiffer the suspension, the less this happens.
|
|
#33
07-17-2012, 08:18 AM
|
||||
|
||||
|
I guess I should have went to bed instead of posting lats night.lol
__________________
http://www.youtube.com/watch?v=IUgir...ature=g-t=2668 FABRICATION ITS HARDER THAN YOU THINK
|
|
#34
07-17-2012, 10:26 AM
|
|||
|
|||
|
No...don't say that. Your suggestions got me thinking...and thats trouble (according to my wife). In order to keep my cushy suspension I will go with double A-Arms. I will use the Blaster hubs with 10" aluminum rims and build my own spindles. The Blaster spindles are offset and I will go with something with standard off-the-shelf parts (ball-joints). I will make the upper and lower A-Arms equal length. Last night I figured what frame modifications I need to make. I think I will go with a rack-n-pinion setup. I have other things to do with the frame anyway. A proper seat mount (adjustment rails), throttle cable mount, Brake caliper mount, new engine mounting plate, a dashboard,...etc. It will be a constant work-in-progress.
|
|
#35
07-17-2012, 11:37 AM
|
||||
|
||||
|
I know a lot of people on this site like equel aarms but before you build them like that look at a few links first.If you do it that way it wont turn as well as it can because the tires will lean to the outside and this will make it push more than bite.Find one pic of an aarm baja buggy with equal aarms,you cant because no one builds them like that.Not bashing any ones buggy just trying to help,Im rebuilding unequel aarms now to get even more camber change to get more bite.
http://www.yellowdogracing.com/setup.htm http://www.racingaspirations.com/?p=286
__________________
http://www.youtube.com/watch?v=IUgir...ature=g-t=2668 FABRICATION ITS HARDER THAN YOU THINK
|
|
#36
07-17-2012, 12:04 PM
|
|||
|
|||
|
Thanks for the links. They definitely shed some light on steering geometry. Info like this is why I joined BuggyMasters.

|
|
#37
07-17-2012, 02:12 PM
|
||||
|
||||
|
Roysheepdog- The even & un-even A-arm set-ups are based off TRAVEL. With these mini-buggies most will never have over 8" of travel-- this makes an even A-arm set-up the best/easiest choice for steering geometry in IMO. When you go beyond 8" of travel everything changes drastically (in my experience of dirt track racing and dune buggy builds) and every little adjustment has to be calculated carefully for driveablity. Weight has another major factor on how all this re-acts too. We don't have tons of pre-load (droop as you call it) because of the lack of wieght on the front-ends. Our SHORT narrow chassis makes for another big difference than the sand rails/dune buggies design when it comes to body roll too.
The example I'd give to someone wanting to understand the difference between most of our mini-buggies frontend designs vs. long travel designs would be: "indy cars" they're what I think are much closer to what we need (4"-8" travel) & extremely tuneable for a novice.
|
|
#38
07-17-2012, 02:27 PM
|
||||
|
||||
|
The same still goes for short travel,if you want it to handle the best it need some camber.You talked about indy cars,do you think thay have big scrub like you have in your front end?Or do you think the king pin points to the ground beside the tire?What about equal aarms?
Right is right and it can be done how ever the builder wants to build it,I dont have to drive it.It does take a little more effort to do things right but thats why their is so much info on the net. Im on 5 other buggy sites and this is the only one thats tells people to build them this way.
__________________
http://www.youtube.com/watch?v=IUgir...ature=g-t=2668 FABRICATION ITS HARDER THAN YOU THINK
|
|
#39
07-17-2012, 02:58 PM
|
||||
|
||||
|
Roysheepdog- Since I don't read other forums I wouldn't know what's being suggested!!! I don't have "any" scrub issues with even A-arms & 10" of travel. I feel I did build mine right/correctly for the buggy. I don't think anyone here has "told" someone what to build- we've only provided opinions on what can & will work based off personal experience. I'm fairly new to the go kart/mini-buggy world- but not to the racing world. I would encourage any and all information available for individuals to evaluate for the best possible solution that meets their skills, tooling & financial capabilities.
|
|
#40
07-17-2012, 04:32 PM
|
|||
|
|||
|
Thanks.
Last edited by FloridaCracker; 07-17-2012 at 07:02 PM.
|
|
#41
07-17-2012, 07:59 PM
|
||||
|
||||
|
Quote:
wikipedia: The scrub radius is the distance in front view between the king pin axis and the center of the contact patch of the wheel, where both would theoretically touch the road. The kingpin axis is the line between the upper and lower ball joints of the hub. On a MacPherson strut, the top pivot point is the strut bearing, and the bottom point is the lower ball joint. The inclination of the steering axis is measured as the angle between the steering axis and the centerline of the wheel. This means that if the camber angle is adjustable within the pivot points the scrub radius can be changed, this alters the width and offset of the tires on a vehicle. If the kingpin axis intersection point is outboard of the center of the contact patch it is negative, if inside the contact patch it is positive. The term scrub radius derives from the fact that either in the positive or negative mode, the tire does not turn on its centerline (it scrubs the road in a turn) and due to the increased friction, more effort is needed to turn the wheel[citation need
__________________
http://www.youtube.com/watch?v=IUgir...ature=g-t=2668 FABRICATION ITS HARDER THAN YOU THINK
|
|
#42
07-17-2012, 08:09 PM
|
||||
|
||||
|
Quote:
Your race experience you keep talking about are you saying your car had equal aarms?If it did you never had a good finish. I say if some wants to read the link for yellow dog and still thinks equal is the way to go then let them go build it.Maby you should go and read it.
__________________
http://www.youtube.com/watch?v=IUgir...ature=g-t=2668 FABRICATION ITS HARDER THAN YOU THINK
|
|
|
|


 [SIGPIC] Take What You Have and Build What You Need