|
|
|
|||||||
| Mini Buggy General Discussion General Discussion forum for Mini Buggies. (American Sportworks, HammerHead, Carter, etc) |

 |
|
|
Thread Tools |
|
#1
 05-31-2010, 09:03 PM
|
||||
|
||||
|
More carnage today, looks like I will be doing ckau's Heim Joint mod sooner than I thought.
 Who ever thought an 11 year old girl could be so hard on things. Who ever thought an 11 year old girl could be so hard on things.   
Last edited by Rarerat; 02-16-2011 at 07:33 AM. Reason: fix pictures 
|
|
#2
05-31-2010, 09:14 PM
|
||||
|
||||
|
I just ordered 4 of these to do the upgrade.
http://cgi.ebay.com/ebaymotors/ws/eB...=STRK:MEWAX:IT I will let you all know how they work out once I receive them.
|
|
#3
05-31-2010, 10:23 PM
|
||||
|
||||
|
i was impressed with ckau's setup
__________________
olderthan 2008 tomberline punisher 1500 spring 12g sliders 30mm cv pumper carb uni filter no rev cdi polaris xlt snowmobile shocks for front w/550 magnum springs & blaster fronts on rear and another buggy built working on mods gk-13 white spring 17 gram sliders so far
|
|
#4
06-01-2010, 05:14 PM
|
||||
|
||||
|
I guess that is a product of the new wheel setup that caused that?
|
|
#5
06-01-2010, 05:58 PM
|
||||
|
||||
|
most yerfdogs seem to break that way
no matter the tire size i have gone to tractor suppliers and got washers big enough to repair temp but ckau's repair looks like the best i have ever seen i am going to get my friend with a yerf to order the heilm ends that you did for next time
__________________
olderthan 2008 tomberline punisher 1500 spring 12g sliders 30mm cv pumper carb uni filter no rev cdi polaris xlt snowmobile shocks for front w/550 magnum springs & blaster fronts on rear and another buggy built working on mods gk-13 white spring 17 gram sliders so far
|
|
#6
06-01-2010, 07:21 PM
|
||||
|
||||
|
Quote:
 It wont be long and it will be time to upgrade her to something bigger. Or better yet.... time to pass the 350 down to her and upgrade myself to a Pilot. It wont be long and it will be time to upgrade her to something bigger. Or better yet.... time to pass the 350 down to her and upgrade myself to a Pilot. Quote:

|
|
#7
06-02-2010, 08:40 PM
|
||||
|
||||
|
I don't know if the 3/8 heims will be strong enough. I used a 1/2-20 x1/2 with a 1&1/2 " long shaft. I did not want the shafts to flex or break. Order bungs too. I made my own but if i were to do it again, for the price and time savings, I would buy bungs.
Getting the heims positioned correctly is crucial to a good handling buggy. To get full advantage of the heims , there is some geometry involved. First install the shocks and wheel/tires that you plan to use, front and back. Measure the distance off the floor the buggy sets. front and back. Raise the buggy so the wheels are clear and hang free. level the buggy so it sits at the same angle off the floor as it would normally sit. Level the front of the buggy with a 4' level side to side. The lower frame rail will be a Level straight line to take future measurements from. The a-arms hang down at some degree off this line. In my case it was a 15 degrees down angle. After the a-arms have been stripped of all the old mounting tabs they will get bored for the bungs. the idea is to position the bungs so the heims are approx 1 degree tilted down from level. I used a drill press with a tilting table to bore the 3/4 bung holes.I tilted the table at 14 degrees. The bottom a-arm gets bored directly center. the bottom heim should point directly parallel with the frame rail. the upper a-arm bore gets moved back towards the frame. After the lower bungs and heims are in place, install your spindle on the lower a-arm. Tilt the spindle back 3 degrees at the top from center of upper a-arm. This gives the position of the upper bung. tilting the spindle back will give "Castor. This helps the buggy track straight. Like the wheels on a shopping cart, as it moves forwards the wheels automatically straighten. The axles will not turn on a radius parallel to the frame but rather in a downwards arch as they are turned in. In example: Turning the wheels right, causes the right front wheel to angle down/in slightly while the left wheel will angle up/out and vise versa. as though the tires are leaning into a turn. Getting the castor correct will make the buggy steer easier, makes a sharper turn reduces front "push and better traction. tack weld everything in place and try it. check that both spindle have the same castor. the axles are parallel with the frame rail with the rack & pinion centered and there is no binding during suspension travel. Get the math right, it will work unless you have a bent or mis aligned a-arm. only thing left is set alignment and camber. I set alignment with a laser light. this gives me a straight line off the rear wheel. you can draw lines on the floor or use some other form of straight edge to get same results. the laser light just makes it real simple and accurate. With the R&P centered, I measure off the beam to get one front wheel parallel with the rear wheel with a 1/16 th toe outadjusting with steering arm length. I then move to the other side adjust the wheel to give a 1/16 toe out. for a total of 1/8th toe, measuring front and back of the wheels Setting camber is a personal preference . for trail riding, 3 degrees in on the top is a good set up for me. hope this helps and is not confusing. PM me if you got question. Good luck and have fun.
|
|
#8
06-02-2010, 09:27 PM
|
||||
|
||||
|
Quote:
Great info, thank you.
|
|
#9
06-03-2010, 12:07 PM
|
||||
|
||||
|
Got to love feebay at times...
http://cgi.ebay.com/ebaymotors/ws/eB...K%3AMEWNX%3AIT For 13 bucks shipped I thought I might try & move some mounts around & stick them on the front of her Yerf Dog while I'm at it. I figure worst case, they wont work and I'll have a spare set for my FL350
|
|
#10
06-03-2010, 02:22 PM
|
||||
|
||||
|
For informations sake I've posted some clearer pics of my wife's Yerfdog and the mod's I did some 3 years ago.Excuse how ragged this thing looks!!!it's driven at least 4 times a week and she LOVES the mud. I had some doubts about the total travel a hiem would have in-leu of a ball joint and was amazed that they were almost the same laterally. If I'd known this then I'd have made the change over that CKAU did.I would add a dome washer under the hiem just for some clearance where it hits the spindle. If you still have ball joints (aftermarket type) cutting the original mount off and welding a trianglar piece of 5/16" flat stock and drilling the a hole eliminates the breakage Rarerat incurred. When doing these mod's NOW is the time to change the ride height of your frontend as Ckau says. I can't remember the stock height but her's is at 13" now, which matches the rear and stabilizes the kart and removes the tendency for scrubbing when in a turn. Ckau has the directions right on- 3 degrees is exactly the castor I use and has seemed to work in all driving conditions. Her kart would bicycle in a heartbeat before I changed the frontend. I'm still using 18" tires as that's all I could get to clear after adding 2 more grooves (each side) in the rack for better turning radius. I lowered the rack unit to shorten the tie-rods and give the arms better travel thru the suspension.Excellent work Ckau
|
|
#11
06-03-2010, 07:33 PM
|
||||
|
||||
|
Quote:
|
|
#12
06-04-2010, 10:19 PM
|
||||
|
||||
|
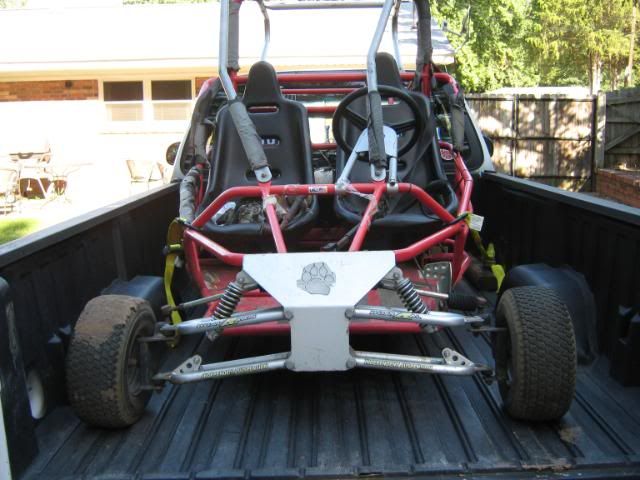
Here is a little update on the upgrade....
The Heims came in today so I started on the conversion. The new shocks are not here yet so I tried to anticipate, the difference in angle from the longer shocks when I set up the heims. Hopefully I am close.  I forgot to order bungs so I ended up driving all over town trying to find some tubing to make my own, and still came up empty.  I finally found some couplers at a hardware store that I was able to make work. I finally found some couplers at a hardware store that I was able to make work.    and here is a better pic with the wheels turned for a better view.  I still need to do the driver side, but it is amazing the difference in how tight this side feels compared to the old ball joint side. I still want to order heims to replace the tie rods ends.
Last edited by Rarerat; 02-16-2011 at 07:36 AM. Reason: fix broken pic links
|
|
#13
06-05-2010, 10:44 AM
|
||||
|
||||
|
Lookin good! I'm really tickled, knowing how much your going to enjoy this. I am concerned about the bolt heads over and under binding against the heim during pivot. Did you test the full range of travel before mounting the shock? I had to use a allen head bolt and turn down the head circumference to match the flat mounting surface around the heim ball hole to allow for full travel, The same with a machined washer underneath between the spindle and heim.
you can go crazy trying to find a-arm heim to match the threads on that Chinese ball joint. I did as you, simply used couplers. I turned 1/2 the coupler round to slide into the a-arm tube and welded on.. I had to cut the arms back so with the added length of the couplers they ended back at the same length. Only play in the whole front end is the universal joints in the steering shaft. Considering the before and after, I can live with that! You can feel stuff you never felt before. Hub bearings get a little loose or sticky? you'll feel it. A shock starting to fail? you'll know it, here's another simple trick to do before you bolt the arms back in. Drill and tap the a-arm for a zerk grease fitting. Drill the spacer tube and chamfer the hole to allow the grease to get to the through bolt. Pump them full of grease. Arms will travel smooth and quiet.
|
|
#14
06-05-2010, 11:00 AM
|
||||
|
||||
|
I forgot to add in the last post... You will need to make stand off spacers for the spindles. you want the tie rods to be parallel with the upper a-arm. This eliminates the bump steer. I also noticed after posting, when talking about the tie rods, I kept calling them a-arms. sorry for the confusion.
|
|
#15
06-05-2010, 11:05 AM
|
||||
|
||||
|
Thanks Ckau, & that is a good tip on the grease zerk.
I didnt think to check the travel with the shock off before I bolted it on.  I can pull the shock back off & if there is any binding I will follow your lead with some allen head head bolts. I am anxious to get out there and try it to see the difference. I can pull the shock back off & if there is any binding I will follow your lead with some allen head head bolts. I am anxious to get out there and try it to see the difference.  Thanks Again for all your help. 
|
|
#16
06-05-2010, 11:18 AM
|
||||
|
||||
|
Ckau, You were right on the bolt heads. I just pulled the shock off and measured, I am only getting 3.5 inches of travel before the bolt heads start to bind.
 I will go buy some grade 8 allen headed bolts to replace them with and make some new spacers. I will go buy some grade 8 allen headed bolts to replace them with and make some new spacers.Thanks Again
|
|
#17
06-05-2010, 07:41 PM
|
||||
|
||||
|
Ok guys I finished it up the upgrade this afternoon, and I am flat speechless at the difference in the way the buggy handles compared to stock. My hats off to you Ckau for the info on the mod.
This buggy went from a poor handling pos that when you turned the wheels it still went straight to a buggy you can now drift and turn on a dime. I highly recommend this front end mod to all, but especially Yerf dog spiderbox owners.  I removed the hex headed bolts and went with allen bolts that I ground down the edge were it meets the Heim. Under the Heims I bought some lock nuts that had a beveled edge and turned them upside under the Heim to use as a spacer. Doing this gave me just a hair under 6 full inches of front travel, so when the new shocks show up I should be set.   Here is a very short video my daughter took of me in her buggy on the first test run. Sorry the video is so short, but the camera card was full, so we only got a few seconds, but you can spin the tail end of this thing around at will now. I couldn't be more pleased with the way it all turned out, & i have to say this was the best 40.00 mod I have ever done.  Last edited by Rarerat; 02-16-2011 at 07:43 AM.
|
|
#18
06-05-2010, 09:57 PM
|
||||
|
||||
|
rarerat and ckau my hat is off to both of you
i am really impressed i will do the same to my friends yerf next time it breaks
__________________
olderthan 2008 tomberline punisher 1500 spring 12g sliders 30mm cv pumper carb uni filter no rev cdi polaris xlt snowmobile shocks for front w/550 magnum springs & blaster fronts on rear and another buggy built working on mods gk-13 white spring 17 gram sliders so far
|
|
#20
06-17-2010, 05:05 PM
|
||||
|
||||
|
Looking good RR and Ckau, y'all are having too much fun.... done prompted me to start looking for a Spiderbox frame/frt half just to tinker with and do a HF 13HP indusrial engine install, with a full indy rear suspension.
__________________
kliff
|
|
#23
07-08-2010, 04:32 AM
|
||||
|
||||
|
Basicly, II'm gonna copy-cat you and ckau.....y'all done all the R&&D, the rest is just fab and install.
I will be building a little stroker motor for it, but nothing unusual there...LOL OH yeah, where are y'all finding those primary sprockets? May as well put some on the shelf.
__________________
kliff
|
|
#25
11-10-2010, 07:11 PM
|
|||
|
|||
|
Quote:
|
|
#26
12-23-2012, 05:17 PM
|
||||
|
||||
|
Well a two and half years later we finally broke a Heim.
 My 7 year old & I were blazing down a hill with a left hand turn in it when she let go. The bad thing was we were alone with nothing but and old strap with us. My 7 year old & I were blazing down a hill with a left hand turn in it when she let go. The bad thing was we were alone with nothing but and old strap with us.  I tried just the strap to limp it home but it wouldn't work. finally I found an old piece of wire laying on the ground and between the strap & wire we made it home.  Looks like maybe a small tool box and and a spare Heim may be in order so we can repair it on the trails should this ever happen again.
|
|
#27
12-23-2012, 05:52 PM
|
||||
|
||||
|
next time use the 1/2" ones and they will not break!! they will bend, I've ran into a lot of stuff and bent a few of them. lol
__________________
T.J. Yerfdog Spiderbox, Uni Type air filter with 6" intake, 130 jet, Orange no-rev limit cdi, Red coil, iridium plug, 1500rpm clutch springs, 1500rpm contra spring, 13g sliders, 22" rears, 21" fronts, aftermarket reverse installed, and Trailtech Vapor.
|
|
#28
12-23-2012, 06:07 PM
|
||||
|
||||
|
that's why i went with heims on the tie rods with my own homemade breakaway aluminum bolt/shafts through them. slam something with the front end and slap a new bolt in. haven't bent a steering arm since i wasted the one with a grade-8 bolt through the heim. done in 3 aluminum bolts so far and it took so pretty major hits. (only 1 actually broke) only thing bending around the heims are the thru bolts (grade 8s) and misalignment spacers because i had no choice but to to reduce down to 5/16ths bolts for the thru bolts on the upper a-arm.
|
|
#29
12-23-2012, 09:06 PM
|
||||
|
||||
|
Quote:
I guess only hurting one in 2.5 years isn't the end of the world. I'll replace it & be back in business in no time. This winter I want to build a set of +4 long travel A Arms for my Pilot so maybe at the same time I can redo the Yerf. I have an extra set of 350 Odyssey front brakes & spindles that would be perfect to adapt to the front of the Yerf.
|
|
#30
12-24-2012, 06:29 AM
|
||||
|
||||
|
Whoa!!! First time I've every seen one completely snap! Seen a few bent but rare. A couple of years use? not bad at all ....Can't say that about much else on these machines!
Sizing up to a 1/2 x1/2 most likely will reduce the chance of ever snapping a shaft again. Keep in mind they are a wear item. Their cheap enough to replace on a regular basis as a part of maintenance. I'll go through mine periodically replacing ones that are loose or show signs of galling and binding. I'm using the rubber heim boots on my next set. The protection the boots give plus filling the boot with lithium grease, as a lubricant and a extra barrier against water and dirt should dramatically extend the life span I use these folks for all my heims and related stuff. Great company to do business with. http://stores.ebay.com/QS-Components...p2047675.l2563 The boots- http://www.ebay.com/itm/Seals-it-Rod...item4ab9719b4e
|
|
|
|