|
|
|
|||||||
| 150cc GY6 and Under Engine Tech GY6 and Smaller Technical Discussion Forum |

 |
|
|
Thread Tools |
|
#1
 11-12-2011, 05:55 AM
|
|||
|
|||
|
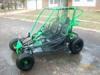
just picked up a yerf dog spiderbox cart. i have a couple questions.1st when i turn the steering wheel the left wheel will turn when it wants or or will turn wile other is straight.is my spindles bad,or ball joints or does the rack n pinion needs replaced? has anyone switched to a brigs or so on these carts.id like put a 4 wheeler motor in it.has anyone done it? if so how hard was it to do,an any pics of what u have done.thanx any help is good.i can weld my own engine mounts an etc,just seeing what others think this is my winter project,so will post pics of build

|
|
#2
11-12-2011, 06:56 AM
|
||||
|
||||
|
Sounds like the pinion gear or rack is stripped. Lots of mods and swaps done with these carts by members here. Check out the mini buggy, go kart and frankenbuggy forums, plenty of threads showing what people are doing with them. Remember to put up pics ... lots of pics ... we love pics ))).
|
|
#4
11-12-2011, 08:34 AM
|
||||
|
||||
|
No idea, you need to take it apart to know for sure. then you can also figure out if it can be repaired before spending money that you can use elsewhere on improving the cart. From what I gather, early versions of the spiderbox were recalled for ball joint failure. There are several threads describing how to upgrade the ball joints and/or convert to heim joints. You may want to PM a moderator (buggymaster) and ask him to move this thread to the mini buggy section. Then you can use it as your ongoing-seekign help/showing your changes thread. Putting up pics of problem areas on the cart is the best bet to getting advice that will help you instead of relying on semi-educated guesstimates like mine.
|
|
#5
11-12-2011, 10:05 AM
|
|||
|
|||
|
how do u post pics? id like to keep same motor on it,just heard bad things about these motors,that only reason wanna change motors.I no i do need a new elect chock only starts when i spary starting fluid in it.
|
|
#7
11-12-2011, 11:32 AM
|
||||
|
||||
|
1. You have the very weak first generation spindles. Go to Buggy Depot and get their stronger model for uneven a-arms or use their design for inspiration to rebuild yours. You can see the bent control arm on one spindle and the bowing in the cross section on both - This is not how it should look.
2. Poor starting is not a result of a bad choke. The electric choke is a control to allow additional fuel fuel into the carburetor. It runs rich to allow cold starting and then cut off the fuel when warmed. You most likely have a dirty pilot jet, an intake leak or the valve lash needs adjustment.
|
|
#8
11-12-2011, 01:30 PM
|
||||
|
||||
|
After seeing your pic's- is the rack-n-pinion the issue or the terribly bent spindle?It's pretty hard to strip out a rack.
|
|
#9
11-12-2011, 04:14 PM
|
||||
|
||||
|
that puppy on the right side is wasted! That's how my 03 spindles look 2-3 times every ride before i bend them back lol-- yours are a totally different design, so i wouldn't try bending them back.... I'd say it's that ball joint and spindle, rack is probably fine. I'd upgrade to HD joints and new spindles. Are these the recall spindles--and is that still valid if they're the originals?
|
|
#10
11-12-2011, 04:29 PM
|
||||
|
||||
|
x-bird's comment: Are these the recall spindles--and is that still valid if they're the originals?
No more recall's for Yerfdog! Ball joint failure led to lawsuits for injuries incurred and contributed to the bankruptcy in late 2005.
|
|
#11
11-13-2011, 08:58 AM
|
||||
|
||||
|
Knew about that, but was wondering if the responsibility of taking care of any recalled karts that weren't taken care of transferred to those who bought up the remaining parts supply. I guess if BMI didn't buy the company as a whole and its name, then there isn't any.
|
|
#12
11-13-2011, 10:07 AM
|
||||
|
||||
|
Quote:
All Warrenties and recalls on the yerfs went south with the company. Like the rest of us, your on your own there. BMI holds the remander of the stock parts assets and is running out of a few.
|
|
#13
11-13-2011, 12:47 PM
|
||||
|
||||
|
I agree with ckau- these Howhit's are solid and reliable, don't know where you'd heard they weren't good! The GY6 is used in a lots of vehicals and if it wasn't any good they wouldn't sell or have so many modification parts. I did a simple thread on putting an ATV engine in a buggy and have transplanted a ATV engine into my wife's Yerfdog if you want idea on how to do it:
http://www.buggymasters.com/forum/showthread.php?t=1602 http://www.buggymasters.com/forum/showthread.php?t=1159 I didn't change from a GY6 because of failure but as a means to get more power and a transmission. Last edited by metalstudman1; 11-13-2011 at 07:59 PM.
|
|
#14
11-13-2011, 02:46 PM
|
|||
|
|||
|
what i ment by no good was parts brake easy,an its harder to find them on this engine.i no all motors dont last long but what ive read with these they brake more,or need more fixing.id like to keep same motor an get more hp.
|
|
#15
11-13-2011, 07:56 PM
|
||||
|
||||
|
Not hear to bust your chops- But as just one user of the GY6 I can say that they're great simple engines. Put out a ton of horsepower for such a small size and turn incredible rpm's without failure or overheating. I think the fact that you hear so much about them is that they're on LOTS of vehicals using them & being abused and NOT maintained by people that think it should just work without any working on it!!- and you can buy parts for these engines EVERYWHERE. I've never blown up one of them up or broke a part out of 5 that I wore out to the point of some smoking and still ran great. Do some more research and you'll understand my opinions.There's a reason you won't find others replacing the GY6 with a lawnmower style engine(3600-3800rpm's). The idea of switching to a Briggs is just down right funny- you're poor Spiderbox won't perform anywhere near that of the GY6- (rpm's & enclosed variator/clutch spells power in this case).You might get close if you installed a Briggs 15hp,then weight becomes an issue since the GY6 is only about 55lbs.
I'd try adjusting the valves to see if it starts better (before assuming it's an enrichment valve issue,doesn't cost anything to adjust valves)- very simple to do, remove valve cover bolts, rotate engine till one off the rockers/cam lobes are all the way up(loosen the nut on the rocker arm stud) and slide a .003 feeler gauge between the valve top and rocker arm with little resistance on both intake & exhaust,tighten nut down, then rotate to the other valve.They tend to get tight over time and this maintanance is needed everytime it get's hard to start. Last edited by metalstudman1; 11-13-2011 at 08:10 PM.
|
|
#16
11-13-2011, 08:05 PM
|
||||
|
||||
|
Quote:
Sure.. you can swap out for a more horsepower motor but if you think you got mechanical issues now you ain't seen nothing yet  Tell us what kind of riding you do, terrain, frequency etc. we can help you get the most out of that motor without breaking your bank.
|
|
#18
11-14-2011, 03:29 AM
|
|||
|
|||
|
i have two yerf dogs a # 3202, an a spyderbox. 3202 ran great till one day throttle stuck on my son,so i adjusted it,tried to start it an carb flooded,so i let it sit for few hours an tried to start again an still floods,so i pulled carb off cleaned it good,bought rebuild kit,put back together(3 times) cause still floods.i pulled the string wile looking inside carb an gas whould spray towards the filter insted of intake.i checked my plug an no gas to it,was dry.put my finger over spark plug hole to check for compresion,an is very lil compresion,These r my first two gocarts( my 7 year old sons carts) i dont no much about go carts. when i said these engines are bad,i read threw alot of posts on here about them.I have quads we ride on trails,mud an hills,an my son wanted a buggy so bought him one. im just looking for lil more hp,and safer for my son thats all.i do wanna keep same motor. now the spyderbox,id like to keep same motor just add more hp,an keep it safe from breaking.
|
|
#19
11-14-2011, 03:52 AM
|
|||
|
|||
|
so just buy the lifetime spindles an liftime an balljoints from buggy depo? i found a rack n pinion on ebay for 60$. all i no is the boot ripped on my rack,an tire turns when it wants.My cart doesnt have a filter in it an someone broke off one of the screws that holds the intake together.an wont start less i spray starting fluid in it.I just wanna get it ruuning like new an fix the steering.now for the intake box wanted to get the uni filter,do i need to change my jet? an if so what size do i need?
|
|
#20
11-14-2011, 06:20 AM
|
||||
|
||||
|
do the spindles and ball joints, no question about that it seems. disconnect the steering rods from the spindles and either take apart the rack to check the teeth or have your son turn the wheel while you hold the rods---if there's a lot of play or binding, then a new rack may be in order, but it's doubtful--so you can save some money there maybe.
|
|
#21
11-14-2011, 11:13 AM
|
||||
|
||||
|
Yes you'll need to re-jet- ckau has suggested a 124 in other posts.Look and see if the steering arm on the rack just came unscrewed at the end.Post some pic's
|
|
#23
11-14-2011, 06:45 PM
|
||||
|
||||
|
Hey guys, I bought a set of the lifetime Spindles from ********** and my steering seems to be off a bit... with the rack centered and wheels strait, when I turn fully to the left or right the outside wheels seem to turn very aggressively and the inside ones don't turn as much.
Is this the way things are supposed to be? or is something off? I'm under the impression that the wheels should turn equally or at least the inside wheel should be turning with a little more angle than the outside ones. I can't up pics right now, I was on my trails yesterday and I hit a rock and bent the driver Side BDX spindle where it connects to the tie rod joint. I have to send it back to them for repairs... good thing I have the stock ones on hand for temporary riding.
|
|
#24
11-14-2011, 08:06 PM
|
||||
|
||||
|
When setting up the rack-n-pinion:Forget the steering wheel!! center the rack unit(same amount of gears showing on each side)with wheels not attatched at ball joints, Straighten the front tires, measure the steering arms to know if they're correct length. Any small change to the front end will make changes to the steering arm length-ie.ball joints,spindles,bent or warped A-arms,shocks,ball joints on the steering arms.Once you have a good measurement check the stock arms for a match. The ball joint needs at least 5 full threads in the arm- in a good set-up you should have 3 threads and then the nut exposed- very seldom does the ball joint need to be moved inwards after set-up. If the arms aren't within these guide lines cut the center of the arm- add or cut out the amount needed to get the right length and reweld. I put a small solid rod in mine to help keep it straight or you can sleeve the connection with a closely fitting tube.You are correct about the angle of the wheels when turned- left turn should have the left tire slightly turned more than the right tire-(inside tire about 3-5 dergrees more than the outside tire) same in reverse for right turn. If you carefully file or grind 2 new grooves in the rack on each end it will increase you're turning radius greatly.
The part I was asking if it was unscrewed was at the ball end of the rack where the steering arm is attatched, there are slots for a wrench to go (RH thread) remove this when welding on the steering arms so that the pinion portion doesn't get heated up and so you don't have to remove the unit from the buggy.Re-grease the rack liberally in the teeth and shafts both sides and run it back and forth to spread the grease to the pinion-add grease as needed to get it smooth and easy to turn.
|
|
#26
11-20-2011, 06:59 AM
|
||||
|
||||
|
[QUOTE=metalstudman1;17743]When setting up the rack-n-pinion:Forget the steering wheel!! center the rack unit(same amount of gears showing on each side)with wheels not attached at ball joints, Straighten the front tires, measure the steering arms to know if they're correct length.
I second forgetting the steering wheel! Disconnect the wheel shaft at the splined connection at the rack, take measurements ,adjust, then position the wheel back. You'll go crazy trying to align while keeping the wheel orientated. Another thing to look for is the static position of the ball joints. These joints have enough play, especialy if their worn, to lay at slightly different angles one may lean to the left while the other to the right. In, out! This goofs up the camber and castor big time. Unfortunatly the only time the alignment is truely correct is when the ball joints happen to fall into the original positions when alignment is set. give the spindle a good jerk to see if you can rock it back and forth, in and out. Pull the spindles back so the joints are all leaning towards the rear. Forwards movement places them in this positon most of the time. This will keep the alignment correct most of the time also. The heim conversion cures this problem.
|
|
#27
11-20-2011, 09:57 AM
|
||||
|
||||
|
I've been fussing with it for the past couple days... it's a pain in the but, just can't get that outside wheel to turn less then the inside one and this is with everything lined up as you guys stated. The only other thing I can think of is the rack being off or something. I don't want to cut and re-weld anything (I'm a welding noob) I bought one of the 90Amp harborfreight MIG welders with the flux core wire to learn with and work on the buggies I have. I've been able to make a few quick welds here and there but they are not so pretty yet.
I have some new shocks from Surplus center coming Tues for the front, I'll check everything then, I have to flip the bottom A arms over so that the 12 and 3/4" shocks will fit... I hope they go in with little problems! I have the stock ones from the back that were replaced with some better oil filled ATV ones that are 13-14". I'll test fit them today to see if I'll have to do any major work. Last edited by T3beatz; 11-20-2011 at 09:59 AM.
|
|
#28
11-21-2011, 12:34 PM
|
|||
|
|||
|
I flipped my lower swing arms and mounted SC shocks up front. On mine the lower shock was making contact with the cross support for the shock mount bracket and didn't allow for everything to line up. I made a bracket out of a piece of 1.25 square tubing vs. increasing the size of the hole on the existing mounting bracket. I just cut off one side of the square tubing and bolted it up to the existing shock bracket. It's not fancy but works. I can take a pic if it would help.
|
|
#29
11-21-2011, 12:52 PM
|
||||
|
||||
|
Quote:

|
|
#31
11-21-2011, 02:16 PM
|
||||
|
||||
|
My A-Arms look similar to the ones in the first picture, so I should be able to fit them on, I'll post pics later, My Arms are the uneven ones with the top shorter than the bottom. For the BDX shocks (that are the same length of the surplus center ones they say you can only get 1" extra lift because the geometry will be off), I'm guessing this is if you go with strait bolt on with no welding or mods and just flipping the bottom arm.
Last edited by T3beatz; 11-21-2011 at 02:21 PM.
|
|
#33
11-21-2011, 04:55 PM
|
||||
|
||||
|
Mine have three holes drilled, I just flipped one side and put the old shock from the rear on the front and it went in with no problems, but there is only like a mm or so gap between the cross support and the lower stem of the shock. The SC shock's stems are a little fatter so I know I'm gonna have to beat the support in a little.
|
|
#35
11-21-2011, 05:15 PM
|
||||
|
||||
|
If you're going to use brackets, why not push the mounts farther outboard on top of the a-arm to avoid catching it on something while driving? I didn't mind as much with a little sticking under, but where I ride that extended setup would get beat up on rocks.
|
|
#38
11-21-2011, 07:11 PM
|
||||
|
||||
|
@Sopkart, so is the ride a little better with the SC shocks up front? I know its not gonna be a world of difference but the stock shocks are stiff as a brick, they might as well stuck a pole in where the shocks are and called it a day, because the ones they have on there don't move at all.
I was a little worried about the shock mount hitting on something too, but I'm gonna put some bigger front tires on as soon as BD gets the 4x110mm Hubs in stock for the Yerf... I have some 19x7x8's laying around but can't put them on without hubs... sucks! Surplus Center also has these... http://www.*************.com/item.as...catname=wheels which is a great deal at that price, the only catch is finding hubs that will fit for the go kart, they have a 4x108mm bolt pattern, most hubs that I find have 4x110 or a 4x4" bolt pattern, I would have to buy an adapter and that would take the price over the top. 4x110 hubs might fit with a little drilling and a couple hub centric rings... but I wouldn't know what I was doing, I might mess something up. The only other option would be to buy the set from Surplus Center and then buy some 7" front rims with 5/8" bearings already installed... http://www.*************/item/7-Front-Rim-260037-6613 and then take the tires from the SC wheels and stick them on the BMI rims... all this will be around 100.00 bucks, which is still just about cheaper than buying just the tires buy themselves from somewhere else. Last edited by T3beatz; 11-21-2011 at 07:18 PM.
|
|
#39
11-21-2011, 07:29 PM
|
||||
|
||||
|
Does your hubs have a round back plate?108mm is just barely different than 110mm- rotate the bolt pattern 180 degrees & re-drill the plate for the other bolt pattern - or oval out the bolt holes in the wheel
|
|
#40
11-21-2011, 08:02 PM
|
||||
|
||||
|
Quote:
I was gonna get the surplus center 18" from the link I posted for $25 each and find some hubs that will fit, for temporary riding, then move them over to my Manco Intruder once the BD hubs show up. My problem is, I can't find any 4x110mm hubs for the yerf with 5/8" bearings... other than the BD ones.
|
|
#42
11-21-2011, 10:48 PM
|
|||
|
|||
|
The SC shocks are nice. I never drove with the stock shocks so I don't have a comparison. The previous shocks I had on our first cart were old motorcycle shocks which were nice but one was pretty much blown. I'm happy with the SC shocks.
|
|
#43
11-22-2011, 10:34 PM
|
||||
|
||||
|
I got the SC shocks installed and wow it's a huge difference and I have not even drove it yet! I can step on the front and the shocks move a little, the stock ones did not budge unless I Jumped on it.
I've also jumped on the front end with the SC shocks and they did not bottom out, and they are smooth... I'll post pictures once I transfer them from the camera.
|
|
|
|