|
|
|
|||||||
| 150cc GY6 and Under Engine Tech GY6 and Smaller Technical Discussion Forum |

 |
|
|
Thread Tools |
|
#1
 05-31-2013, 05:51 PM
|
|||
|
|||
|
A dog chewed up the wiring harness to the ignition switch and light switch so I am trying to sort out the wiring to repair it. I haven't been able to find the correct wiring diagram for a 5 wire ignition switch so am working on developing one. The throttle cable is broken so one is on order. While waiting for parts I have done the following:
Charged battery and it is holding charge. Seems to be good. Scraped and wire brushed some surface rust and applied Extend rust converter. Will be spraying touch ups with green camoflage paint as this is the closest to the army green paint on the buggy. Removed the bench seat and disassembled it. Found the plywood in the seat had gotten wet and rotted completely. It was so bad it was difficult to use as a pattern. The moral is don't let it rain on your buggy. Will have to scrape, wire brush, and paint with Rustoleum the steel seat frame. Will use the original upholstery on the new plywood seat supports. Restoring the seat is taking a lot of time, but am getting it done while waiting for parts. Next up: finish the seat, wire harness to switches, install new throttle cable, drain and clean fuel tank, disassemble and clean carb, change oil, and then try to start buggy. Hopefully the ignition is ok, but we shall see. Will keep you posted with progress. 
|
|
#2
06-01-2013, 07:13 PM
|
|||
|
|||
|
More scraping of rust and treatment with Extend. Also scraped rust, wire brushed, and painted seat frame with POR. It dries to a hard black gloss finish which should protect the frame well. My Talon is not a rust bucket, but I am very agressive at fighting even the smallest amount of rust. Will install plywood on frame and staple in upholstery next. Throttle cable should be in by end of week, so want to clean fuel system and get seat ready for installation. Hope to fire up by end of week. Also did some miscellaneous small repairs. Really want to try to start engine but maybe can try next Saturday.
When looking at used buggys, be sure to check the plywood in the seats for delamination and decay. I looked at 4 used buggys (Dazon, Helix 150, and Hammerhead, Carter Talon) and all 4 had delaminated plywood in the seats meaning they had got wet. Rebuilding my Carter Talon seat cost only $30 in plywood and screws as I already had the POR. However, seat restoration does take time. So, if buying a used buggy, bad plywood in the seats can be used in price negotiations. Be sure to check for it. A buggy always garage kept would be best, but these are hard to find and expensive in my area. If working on a small budget like mine, we usually have to deal with less than ideal conditions. Last edited by Gawald; 06-08-2013 at 06:32 PM.
|
|
#3
06-04-2013, 08:20 AM
|
|||
|
|||
|
Why does everything take more time than I thought it would? Got the rust on the seat frame taken care of and plywood cut and bolted to the steel frame. Will staple in upholstery and restore the headrests today. Will have to wait until the throttle cable arrives before seat can be reinstalled. I have made a lot of progress addressing the neglect the buggy suffered.
|
|
#6
06-05-2013, 03:50 PM
|
|||
|
|||
|
I'm looking at one of these buggies this weekend that has been sitting a while. Thought it would make a good fall or winter project. (If I can get it for the right price)
I'd like to see pictures of your work in progress..
|
|
#8
06-08-2013, 06:30 PM
|
|||
|
|||
|
Just finished the seat resroration today. Should have finished 3 days ago but found the 1/8" masonite to finish the seat backs didn't fit the seat back contour as well as I wanted, so reshaped on my disc sander, repainted, drilled screw holes and installed seat back. Restoring the seat will take the most time in my restoration (I hope). I received the throttle cable and installed it so the seat is ready to go back into the buggy. I have decided to keep the seat out until the engine is up and running as it is lots easier to get to the engine with the seat out.
Get ready for a laugh, or at least a smile. I removed the fuel tank and carburetor. The fuel tank was full of spoiled fuel (bad smell) so I drained it and left it empty for fresh fuel to be added. I disassembled the carb and found black tar like substance in the bottom of the fuel bowl and clogging the jets. I removed the pilot jet and cleaned it. I only removed the bottom of the main jet, not the complete jet assembly, nor did I remove the jet needle diafragm. I knew better but the wife was reminding me the grass needed cutting so I rushed the job, reassembled, and reinstalled the carb. After cutting the grass, I repented over my rushed carb job. Now I get to remove it again to completely disassemble the carb and do the job properly. So guys, you can laugh now, or if you have done the same thing - smile. Next moves, clean the carb properly, wire in the switches (ignition, kill, and headlight), install the battery, check for spark, trouble shoot on spark if necessary, add fuel, and fire the engine.
|
|
#9
06-09-2013, 04:51 PM
|
|||
|
|||
|
Removed and disassembled the carb for the through cleaning I should have done the first time. Good thing I did as the main jet was clogged and the idle screw passage in the throat was also clogged. But now, I am confident the carb is properly cleaned. Also tested the electric choke and it is good. Now for the electrics......
|
|
#11
06-11-2013, 02:06 PM
|
|||
|
|||
|
I wired the ignition switch, kill switch, and headlight switch - correctly it seems as the lights work and the starter turns over the engine and the spark plug fires when grounded to the engine! When the wife wakes up from her nap, I'll verify that the kill switch kills the spark. Then add fuel, put the rear end on jacks (in case my idle is too high and would engage the clutch), and try to start the engine.
I'll post in a separate thread the wiring diagram for a 5 wire ignition switch Carter Talon as it seems to be a scarce item. It took me a lot of hours studying wiring diagrams and talking with Tom at SYC to develop a wiring diagram. It was a nervous moment putting power to the buggy but I believe I have it right. Folks, I am excited and relieved right now. When you get a non running buggy, you never know what you have until you go to start it. The starter, magneto, pick up coil, CDI, coil, plug, and carburetor were all unknowns until the last 3 days. But, now things are looking up!
|
|
#12
06-14-2013, 07:57 PM
|
|||
|
|||
|
Touched up paint. Re-installed seat. Looks like a buggy now. Remaining to do: finish paint touch ups, clean and install seat belts. Will also replace tail light when I find one that fits as the current one is cracked and the lens is in poor condition. This is a functional restoration, not a show cart. It looks good and all is in good order now.
Yesterday, I lubed the chassis, changed the oil, and changed the final drive oil. I broke two brass alemite grease fittings but found an assortment of metric fittings at Harbor freight for $5.49. Guys, be sure to check the level of lube in your final drives. Mine was a little low and due for a change. The buggy can be driven now but not in my development. Will have to trailer to the property to give her a run. If anyone needs a wiring diagram for a Carter Talon FX 150IIR with 5 wire ignition switch, send me a personal message and I'll share what I have.
|
|
#13
06-15-2013, 09:38 PM
|
||||
|
||||
|
Come one and post a picture already
 . I did a complete restore on my HH 150 from the information I learned from these fine folks and Tom. Yet I never posted a picture of it. Now I feel guilty. Mine is a 10' looker, you get much closer and you see the differences. However, I did learn that Rustolium, Royal Blue is a good touch up paint for the 10' rule . I did a complete restore on my HH 150 from the information I learned from these fine folks and Tom. Yet I never posted a picture of it. Now I feel guilty. Mine is a 10' looker, you get much closer and you see the differences. However, I did learn that Rustolium, Royal Blue is a good touch up paint for the 10' rule 
__________________
2005 Hammerhead 150 170cc BBK, PnP Big valve Head, A12 Cam, Uni Filter, Custom Exhaust, 10G rollers, 1500 Contra Spring, 2000 Clutch Springs Just added - 2007 Joyner 250 SV - Let the fun begin 4-Dirt Bikes, Baja Bug and enough toys to keep me in the garage and out of trouble.
|
|
#14
06-16-2013, 07:14 AM
|
|||
|
|||
|
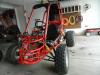
Here are some pictures of kart unrestored. Just figured out how to post pictures. Note the bundle of wires going to the switches. Had to figure this out and develop my own wiring harness for the 5 wire ignition switch. The picture of loose wood is half of the seat bottom. All the plywood in the seat was delaminated and rotted. Also note the rust. It looks bad but is surface rust and cleans up. I still have to restore or replace the steering wheel. I will post some after pictures when I get finished with the kart. The good news is that this buggy seems to have very low mileage. It starts on the turn of the switch and runs great. Budget wise, the buggy will cost about $180 for all parts including the $50 I gave the lady for her garage sale. She gave it to me free but I voluntarily (and feeling somewhat guilty) gave her $50 to get change for her garage sale. Also $180 includes the cost of a new steering wheel. This buggy has been a lot of fun for me. If you look at the restoration as entertainment, the cost of the buggy is cheaper than going to the equivalent number of hours at movies. Plus I learned a lot about GY6 engines and love them. My thanks to all members who gave me support, especially Tom at SYC.
|
|
#16
06-16-2013, 01:47 PM
|
|||
|
|||
|
Here are pictures of the buggy. Still need steering wheel and to install seat belts... If anyone has a used steering wheel in good condition from a Carter Talon or Hammerhead GT150 or Twister that you want to sell, send me a personal message. The changes in the buggy from restoration are subtle - you have to look carefully but the changes are there. The rear wheel and tire in the picture is the spare that was included with the buggy. This alone is worth the $50 as the tire is new. Love this buggy... Really look forward to getting it to the property in NE Georgia to give it a run.
Last edited by Gawald; 06-16-2013 at 01:49 PM.
|
|
|
|