|
|
|
|||||||
| Other tech issues For all other technical issues. Think frame, suspension, steering, brakes, etc |

 |
|
|
Thread Tools |
|
#1
 09-24-2013, 01:00 PM
|
||||
|
||||
|
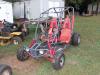
I decide to start this thread on the ASW exhaust gut since I didn't find any info specific to my machine's muffler insides.
I wanted some more flow, so originally I just removed end cap and drilled 3 additional holes. It didn't really give me the results I had hoped for. It did just let a small amount more of exhaust escape and I had a little more noticeable difference in sound. After asking questions  , reading info, and taking advice I decide to go forward with the gut. , reading info, and taking advice I decide to go forward with the gut.after removing muffler and heat shield I drew and numbered 4 lines on it to help me realign it properly when it is time to weld back together. I then used my angle grinder and cut behind the end cap; right behind manufacture weld. This is what the inside looks like so far. Just a restrictor plate. I will continue the project later and document it for those who need. Kids are whining 
__________________
Growing old is mandatory  Growing up is optional  https://www.youtube.com/watch?v=NEXoa-8d7qE Last edited by 2SlickNick; 09-24-2013 at 01:12 PM. 
|
|
#2
09-24-2013, 05:49 PM
|
||||
|
||||
|
I tried to just bang out the tack welds holding the restriction plate in place. That didn't go as smoothly as I thought. Between long flat head screw driver, pry bar, hammer, needle nose pliers and tin snips I got it removed. If I had a dremel I could clean it up better. Better it should be okay.
There appears to a baffle in there and two other holes to another restriction plate possibly. I thought it was card board; wrong.... metal baffle. trying to remove. Wife standing here will post later 
__________________
Growing old is mandatory Growing up is optional https://www.youtube.com/watch?v=NEXoa-8d7qE
|
|
#3
09-24-2013, 07:21 PM
|
||||
|
||||
|
dang kids whining, the boss standing there, I can see why you had to go . lol
|
|
#4
09-25-2013, 09:19 AM
|
||||
|
||||
|
That metal baffle is removed. Banged it out for a while, but it is out. Those 2 holes in the back don't do anything but back pressure I believe. So that plate will stay. It is about 1-2 further back than where the exhaust header exits in muffler.
I also cut an extra inch off the end cap pipe on the inside. I decided not to make the exit hole bigger so I can keep some back pressure. Hopefully I can get it welded back together by tomorrow or the weekend. I will let you know results and post video of sound.
__________________
Growing old is mandatory Growing up is optional https://www.youtube.com/watch?v=NEXoa-8d7qE Last edited by 2SlickNick; 09-25-2013 at 09:23 AM.
|
|
#5
09-25-2013, 09:44 AM
|
||||
|
||||
|
Quote:
But she love riding it.
__________________
Growing old is mandatory Growing up is optional https://www.youtube.com/watch?v=NEXoa-8d7qE
|
|
#6
09-25-2013, 12:23 PM
|
||||
|
||||
|
The inside looks good, leaving the outer portion of the resonating material will result in a lower tone and won't be too obnoxious. If you want to leave the tailpipe section on the cap, then at least cut the inner portion of the small pipe off. Additional back pressure is not needed on 4 stroke engines, and leaving that pipe on the inside will only cause turbulence inside the can, and will likely flow no better than before. The smaller hole, however, will add just enough restriction that it won't harm the torque curve of the engine.
That honeycomb looking piece appears to be a low grade catalytic converter, which is used to clean up the exhaust chemicals. Hard to believe they are hitting our buggies with them now.
__________________
ASE Master and Toyota Master Diagnostic Certified Buggy Building Trainee '04 Dazon Raider 150 'modded'
|
|
#7
09-27-2013, 07:39 PM
|
||||
|
||||
|
Well it is complete. I didn't get the last inch off the inside of the cap
 or drill out the 3/8 inch exit hole. I didn't have a hole saw bit and my buddy came over with the welder sooner than I thought. It does sound great ( deep tone)without being annoying, deafening, or obnoxiously loud. I thought by gutting it I would be done jetting down. Looks like I will be ordering a 122,120,118. 124 is still too rich  I hope that does it; because I miss riding and fall weather is great for riding. Also...I am so damn tired of trying to find the right jet size. http://www.youtube.com/watch?v=vDIU0A1hMjU
__________________
Growing old is mandatory Growing up is optional https://www.youtube.com/watch?v=NEXoa-8d7qE Last edited by 2SlickNick; 09-27-2013 at 07:42 PM.
|
|
#8
09-29-2013, 01:12 PM
|
||||
|
||||
|
http://www.ebay.com/itm/VHT-High-Tem...-/231057691842
Thinking about paint the exhaust pipe red. Oh yeah!
__________________
Growing old is mandatory Growing up is optional https://www.youtube.com/watch?v=NEXoa-8d7qE
|
|
#9
09-30-2013, 12:04 PM
|
||||
|
||||
|
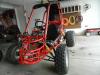
Well I went ahead and did it. I used my wire wheels and removed surface rust, used degreaser and brillo pad, and cleaned it up for paint prep.
The only red that was available was flat red, but I still like the way it looks.  In the process of curing it now; right on the buggy. 
__________________
Growing old is mandatory Growing up is optional https://www.youtube.com/watch?v=NEXoa-8d7qE
|
|
#11
10-01-2013, 01:14 AM
|
||||
|
||||
|
Thanks I thought it looked pretty Slick....too.
__________________
Growing old is mandatory Growing up is optional https://www.youtube.com/watch?v=NEXoa-8d7qE
|
|
#12
10-01-2013, 05:55 AM
|
||||
|
||||
|
Kinda reminds me of the old Cherry Bomb glass packs.
__________________
ASE Master and Toyota Master Diagnostic Certified Buggy Building Trainee '04 Dazon Raider 150 'modded'
|
|
#13
10-01-2013, 06:47 AM
|
||||
|
||||
|
Lol ya it does.
This product at advanced auto had about 5-7 color choices at $8 a can.
__________________
Growing old is mandatory Growing up is optional https://www.youtube.com/watch?v=NEXoa-8d7qE
|
|
#15
10-12-2013, 06:45 AM
|
||||
|
||||
|
Quote:
 I guess some of the pics didn't come through, but you can see them using iphone. I guess some of the pics didn't come through, but you can see them using iphone.
__________________
Growing old is mandatory Growing up is optional https://www.youtube.com/watch?v=NEXoa-8d7qE Last edited by 2SlickNick; 10-12-2013 at 06:57 AM.
|
|
| Thread Tools | |
|
|