|
|
|
#1
 01-14-2012, 11:29 PM
|
|||
|
|||
|
I replaced the ball joints, and the spindles. There is a popping sound intermittently coming from the right spindle now. But my main issue is that this thing will not turn other than like an 18 wheeler with flat tires. I can't even cut a doughnut because my front end is being out driven by my little gy6. I have what appear to be lawnmower tires on the front and back, is this why my front end will not respond when I turn? I thought about replacing the front tires with mud tires. I am beginning to think that there is nothing that can be done for this kart's front end. This is the 4209 so if it is a lost cause, please let me know and I will just put a Hyabusa engine on the thing, slam a brick on the gas, and drive it in a straight line towards the sunset.

|
|
#2
01-15-2012, 12:02 AM
|
||||
|
||||
|
I know that was a let down- Did the rack-n-pinion move smoothly when the steering arms were disconnected?
can you post pic's? if not shot me pic's in an e-mail- tires do make a difference, lawnmower style tires should turn very easily. Let us/me see what it looks like now with the new spindles and ball joints to verify that you have things where they're suposed to be. Something as simple as the ball joints installed on the wrong part of the spindle can make it not function properly.
|
|
#3
01-15-2012, 07:34 AM
|
||||
|
||||
|
Are the ball joints and spindles from BD? if so, check to insure the ball joints are not binding against the spindle . Those joints have orientation marks to get them properly fitted. If the front tires are the stock 8"wheel tire combo you got what is known as "push". typical of the stock combo. Those tires won't grip enough to make a hard turn. If your considering replacing them, use a Kenda 248 front max 21x7-8.
the kenda's can open up another can of worms though, the larger tire can rub against the frame during tight turns. if you do have the BD spindles , I believe the axles are intentionally long enough to space the hub out with shims to give needed clearance.
|
|
#4
01-15-2012, 07:45 PM
|
|||
|
|||
|
I will get pics up asap. I made sure to "actually" follow the directions and I made sure that the tick marks were facing away from the kart
 . I did not check the rack and pinion. . I did not check the rack and pinion. I simply disconnected the tie rod end, lined it up and tapped it lightly back in. I adjusted the tow in on the left front to match the right with both tires parallel straight ahead but when they turn they end up different. I simply disconnected the tie rod end, lined it up and tapped it lightly back in. I adjusted the tow in on the left front to match the right with both tires parallel straight ahead but when they turn they end up different.  Again, I will get pics up of all of that. I now have problems with the carburator. It idles perfectly and runs great until you get over half throttle. It is running way too rich and I had to park it. Again, I will get pics up of all of that. I now have problems with the carburator. It idles perfectly and runs great until you get over half throttle. It is running way too rich and I had to park it. Considering that I Considering that I have found carburators for the GY6 online for as little as $25 brand new I am just going to replace it and the manifold.  Is there anything that I need to beware of buying new carbs, and is there something simple that I can do to improve the performance of the new carb or do you think that whatever the issue is with the old carb, that something simple can be done to fix it? I know that is a lot, but from the looks of it, you guy's love karting so much that you even like fixing other folks problems, Thank you so much for your help, I will now go and order the new carb. Is there anything that I need to beware of buying new carbs, and is there something simple that I can do to improve the performance of the new carb or do you think that whatever the issue is with the old carb, that something simple can be done to fix it? I know that is a lot, but from the looks of it, you guy's love karting so much that you even like fixing other folks problems, Thank you so much for your help, I will now go and order the new carb.
|
|
#5
01-15-2012, 10:11 PM
|
||||
|
||||
|
By the way the tires do end up at a different degree when turning- tire inside the turn should have more angle than the outside tire (known as Ackerman) If one tire turns more or get's closer to the frame than the other then your steering arms need to be re-adjusted to even them up.
The carb probably just needs to be cleaned/fuel air mix screw adjustment or the aircleaner needs to be replaced/cleaned.
|
|
#6
01-16-2012, 12:43 PM
|
||||
|
||||
|
Here's a pic for you!
|
|
#7
01-16-2012, 08:44 PM
|
|||
|
|||
|
I adjusted the air screw( and thanks btw for letting me know where that was) but it didn't change much except when I dialed it too low it went dead. I have the new carb en route and hopefully it will be here come Wednesday. I am pretty sure that I will be able to have it running in tip top shape once I replace the carb. I haven't had a chance to get those pics up yet but I will. The only camera I have that will download downloadable pics is at work in a drawer used to take mugshots of convicts and I kinda need it more there than here...???????although I am so nuts about these things now I may have to change my priorities.
|
|
#8
01-16-2012, 08:59 PM
|
||||
|
||||
|
Are you sure you got the correct generation of replacement spindles?
A pic of the new next to the old ones will verify that. On a side note: I am currently installing the new HD ball joints from Buggy Depot on my Yerf Dog 3206 and am quite disappointed with them. Really wishing I had gone the way of the heim joints as you guys have. 1. The "lugs" aren't long enough. I welded 1/4" plate into the existing "pocket", and welded the inner filler/washer/spacer in the old ball joint opening. That equals 3/8", the same as their A arm "reinforcement". The lugs won't even reach the nylon of the supplied locknut. I now have to find a shallow grade 8 nylock nut in a 3/8" fine thread.... 2. Who the Hell has a wrench thin enough to fit on the "flats" of the ball joint to keep it from spinning as you tighten the nut? A supplied wrench to fit them would have been nice..... 3. Shouldn't all the "ticks" line up on the ball joint body? I have 3 ball joints that the "tick" aligns with the "point" of the "flats". And 1 ball joint has the "tick" dead center of the "flat". I don't know how they are made, but would assume the ball joint body should all be situated identical. After all, they tell you to face the "tick" forward for a reason. Wouldn't you think they would all be identical? 4. The instructions should be a bit more informative. Instead of remove old ball joints and install new ones, wouldn't it be benefiacial to supply proper torque values? How tight am I supposed to torque the nuts? Is the "lug" supposed to spin inside the ball joint? Or is it supposed to be loose enough for the spindle to spin around the "lug"? Last edited by xlint89; 01-16-2012 at 09:03 PM.
|
|
#9
01-16-2012, 09:12 PM
|
|||
|
|||
|
I am pretty certain that I got the right ones. I had two choices either the 1st and 2nd generation which are for the uneven A arms, or the third generation which is for the even, I made sure that I got the uneven's. They are a little tighter than the old ones and seem to have less room than would be ideal but who knows? The old spindles were so jacked up and the old ball joints were so screwy, I think that with these hd upgrades, the specs aren't what they were from the factory. I used a 12 mm open end wrench to hold the ball joints until I could get them tight enough and then just had to tweak it with some channel locks. I agree about the tick marks, and the tick marks were not uniform in that they looked like a drunk one eyed monkey with a hair lip went nuts with a ball pin hammer and a phillip's head screw driver. I like that I can use a wider range of wheels with these spindles however I do not like the two inches of threaded rod sticking out from my front tires now. If I catch somthing with those (like I did tonight when I hit the bricks of my house while parking it) I will do some serious damage, and if I ever clipped someone with them, I can't help but remember the "Greased Lightening" scene in Grease where the VW got tore up pretty bad. I am not completely satisfied with the upgrades but atleast it will turn now, even though not well. But that is the risk you take when you take a kart that was well known for front end defects.
|
|
#10
01-16-2012, 09:51 PM
|
||||
|
||||
|
Sorry you gentlemen are having troubles- It's just a bolt-on option! I had to grind a wrench down to fit the neck on the ball joints to be able to tighen them. I over torqued one and that's why it broke. I always had to check them and tighten them up on a regular basis. They are an improvement over the stock ones. I don't believe it makes any difference which way they point !!!The ball joint is just crimped around the ball and they will spin sooner or later. They get loose/sloppy very quickly even when lubed regularly but I can verify they don't break/come apart at the ball joint portion even after a lot of heavy abuse which is what you're after to avoid complete loss of steering. I wasn't impressed with the claims or performance on the HD axle either- but it was an improvement over the stock ones again. Buy a box of washers to go behind the hub to get your wheels out closer to the end of the spindle.
Who'd have thought the Spiderbox chassis would have gotten the following that they've received- If it didn't require so much capital I'd fabricate solutions and make jigs for these buggies as I'm addicted to them too! I hope soon I'll have the money to complete our Spiderbox front suspension make-over again with fresh ideas to see if I can resolve all the known issues.The Heim solution addresses the spindle/ball joint portion only, The tube on the A-arm at the bulkhead is still an issue for me even with the grease zerks. Our love for these things is what brings us closer to a resolution and with the diversity of individuals and they're ideas. shootispd27- your priorities might be getting a little tilted!!!!But I'm right there with you!!! 
|
|
#11
01-17-2012, 06:41 AM
|
||||
|
||||
|
If you think it's worth the expense, look up Park Tools for the thin wrench. They make bike tools and should have a large variety of wrenches that are about 3/32nds thick. I have them from 10mm to 40 mmm.
|
|
#12
01-20-2012, 07:41 PM
|
|||
|
|||
|
I got the carb installed but I cannot adjust the air screw. It doesn't have a cap over it, it just looks like a flat circle with about an 8th of it taken away. It has got to be needing some tool other than a phillips head. Ahhhhhhh!!!!!! It idles now so beautifully and it runs good except for when I give it full throttle. Its almost what the old one was doing.
|
|
#14
01-21-2012, 08:30 AM
|
||||
|
||||
|
Quote:
The full throttle problem may be a main jet issue. Those carbs come jetted way too lean for the buggys. With a stock air box and unaltered exhaust you need around a 114 main jet. With air up grade{uni} you jump to a 125 or larger if you got a gutted exhaust. Increase your fuel line size and use a large volume fuel filter. You can suck a carb dry at full throttle without a 5/16 or larger fuel supply line, definitely if you go above a 114 in jet size. The correct jet and fuel supply should take care of full throttle IF the problem is with the carb. If not, look for a faulty electrical connection. particularly grounding points, this can give the same sort of higher rpm symptoms.
|
|
#15
01-22-2012, 04:13 PM
|
|||
|
|||
|
Quote:
I will look into the wiring issue. I know that some times I have to ground out the solenoid to crank it. I jiggle the wiring and then I can use the ignition wires. Next question. What is the wiring kit called? I think I would just like to replace the whole thing although I would like to know what the issue is with the wiring, if that is the choking issue, before I go and get a new wiring kit. I am already about $400 bucks into this kart. I want to replace the motor with an atv motor but I don't have a motor, and I haven't bought the necessary welding tools to do it right. If you can, please just tell me what wire that I need to be looking at. Thanks to all of you who are helping me out. I would be lost without you guys. 
|
|
#16
01-22-2012, 05:26 PM
|
||||
|
||||
|
This sounds like a fuel enrichment valve issue-is the block resistor still connected before the wire enters the fuel enrichnmet valve wire plug? If there's not a resistor then you could be burning out the FEV very quickly, this would make for a good idle and starting ability but fall on it's face when throttled up. I'd check this to eliminate it as a possible issue.
test: remove FEV from carb by removing the 2 screws note the position of the valve (length) apply power either by connecting to the plug (ignition "on") or by jumper wires from a 12v. power source After 2-3 mins. the valve should extend about a 1/4"
|
|
#17
01-22-2012, 07:13 PM
|
||||
|
||||
|
I think you are asking about the wiring harness... the 3206 I got had been "worked on" with wires everywhere. I was trying to find the "pin and socket" I needed to make my own harness, but finally gave and ordered a new harness. This one is said to work with the spiderbox. http://www.*************/item/Engine-...ne-05711A-5929
|
|
#18
01-22-2012, 09:34 PM
|
|||
|
|||
|
I will have to research to find out where the fuel enrichment valve is and I will do that tomorrow night. I really don't want to put any more money into this engine since I just want to mod it with a bigger atv engine anyway. But I have my eye on a little gokart that has a five horse on it, and considering that I will scrap the old swing arm and howhit on my spiderbox anyway, I think that it would be pretty sharp just to chop and connect the howhit to the little one seater with dolly wheels on it. It should be pretty fast but look like a frankenstein shopping kart.
|
|
#19
01-22-2012, 10:06 PM
|
|||
|
|||
|
Ok, I found out what the fev is and I thank you metal for letting me know about that. The new carb came with an fuel enrichment valve on it. Surely I would not have an old carb that had a defective fev and a new carb with the same right? Now when the fev is malfunctioning, does it have to be defective in itself? Or is it an issue from the wiring or information fed to it from the stator? Last question and a half. I am going to test it, but will the fev add the extra fuel if I disconnect it from the stator, and can I run or will it run with the fev removed. I'm getting into the "I don't keer wut er how it duz nothin, just as long as it gitzerdun" attitude. I have been let down plenty by this 4209. Every time I get excited about getting a part that I think will fix it, something else is wrong, or I find that the part I just wasted money on is not the issue that needed fixing. I have been fooling with this thing for three weeks now and have yet to be able to enjoy it.
And by the way guys, I just want you all to know how grateful I am for all of you taking time to read my post, diagnose issues, and giving me invaluable information that I would most certainly pull my hair out looking for myself. In a world where people no longer wave at people as they pass, or hold doors open for women without fear of being labled a chauvinist, and being all out for number one and to heck with one's neighbor, it does my heart good to know that there are still some really great people still in this world. God bless you all.
|
|
#20
01-23-2012, 10:09 AM
|
||||
|
||||
|
The fact that you had 2 carbs with the same issue is why I brought up the FEV. If the resistor block was missing from when you got the buggy then it would be burning out the FEV on the new carb too. I had this same issue with ours- previous owner felt the resistor block wasn't needed and I had no clue it needed to be there. I had to pump the hell outta the gas pedal to get it to start. After buying another buugy with a GY6 I saw it (resistor block) and understood it's function after tracing the wires back to the FEV.Bought a new carb as I couldn't find the FEV by itself and no more starting problems. If the valve has burnt out in the idle mode then it wouldn't get gas at the higher rpm range. This may not be the issue- but it's easy to check to eliminate it as a suspect.
|
|
#21
01-23-2012, 07:23 PM
|
|||
|
|||
|
So? Where is the resistor block. I will be looking for that too. But if the fev is not used or has no power going to it, will that cure the problem? Does the fev cause more fuel to run to the carb when it is cold by default and as the engine warms it decreases the fuel input? W
|
|
#22
01-23-2012, 07:56 PM
|
||||
|
||||
|
This may or may not be the issue- only suggesting this as a possible thing to eliminate.
The FEV is needed for start up- it's function is to enrich the cold engine same as a choke by allowing more fuel less air- as the valve extends it opens the airway and exposes the main jets fuel source while closing off the enrichment orfices. The resistor is usually a ceramic block type fuse/resistor. It's usually located under the electrical cover on the swingarm. After seeing many used GY6 buggies and nearly always the resistor was removed or un-hooked. Members here on this forum have talked about a manual choke conversion but I have never persued this option. Just a note: There may be 1 or 2 resistors- I never could read the resistance values Without the FEV on a cold day you probably wouldn't be able to start it
|
|
#23
01-25-2012, 09:37 PM
|
|||
|
|||
|
My comp will not download more than one pic for some reason. Here is the best one that I could get in just one. If you need more please let me know. I will be following up in a minute with a pic of my wiring harness so you can see whats up with that. Thanks in advance for your help.
|
|
#24
01-25-2012, 09:42 PM
|
|||
|
|||
|
Metal, this is a pic of my wiring harness. I don't see anything that looks like the resistor block that you were talking about. I have not had a chance to get out my testing kit to see if power is going or coming to the fuse. I have been really busy working on my wife's super beetle. I have to buy the whole floor pan set for it and its gonna cost me about a grand just for the parts that I need. She is so inconsiderate. I mean really? Should her dream car take precedence over my dream kart?
|
|
#25
01-25-2012, 09:48 PM
|
|||
|
|||
|
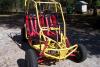
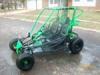
Here are the pics of the left and right spindles individually. Let me know if these are enough. Some how the comp started working better. And on the pics of the wiring, my finger is pointing to the wire coming from the fev on the carb.
|
|
#26
01-25-2012, 10:16 PM
|
||||
|
||||
|
Super Beetle!! that definitely takes priority- especially the floor pan in the winter!!!
I don't see anything on your frontend that would be causing your issues-Can you get pics of the wheels turned to there extremes? Try un-plugging the FEV and see if it will start & idle the same as when plugged in,look at your pic with your finger-just left and up looks like the resistor(tan/white in color)mounted to the bottom of the electrical box. The bus fuse appears to be from the stator to the regulator-it should have voltage while running.
|
|
#27
01-26-2012, 12:54 AM
|
||||
|
||||
|
Something looks off with the rack a bit. It looks unlevel?
The driver's side seems to have more of a steeper angle than the passanger side for some reason. And what's going on with the passanger side lower ball joint? The lower "stud" doesn't have any threads reaching the nylon in the lock nut, while the upper has the threads just barely coming out the top of the nut. Make sure your washers are properly seated inside the old ball joint holes and "sandwiched" properly.
|
|
#28
01-26-2012, 07:28 AM
|
||||
|
||||
|
i saw the rack too, it's crooked, looks like the mount holes might have opened up. it might be moving while turning, contributing a little to the turning issue. It also looks like at the spindle end, the arms are much closer to each other than at the frame side. while i have no experience with these setups, the ball joint/arm tab looks stacked up too high. something looks just plain wrong there--like the tabs aren't seated as far down as they should be.
|
|
#30
01-26-2012, 09:06 AM
|
||||
|
||||
|
Since so many problems I've had have been electrical related, I've been working on a way to make the box more accessible. After trying the PVC square box, other solutions I've seen surfing, here is what I've come up with. This is on my "spare" engine, the one the kart came with that had the wiring all messed up.
|
|
#31
01-26-2012, 09:47 AM
|
||||
|
||||
|
http://www.buggymasters.com/forum/showthread.php?t=2593
dont know why the link did not work sorry Last edited by drillpvt; 01-26-2012 at 11:01 AM. Reason: typo
|
|
#32
01-26-2012, 10:11 AM
|
||||
|
||||
|
drillpvt- the link isn't good
satoys- nice job on the box. I'd taken a cd box and used it as it provided more access.
|
|
#33
01-26-2012, 01:06 PM
|
||||
|
||||
|
Quote:
|
|
#34
01-26-2012, 01:42 PM
|
||||
|
||||
|
looking at your grommets, if you want nice, decently inexpensive, waterproof connections into the box, check out a local electrical supply company for strain gage fittings. They thread in like the cheap metal ones that come with common outlet boxes but are pvc with an internal rubber collar that seals tight around the wires when you tighten the outer cap.
|
|
#35
01-26-2012, 02:16 PM
|
||||
|
||||
|
satoys- there's a metal plate welded to the frame rail the cd box is screwed too!!
|
|
#36
01-26-2012, 06:15 PM
|
||||
|
||||
|
Quote:
 I could not understand how it was holding in place. I could not understand how it was holding in place.
|
|
#37
01-26-2012, 06:18 PM
|
||||
|
||||
|
Quote:

|
|
#38
01-26-2012, 07:05 PM
|
|||
|
|||
|
Thanks Metal, I will give the unplugging a shot. They need to just rename this site Metalology.
|
|
#39
01-26-2012, 09:29 PM
|
||||
|
||||
|
Old fart with too much time on his hands!!!!!
|
|
#41
01-26-2012, 09:51 PM
|
||||
|
||||

|
|
#42
01-26-2012, 11:40 PM
|
||||
|
||||
|
I'm sorry to hijack this thread, but I see you guys are talking about electrics and I don't want to start a whole new thread for a simple question.
What do you all think would cause erratic voltage readings from the electrics in these buggys. anytime I put my ground probe from the multi meter on any ground on my buggy while it is running the readout is all over the place. I've unplugged the stator while the kart was running and it still did it (I left the ones needed for the CDI plugged in).
|
|
#43
01-27-2012, 07:26 AM
|
||||
|
||||
|
Quote:
|
|
#44
01-27-2012, 08:44 AM
|
||||
|
||||
|
Thanks, that's what I was thinking, maybe a bad connection... the plugs on my buggy are starting to crack up. When I bought the buggy it was not in bad shape as far as rust, it had very very little, but the wiring harness was deteriorating. The guy threw in an extra engine that had a wiring harness in it that was much better so I'm slowly changing out the plugs, it's just a tedious process.
I guess I'll go through every thing one by one to see if I can find the problem. ohh, and shootistpd27 I was having the same problem you are with my steering so I put on some bigger off road tires and things got a ton better, but still not the best. It's also got something to do with the uneven A arm setup, something about it is just not right. I plan on switching to an even setup later in the spring, and sending in my bottom A arms to bdx to be re welded with the new tabs. I would do it myself but I don't trust my welding for something that important, I'm a newb when it comes to welding. I upgraded the shocks on the front of mine to the surplus center ones (no longer in stock) and it was also a huge improvement. The bad thing about that is with the uneven A arms you have to flip the bottom ones to fit longer shocks (mine are 12.75"). Last edited by T3beatz; 01-27-2012 at 03:27 PM.
|
|
#45
01-28-2012, 06:54 PM
|
|||
|
|||
:m ad:  I was mentally stable before I began dealing with buggies. I took on too much. It was all so inviting that like dope, I just had to have more. I buy a new one, then look for an old one, get the old one, and everything has been down hill from there. I find a super deal on a great 72 super beetle, but I have done nothing but spend money and work on it since it was bought just for it to be almost mechanically sound sitting on 12 concrete blocks in my driveway. Its official. The cheese has officially slipped off of my cracker. Ahhh. I was mentally stable before I began dealing with buggies. I took on too much. It was all so inviting that like dope, I just had to have more. I buy a new one, then look for an old one, get the old one, and everything has been down hill from there. I find a super deal on a great 72 super beetle, but I have done nothing but spend money and work on it since it was bought just for it to be almost mechanically sound sitting on 12 concrete blocks in my driveway. Its official. The cheese has officially slipped off of my cracker. Ahhh. Now that rant is over with, here it goes with the spiderbox. I took your advice metal and the fev is working perfectly. I could not get it to crank once I disconnected it. I am going to methodically dismantle it and look for somewhere that it is sucking air. I don't know anything about these engines but it has to be a crack in the manifold or something. If I can find it, I am going to J.B. Weld that motorscooter up tight and pray for the best. And as for the turning, I have not had it running enough to take it for a test drive but I am going to replace the tires on the front end. I have a set of atv wheels and tires but haven't tried to see if the bolt pattern will work. I know there is a four bolt pattern on the rear, but I am going to have to stick with the lawnmower wheels on the front. I just hope that the atv tires are the same size so that I can just swap them over. Thanks for your help guys.
|
|
#46
01-28-2012, 07:32 PM
|
||||
|
||||
|
If you still have the cheese and the cracker I'd love to try and reunite them!!!!
Another issue item to check- Valve adjustment- doesn't cost anything but your time. I set both intake & exhaust on mine @.003. I found that the valves tighten up over time, correct adjustment can make a dramatic difference in starting and WOT. Your stock bolt pattern is 110mm- pretty common in the ATV world- just about any treaded tire will help with your steering!!Good luck!!!
|
|
#47
02-04-2012, 10:44 AM
|
|||
|
|||
|
I adjusted the valves and no change. This thing is on the verge of becoming scrap.
|
|
#48
02-04-2012, 12:39 PM
|
||||
|
||||
|
I would change out all the vital electrical parts one by one... CDI, coil, spark plug (that is if you have not done that already. They are pretty cheap on ebay, even from american dealers. I upgraded to the orange CDI, Red coil, and Iridium spark plug, all could be bought for less than 40 bucks.
check the air box and make sure it's clean... got to get air, (don't know if you have it hooked up at this time). I wouldn't say it's the resistor block, I've run my buggy with it unplugged before (it does not run optimally but it runs, and gets up to speed). and when I say unplugged I mean the fuel enrichment part. Also have you checked every part in the CVT area, try removing the variator and belt and see if just the engine will run on it's on. Last edited by T3beatz; 02-05-2012 at 12:49 AM.
|
 |
|
|