|
|
|
|||||||
| Mini Buggy General Discussion General Discussion forum for Mini Buggies. (American Sportworks, HammerHead, Carter, etc) |

 |
|
|
Thread Tools |
|
#1
 02-10-2014, 02:28 AM
|
|||
|
|||
|
After reading all the posts about yerf front ends the past couple days, sort of got the feeling I started my redo at the wrong end. Guess I need to put electric starter on hold and start on front endl Any advice on where to start, Can't afford to get everything at once. Thankful at least for my welder

|
|
#2
02-10-2014, 05:56 AM
|
||||
|
||||
|
The big expense up front are the ball joints, or heims, should you choose that route. Most of the rest of the reinforcement stuff is relatively cheap, because it's mostly raw materials and hardware. With the weld in reins and upgraded hardware, at least it will be safe, then you can start making it turn better, and then soften up the shocks.
Post a couple pics of your front end, there are a few generations of spindles and a-arms, and each has their own faults.
__________________
ASE Master and Toyota Master Diagnostic Certified Buggy Building Trainee '04 Dazon Raider 150 'modded'
|
|
#3
02-10-2014, 06:34 PM
|
|||
|
|||
|
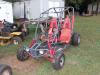
I uploaded a couple pictures of my front end, maybe they are good enough for you to tell me what I need to do. If you need a better close up let me know
|
|
#4
02-10-2014, 07:54 PM
|
||||
|
||||
|
Firstly , get the frame strong. Adding some bracing will stop and cure the known failures experienced with the frame. Add some gussets to the middle two down tubes. the frames are known to crack in this area. double bolting the box in the top rail will hold thing in place better. Add a tube brace at each outside corner of the frame. this stiffen up the whole front. make sure the frame is flat and square before welding these corner tubes in. flip the frame over and weld in a piece of angle under the lower mount. The rest depends on how far you want to take it.
|
|
#5
02-10-2014, 08:46 PM
|
||||
|
||||
|
I agree with the down tubes connecting the top and bottom frame halos, although I have not done this to mine yet. That may interfere with the brake pedal, be forewarned. I also went up at least one size on the fasteners up front and used only grade 8 bolts to secure it to the frame.
Take some time and gusset the top tubes as mentioned before, and add gussets to the outside of the 'tongue' of the frame as well. You can find pre cut gussets on ebay, will save lots of time. If are looking to do serious trail riding, then you should reinforce the mounting tabs for the control arms as well. I went overboard and did the front and rear, although the rear is likely not needed. I also went a little crazy and replaced the control arm bolts with grade 8 bolts with enough shoulder to go all the way through the control arm bushing tubes to eliminate any excess slack in the tubes. I got those from Fastenal, I think the four bolts were about $24. Already covered are the ball joints, and some searching on here, you will find a few heim joint conversion options, or you can just get the replacement HD joints. If you do the ball joints, replace the mounting tabs with some 1/4" plate tabs, as the sheet metal factory tabs will tear off. Next on the list is shocks. B u g g y d e p o t has upgraded shock options. While you are there, check out the rack upgrades as well. They aren't mandatory, but worth considering. The front ends are kinda the achilles heal of the spiderbox, but not too difficult to reinforce and modify. Once you get the frame and front end done, you will see a huge improvement. Search metalstudman1 for a very in depth yerf front end build. P.S. Looked at the pics, and can't really see the spindles at all. there are 3 different spindle designs, and the later designs are the preferred. The site mentioned above will have a lot of info regarding the front ends, take a look and decide for yourself which direction you want to go.
__________________
ASE Master and Toyota Master Diagnostic Certified Buggy Building Trainee '04 Dazon Raider 150 'modded' Last edited by Masteryota; 02-10-2014 at 08:55 PM.
|
|
#6
02-11-2014, 06:28 PM
|
||||
|
||||
|
after reading all yall have to do to these Yerfs I"m glad I have my crossfires. lol
|
|
#7
02-11-2014, 06:39 PM
|
||||
|
||||
|
Quote:
__________________
Growing old is mandatory  Growing up is optional  https://www.youtube.com/watch?v=NEXoa-8d7qE
|
|
#8
02-11-2014, 06:45 PM
|
||||
|
||||
|
Quote:
__________________
ASE Master and Toyota Master Diagnostic Certified Buggy Building Trainee '04 Dazon Raider 150 'modded'
|
|
#9
02-11-2014, 07:53 PM
|
|||
|
|||
|
Quote:
|
|
|
|