|
|
|
|||||||
| Mini Buggy General Discussion General Discussion forum for Mini Buggies. (American Sportworks, HammerHead, Carter, etc) |

 |
|
|
Thread Tools |
|
#1
 11-12-2012, 12:44 AM
|
|||
|
|||
|
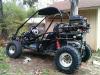
I just bought a brand-new black GK150-S from highrevpower.com and I love it! I wouldn't recommend ordering a buggy online unless you are able and willing to set it up yourself as it came in a big box/crate and I had to put it together. I finally got everything together and after finally tracking down a loose ignition connector that kept it from starting and adjusting the front tires toe-in this thing runs and handles like a champ! I ordered some LED offroad lights for the front and an LED trailer brake light for the rear and hopefully I should have everything here this week to start installing them. I thought I was going to mount the lights on top but out of boredom I photoshopped the lights both on top and on the front and I need your opinion on which location looks and or will perform better. On top looks like a traditional dune buggy but down low seems to give it a little bit of character sort of like a face. So what do you think? Mount them on top or on bottom? Thanks!
Last edited by replayreb; 11-20-2012 at 02:33 AM. 
|
|
#2
11-12-2012, 07:42 AM
|
||||
|
||||
|
I like down low. I think you would be less likely to break them there also. If they were on top a low branch or something might hit them. I know i have holes in my bikini top from branches and sticks hitting it. plus it looks cooler to me
__________________
Trailmaster 300 XRX dr.pulley HiT clutch, 9 gram sliders, yellow main spring, 12 tooth top sprocket, 23" kenda bear claws, 20" kenda front max.
|
|
#4
11-12-2012, 07:05 PM
|
||||
|
||||
|
both Bear and trailrider have good points. Where you place the lights depends on the type of light. floods mount low and forwards to give better lighting directly in front. Spots mount high to give more range.
|
|
#6
11-13-2012, 06:37 PM
|
||||
|
||||
|
I wanted to put led tail light and headlights on my buggy also but isn't it more complicated then just wiring them up?? What all do you have to do to get them to work correctly?
__________________
Trailmaster 300 XRX dr.pulley HiT clutch, 9 gram sliders, yellow main spring, 12 tooth top sprocket, 23" kenda bear claws, 20" kenda front max.
|
|
#7
11-13-2012, 11:17 PM
|
|||
|
|||
|
Quote:

|
|
#8
11-14-2012, 05:32 AM
|
||||
|
||||
|
cool, thanks man
__________________
Trailmaster 300 XRX dr.pulley HiT clutch, 9 gram sliders, yellow main spring, 12 tooth top sprocket, 23" kenda bear claws, 20" kenda front max.
|
|
#10
11-20-2012, 12:35 AM
|
|||
|
|||
|
The buggy in stock form before I got started
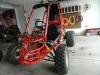
Basic Wiring diagram A little more detailed diagram to help me route the wires First light installed The inside diameter of the mounting clamps was a little larger than advertised so I had to insert a piece of vinyl hose to make a tight fit Both front lights mounted Close-up of the mount Wiring is tedious!
|
|
#11
11-20-2012, 01:01 AM
|
|||
|
|||
|
More wires!
I used a ring terminal crimped onto a 30 Amp inline fuse holder I bought to provide positive voltage to the switch which turns on the lights. That heavy gauge positive wire with the big red vinyl cap on it comes straight from the battery. That way the connection is protected by the big plastic cover that covers the fuse block. I thought about using a 30 Amp relay but decided it was overkill since I am using LED lights. The front LED lights draw about 2.4 Amps each while the LED brake only draws 220mA for a total of less than 5 Amps and since the on/off toggle switch is rated at 15 Amps a relay was unecessary. I removed the kill switch since it was redundant with the ignition switch right next to it and installed the on/off toggle switch for the lights in its place. The rear rack before I installed the brake light Unboxing the LED brake light Taking it apart to figure out how to mount it Drilling the holes where the cover attaches all the way through for my mounting solution I decided to use insulated hose clamps to mount the brake light instead of drilling holes in the frame. That way if I decide to change or remove the light light later no harm done. You noticed I decided to mount the front lights using clamp mounts as well so if I decide to change or remove the lights later you will never know they were there. Last edited by replayreb; 11-20-2012 at 02:22 AM.
|
|
#12
11-20-2012, 01:21 AM
|
|||
|
|||
|
Brake light mounted
From the rear The stock banjo bolt that mounts the brake line to the brake caliper I removed the banjo bolt Lost a little brake fluid The banjo bolt with the pressure switch is on the left and the stock bolt is on the right. You can alternatively use a spring activated brake switch attached to the brake pedal in some way but this way provided a cleaner install since I had hydraulic brakes. Pressure activated banjo bolt switch installed Here I am loosening the brake bleed nipple located just above the banjo bolt to bleed the air out of the brake line while my wife pushes on the brake pedal. You do this a couple of times while refilling the master cylinder brake fluid reservoir up front each time until the brake pedal becomes nice and firm.
|
|
#13
11-20-2012, 01:37 AM
|
|||
|
|||
|
I put shrink wrap and wire loom around the banjo bolt's wires to protect them
Tidying it up with some cable ties Tapping into the positive ignition lead so the brake light only works with the ignition on so my parking brake doesn't keep the brake light on Running light on Brake light on The RAM rail mount with Universal Finger Grip Holder to hold my iPhone. RAM makes some great stuff that is extremely rugged and reasonably priced My iPhone running the Speed PRO app which can be found here: https://itunes.apple.com/us/app/speed-pro/id405087651 Last edited by replayreb; 11-20-2012 at 11:53 AM.
|
|
#14
11-20-2012, 02:09 AM
|
|||
|
|||
|
Wide angle rearview mirror mounted. I much prefer it over a traditional rectangular rearview mirror because it is lighter so it doesn't move around or vibrate loose and doesn't require any adjustment for drivers of various heights. I don't want my kids to take the buggy out for a ride and not see the car behind them because they forgot to adjust the mirror.
Before After HOLY CRAP! I didn't expect these LED lights to be this bright for the price I paid but they are super bright! They turn night into day! They are definitely flood lights with a 180 degree pattern. It is so wide it shines on the front of the buggy frame and the tires as well. I'm glad I mounted them low. View from my garage steps so you can see both the front and rear lights Stopped on the street in front of my house so you can see how far out they project. They actually project much farther than what the camera can pick up. I am very happy with my purchase. They are extremely rugged, bright lights with low power draw that will last the lifetime of the buggy. At speed Here you can see the safety flag I added. I definitely want other drivers to see me or my kids driving around. You can also see the reason I opted for the GK150-S rather than the larger GK150-N that already had lights installed; the smaller one fits in my garage perfectly! Also there are gates that access the road going over the dam of our neighborhood lake and they are locked in an open position just wide enough to allow a golf cart or ATV to pass through and the larger, wider GK150-N would not have made it through. Thanks for looking and I hope this helps someone with their installation. Happy Thanksgiving! Last edited by replayreb; 11-20-2012 at 11:51 AM.
|
|
#16
11-21-2012, 05:29 PM
|
||||
|
||||
|
Thank a lot for the info. Like bear said amazing job! I like the paint on the buggy too. Looks like durable stuff.
__________________
Trailmaster 300 XRX dr.pulley HiT clutch, 9 gram sliders, yellow main spring, 12 tooth top sprocket, 23" kenda bear claws, 20" kenda front max.
|
|
#17
11-26-2012, 11:06 AM
|
|||
|
|||
|
I bought a pair of the featured flood lights for my buggy last week off of amazon. They came in saturday and I haven't had a chance to mount them yet, but they are very very bright. I don't know what the maximum distance is I just that one of these lights up everything in front of you for at least 50 feet in a very wide arc. The headlights on my crossfire are kinda weak and these should make it much safer for the night riding.
And to the original poster, well done on the write-up very informative and well written.
|
|
#18
01-07-2014, 04:00 PM
|
|||
|
|||
|
nicely set up rig!
|
|
|
|