|
|
|
|||||||
| Go Kart General Discussion Forum for general go kart discussion. |

 |
|
|
Thread Tools |
|
#1
 07-08-2010, 06:51 AM
|
||||
|
||||
|
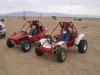
With RareRat & ckau modding the snot out of their yerfies...it just looked like too much fun. Yeah, I still got the 650 Puddle Jumper to work on, but in all honesty, I think I went overboard on the engine. Drags and open sand pits & dunes, should be a blast, but tight woods, I think a stock yerf would whoop it's sprocket. So for the best of both worlds, I'm gonna modd oit a Yerf, while working on the PJ, and hope to have one up for the eastern fall bash at DP, GA, in late October...
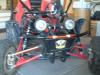
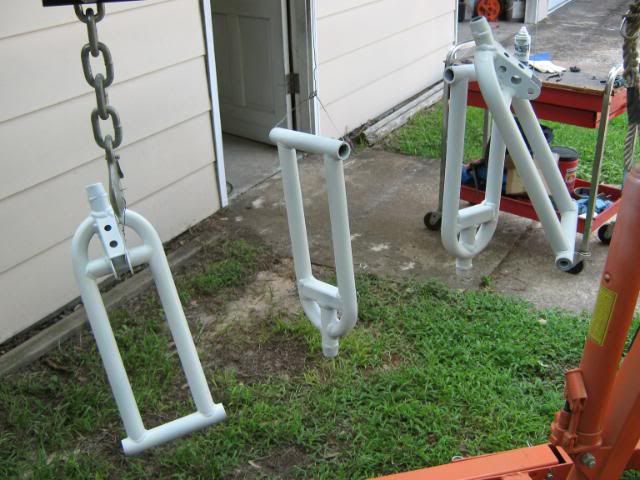
Here's what I brought home...anyone see a problem with the rol bars? 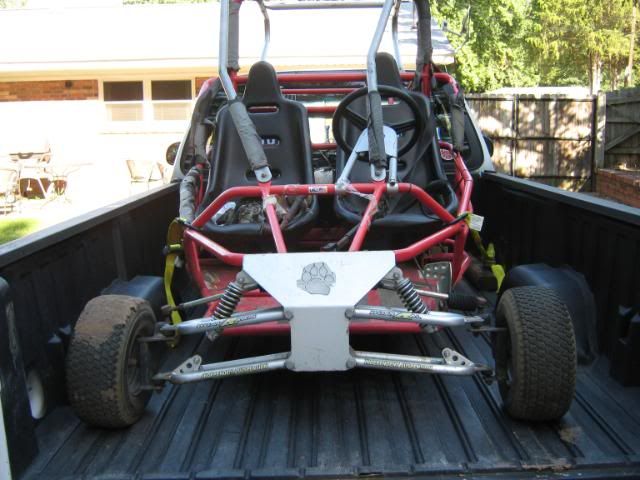 One of those spensive stage 2 or 3 spindles...BENT! 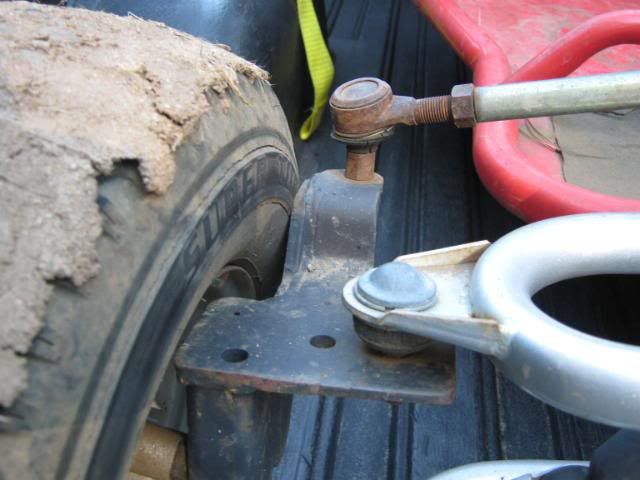 Good way to run an aircooled engine...no lower cooling shroud, oh wait, no air cleaner either.... no wonder there is no compression, and turning it over by hand feels like sand paper going up and down in the cylinder...no worries, got it coverrred. 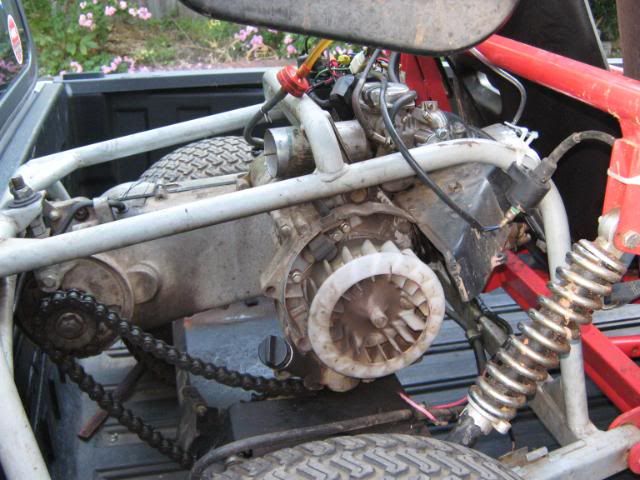  Look close, a couple of cracks around some welds... 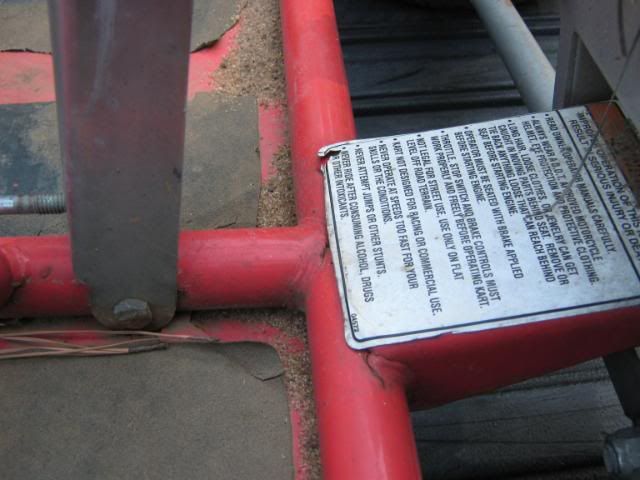 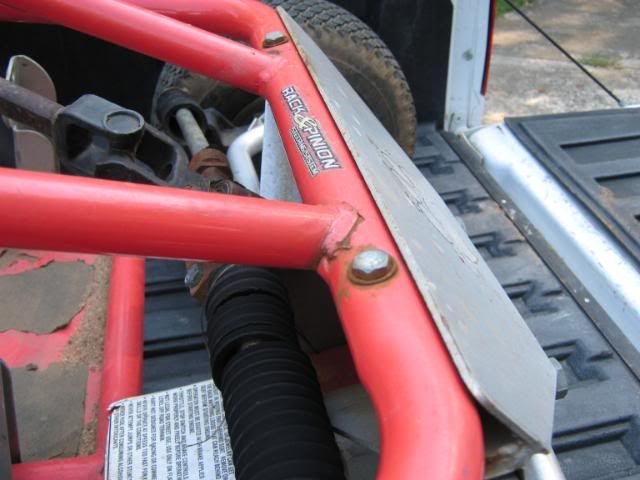 This may look like a lot of problems for some, but being retired, this is FUN stuff here! Give me a couple of months, and see what I roll out.... nutting fancy, just sorta beefed up, freshenned up, FUN! 
__________________
kliff 
|
|
#2
07-08-2010, 07:34 AM
|
|||
|
|||
|
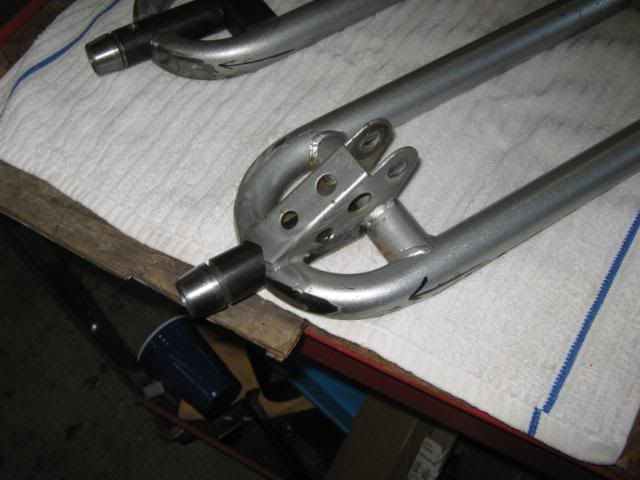
Those fronts are well known for bending and breaking. The yerf is great after a few up grades. I think for sand drags thats probly the best 150 to have due to weight. I'll keep my eyes open for you down here. Sometimes you can get a like new one for 200 and other times you can get one like you just bought for 1200. Crazy I know
|
|
#3
07-08-2010, 02:38 PM
|
||||
|
||||
|
Nice bend in the roll cage!!! Your's looks like a new one in comparison to the one I got for $400. Same types of cracks in welds.I bought a spare front end from BMI just for parts and had to re-enforce the A-arm bolt plate right off as it was cracked at 3 of the 4 bolts! Mine had 4 cracks in the swing arm also. Have fun (we know you will!) All that damage is just opportunities for the upgrades it needs anyway.
|
|
#5
07-08-2010, 04:33 PM
|
||||
|
||||
|
yep! all typical yerf chassis failures.
 Give a shout out when you are ready to fix these problems. Been there-done that. I'll save you some time. When your ready i'll post some pics to show what needs to be done, to the front and the back. You mentioned using the yerf for tight trails, the wheel base is longer than most so the turning radius sucks! The yerfs won't turn tight. the only times I wished I had reverse is on a tight trail where I couldn't manuver enough to make a turn. Give a shout out when you are ready to fix these problems. Been there-done that. I'll save you some time. When your ready i'll post some pics to show what needs to be done, to the front and the back. You mentioned using the yerf for tight trails, the wheel base is longer than most so the turning radius sucks! The yerfs won't turn tight. the only times I wished I had reverse is on a tight trail where I couldn't manuver enough to make a turn.
|
|
#6
07-08-2010, 06:59 PM
|
||||
|
||||
|
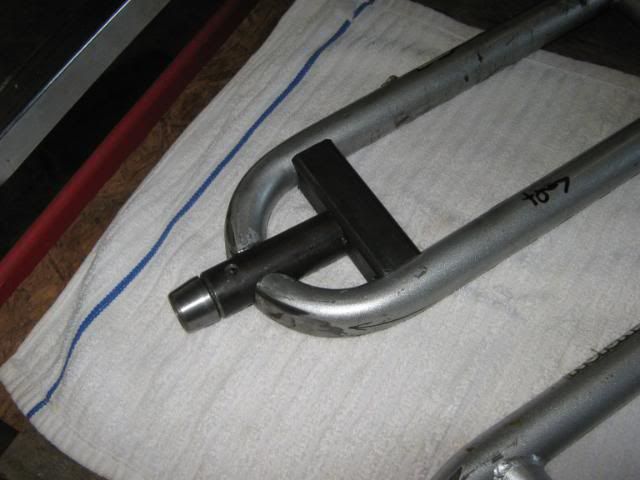
Making it turn tighter is easy!Just cut 2 more notches (each side) in the rack-n-pinion. Our trails are very tight and we've had zero problems. The Spiderbox probably turns better now than any of our other karts with little scrubbing and only have 18" tires.
|
|
#7
07-09-2010, 05:19 PM
|
||||
|
||||
|
Got the front wheels in today. 8" x 6" with a 4 on 4 pattern, same tires RR used, DURO, are on the way 20x7x8.
rear wheels & tires are also on order, 22x11x8. When the new cage bar arrives, I think I'll be welding it all up solid, deleting that cute little silve duck tail, and adding in some useful bracing. Removed the rear swing arm today, and the engine from it. Naturally the top end is burned up, had been so hot with the lower shroud gone, the top shroud began melting over the top of the cylinder. Cases appear OK, so I will be refitting them. I have all new timing & oil Pump chains on hand, new pump, stroker crank, etc. so the bottom end, will be as new. Gotta stip mthe swing arm and do a "ckau" 3rd bearing and extended bearing support mods, along with a 1" axle. 3/4"SAE bolts are in-bound to rebuild the front spindles, 1/2" heims are on hand Gonna pull the rack next week, and start on modding it, and laying out it's new location.. That outta be enough for a couple of weeks, any way, LOL
__________________
kliff
|
|
#8
07-09-2010, 06:55 PM
|
||||
|
||||
|
Do you think you have enough projects going on?
 Well you've got the jump on the rest of us now that everybodies come up with good mod's for the Spiderbox. Something else I did right from the start with mine was re-align the driver seat with the steering and pedals because my leg laid on the side bar and started bruising it after a rough ride,just a thought. Maybe that Puddle Jumper will see some dirt time sometime in the near future if you can get off the Yerfdog long enough!!!! Well you've got the jump on the rest of us now that everybodies come up with good mod's for the Spiderbox. Something else I did right from the start with mine was re-align the driver seat with the steering and pedals because my leg laid on the side bar and started bruising it after a rough ride,just a thought. Maybe that Puddle Jumper will see some dirt time sometime in the near future if you can get off the Yerfdog long enough!!!!
|
|
#9
07-09-2010, 08:28 PM
|
||||
|
||||
|
what sort of shape is the cylinder head in? Is it useable. The howett heads are the best power makers of all the stock head configuratons. Before people started experimenting with port jobs and such, a howett head was the hot item.
|
|
#10
07-10-2010, 06:44 AM
|
||||
|
||||
|
Quote:
That HowHit head will go in MY STASH PILE though. I usually have 1 or 2 rebuilt stockers laying around I selll them too, for 25.00 exchange, + $10.00 to port match their intake.
__________________
kliff
|
|
#11
07-20-2010, 06:10 AM
|
||||
|
||||
|
Luckily, between Dad & Cathy, I had a short, but productive week. Actually got in 4 hours on Fri., and 3hrs on Sat.
Frame is just about completely stripped, cracked areas have been re-welded, a couple of gussets added, bare metal primed. Waiting on an upper right a-arm, it was really tweeked, then I can heimerize the front, install some KZ440 rear shocks on the front(12.5") relocate the rack, and add a couple of teeth to each side..... anyway, their ain't nothing left to take apart, the frame is repaired...upgrade and reassembly next! Just before removing steering column, pedals, and cleaning, for an extensive search for cracks, only about 5 found and repaired.  (white primer) 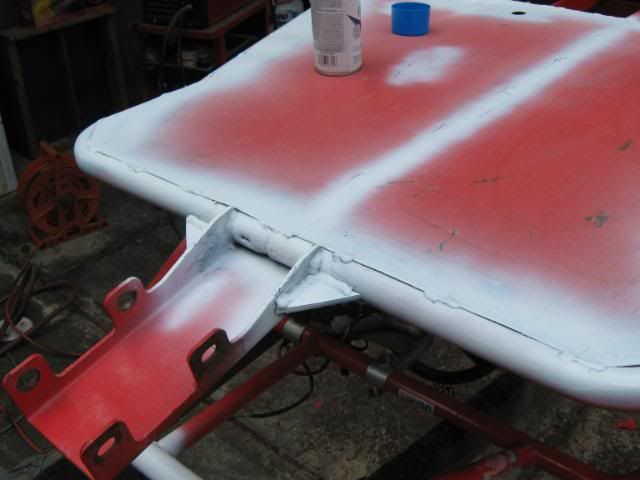 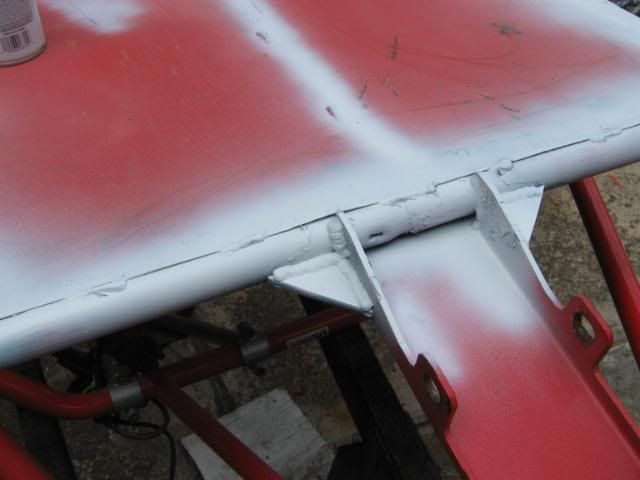 Oh yeah, the swing arm.... gonna get the "ckau" 1" flexproof" axle up grade, with a 3rd sprocket support bearing too... 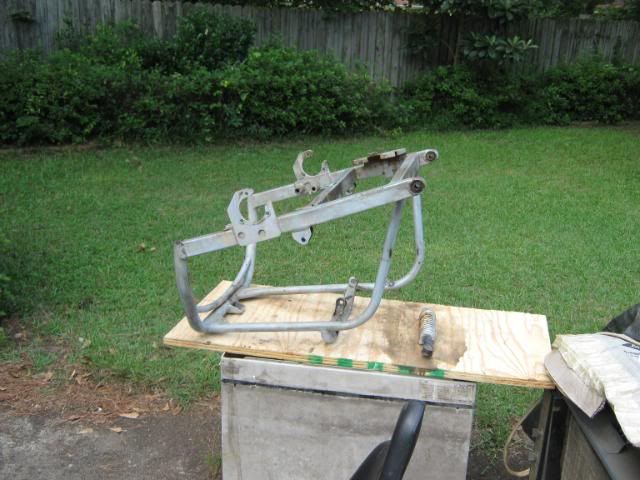 Now, why all the out side action shots? I have worked myself OUTSIDE. TOO many projects. All LONG TERM, can't just box 'em up, they are, where they are. So this MUST be a short timer, which stacks the odds even HIGHER that I'll be at DP in October, hopefully a break-in run/shakedown or 2, in September. So here is the question.... the Howhit case looks useable, and I'm still waiting on an email reply about another set. So how extreme should this build get? I have a couple of NIB cams on hand A9, A14, A15(promised out). An NCY BBig Valve head( naturally, I'll massage the ports) 2mm stroker crank 59mm BBK NCY CDI(orange metal case) Hot coil Carbs, 24mm CV Keihin, 24mm flatslide Mikuni, 30mm pumper CVK, 30mm NON pumper cvk All that is on hand, bought and paid for, but I could have my arm twisted to spring for a 61 or 62mm BBK. CVT & Clutch, yeah, still plenty of leftovers from the scooter days... NIB NCY "blue" racing clutch, to be outfitted with yellow 1500 springs and a 1500 yeller torquer too. NCY clutch bell. Prodigy 115mm vented variator, 10.5G Dr P sliders And probably a 13/40 rear ratio to start, 41-43 on the shelf ready to be assembled to hubs.
__________________
kliff
|
|
#12
07-20-2010, 06:13 AM
|
||||
|
||||
|
Yet a bit more done today.... but instead of the 2"x2" gussets on the front, what about a 1/4" thick winch plate, with a whole lot more, like nearing 24" of lateral tubing support? Sorta like this...
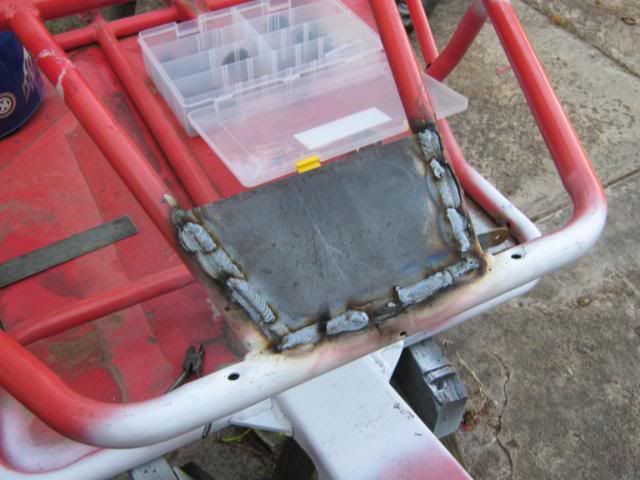 Combined with a reinforced spider box... 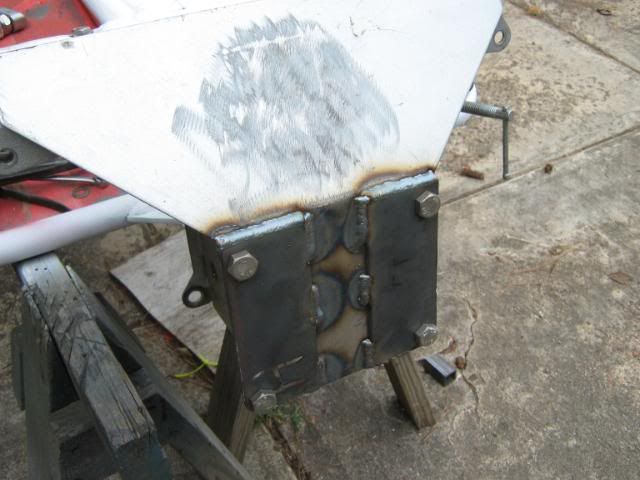 Starting to look a bit more stout, than OEM, anyways....HUH? 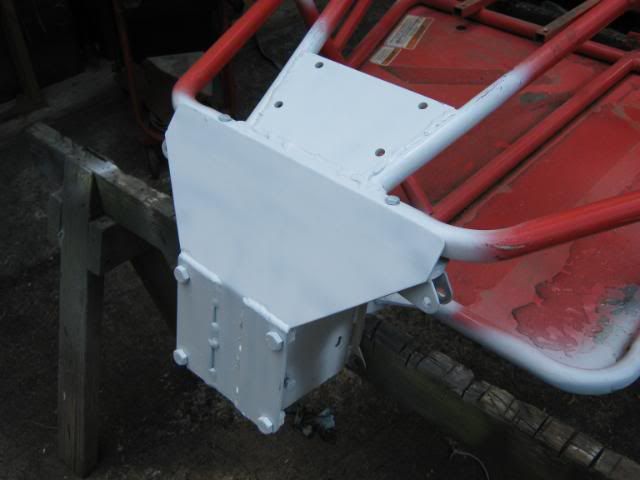 And you know, I never really liked that little duck tail thingie, behind the cock-pit, above the luggage rack, always thought just some straight load supporting tubes for the rack would be sufficient. Along with another cross bar in the cage overhead, just as it bends downward, and all of the upper bolted joints welded. 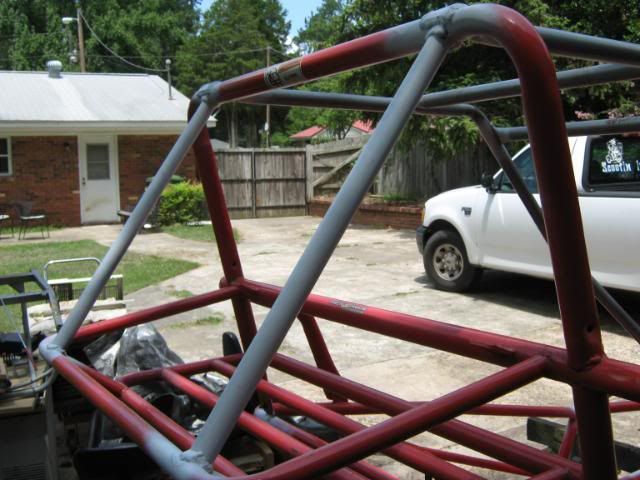 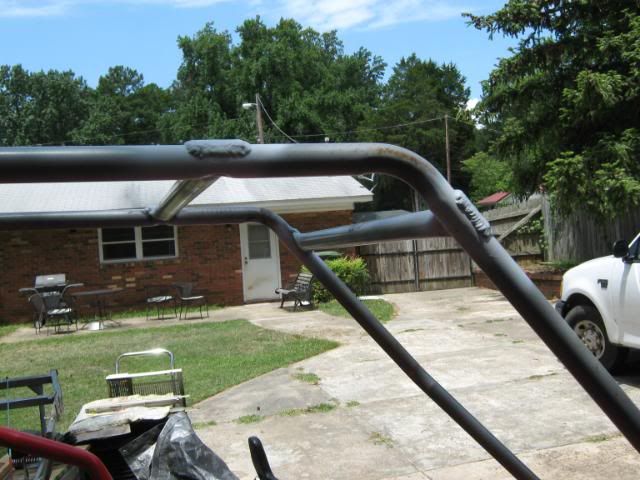 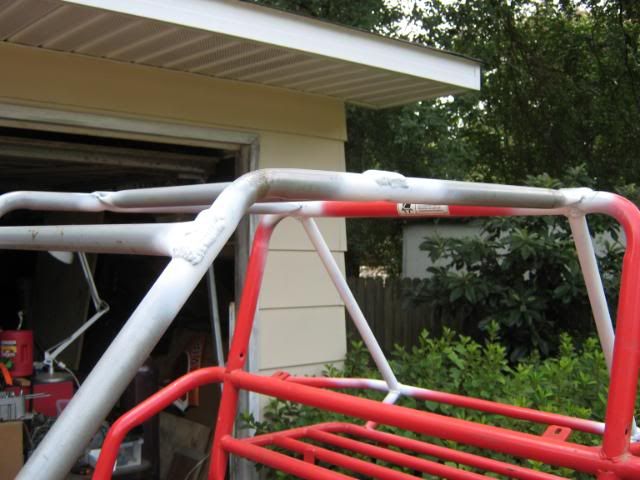 Those front tube additions are only awaiting final mock-up of the front end, so I can check tie rod clearances, et al.
__________________
kliff
|
|
#13
07-20-2010, 07:11 AM
|
|||
|
|||
|
Man your moving along brother. Did you ever call my pops? Or did you find another case?
|
|
#14
07-20-2010, 03:10 PM
|
||||
|
||||
|
Quote:
Would you mind asking him to check his in box, and if it isn't there, I'll forward again. I'd love to talk to all of you guys, but face to face just works better for me, long distance, I NEED the print thing...sorry. But please ask, I'm still interested. 
__________________
kliff
|
|
#15
07-20-2010, 03:11 PM
|
||||
|
||||
|
A little more today.... 3rd rear axle bearing addition, battery box deletion.
Horizontal versus verticle....time willl tell. weight, Digger? Not adding much more now, a few plastic body panels, a light or 2. Nothing big nor heavy. Going for the finish now. If, at a later date, I need to extend the rear wheel bearings, so be it, I'll get 'er done. But for now, this little 165cc'er is heading for the home strip, after that, a thorough tear down, and paint..finis. Just a couple of weeks now. 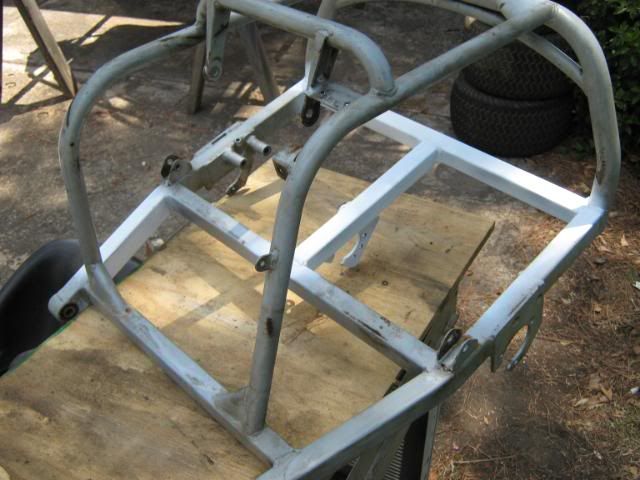 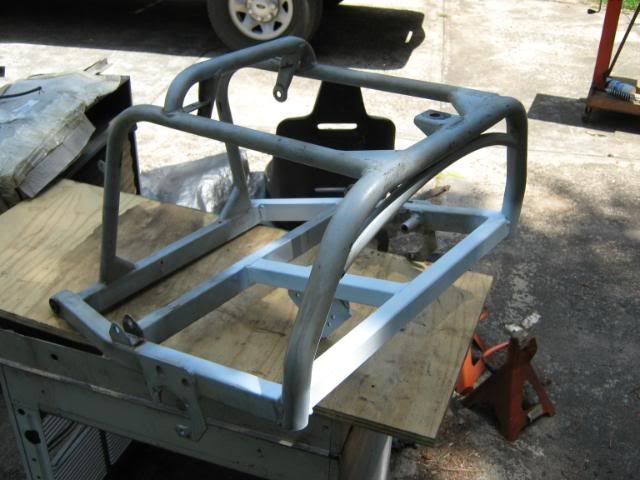 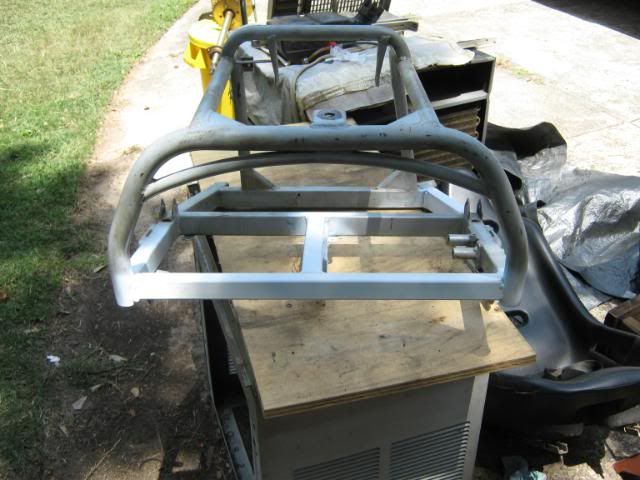 Might have gotten more done today, but I ran out of 75/25 mix, picking up 2 160 cylinders tomorrow. Just about got the engine clean enough to totally break down, after pulling the top end, just for a look see, had to re-assemble to clean before going forward....yeah, it was that BAD! NCY head looks good... port match, some bowl work, and flashing trim under the valves, and we'll call the head ready to go. Stock, domed 59mm piston, shimmed for proper deck, or 59mm shaved .030 and ported for turbo usage, is also a candidate, with the +2 crank... eeni, meeni, mieni, moe.....only I'lll know for sho...LOL! 
__________________
kliff
|
|
#16
07-20-2010, 05:42 PM
|
|||
|
|||
|
Yea I'll ask. He's here at the house so no problem. I'll probly pm you over there later
|
|
#18
07-21-2010, 06:06 PM
|
||||
|
||||
|
Thanks guys, but I gotta get this thing done so I can move back into the shop, and work on the Puddle Jumper.
One thing for sure, if even just for a few hours sat. morning, DP in October is looking like a DEFINITE! Knee deep in the little engine today. Just as I thought, the crank is trash, both main bearings and the rod bearing rough and gritty feeling, rod burned blue from wrist oin down to the crank journal, oil pump also shot, piston/cyl wall clearance .038(10 times normal!), I guess if you run them with half the fan shrouds removed, and no air cleaner element, you should expect these little hindrances...LOL, check out the overall condition of the engine externals...  That is how it was operated, and what it looked like when I took possession. It took 6 hours of hand cleaning the externals, BEFORE I even open it up. But she cleaned fairly well, and is ready for some internal dremel work(stress relieve) before assembly. Cam should be in from Eric next week, so I can check piston to valve clearances, and compensate as necessary, I'll go ahead and match the intake, start fabbing the exhaust(also for port match) and clean up the bowl areas under the seats, check for spring bind, and correct if needed, re-do the seats....yadayadayada...just a bunch of ole man stuff, cause I got time..LOL! 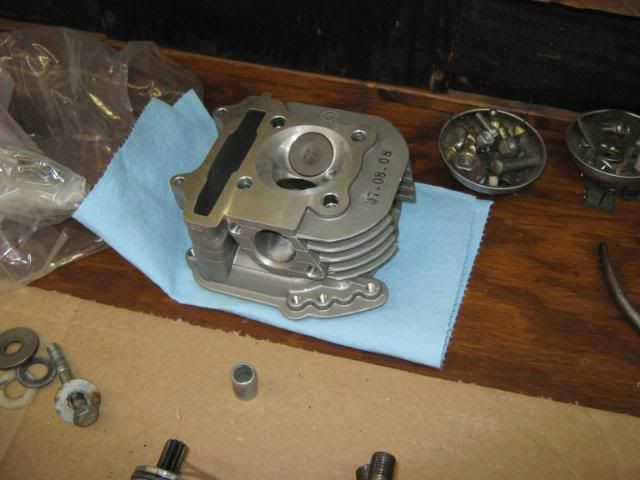 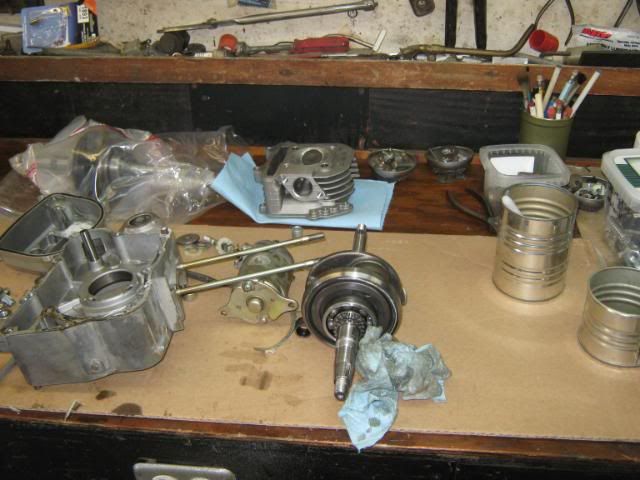 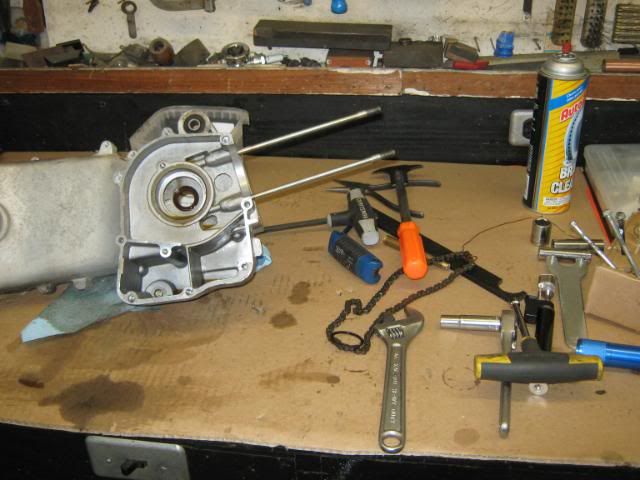
__________________
kliff
|
|
#19
07-29-2010, 05:37 PM
|
||||
|
||||
|
Wheeeewwwwww, what a couple of days.... got some work done, and some pics of work already completed, or near completion.....
Rear spring shackle... 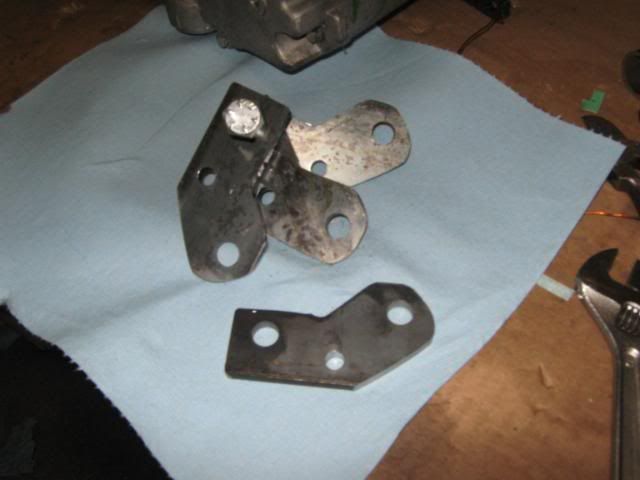 And since we're gonna have a dash mounted oil pressure gage, I went ahead and drill the pressure test port, tapped to 1/8npt, and hung my little test gage in the hole temporarily. 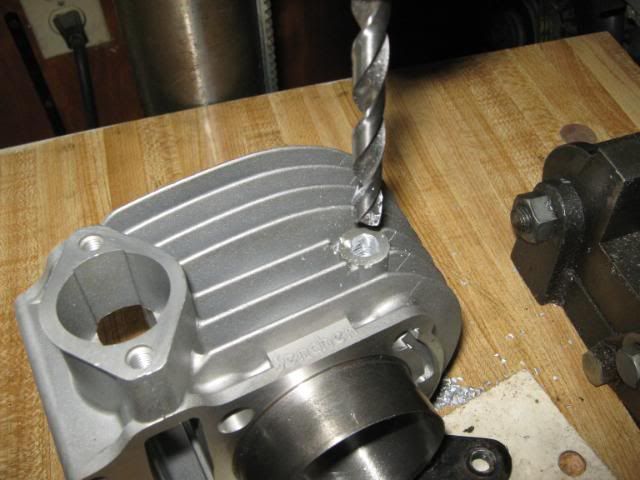 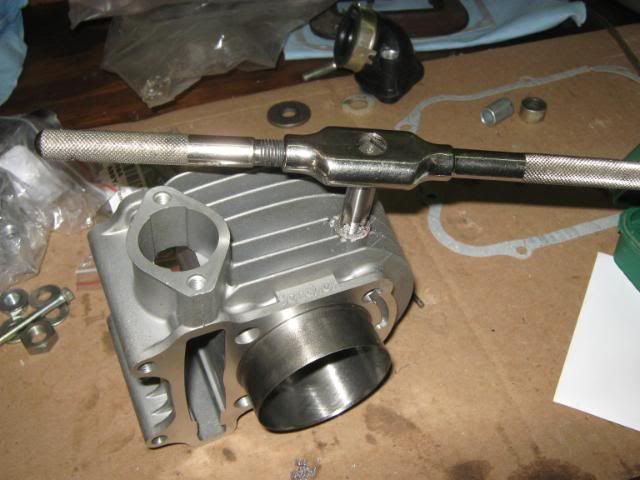 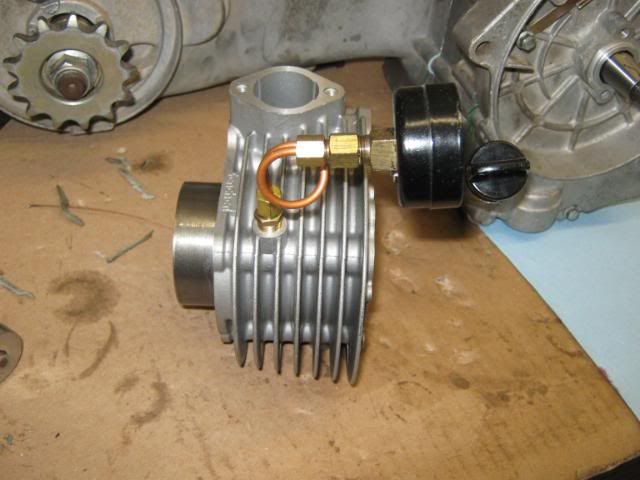 After clearancing for the stroker, she just sorta, fell together....new oil pump too(cheap insurance) 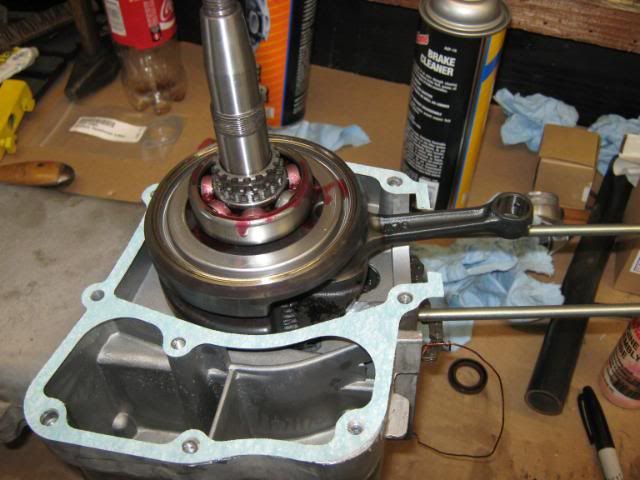 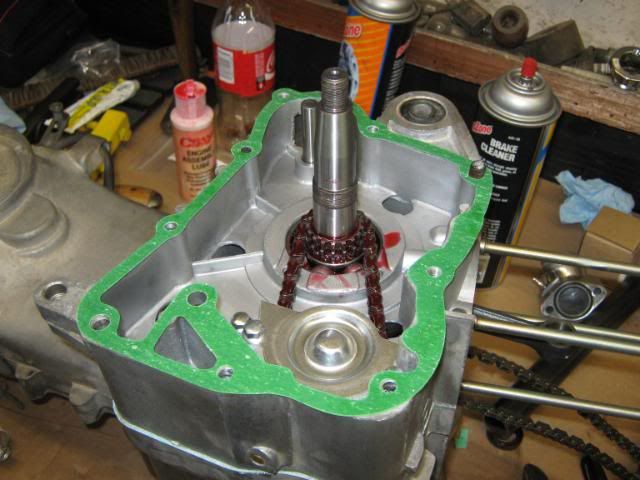 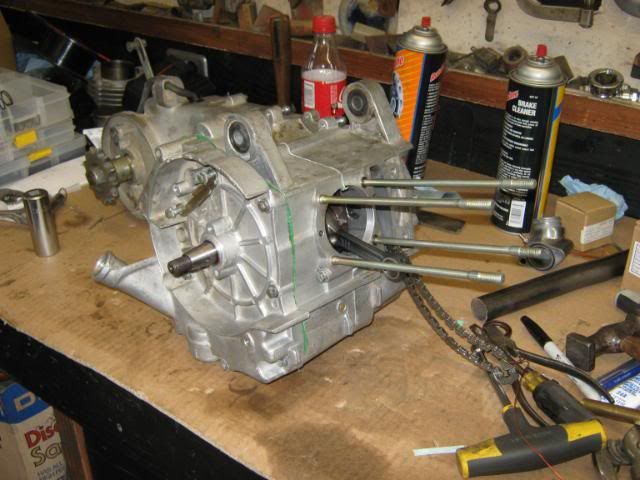 Finally settled on a .045" deck height, and away we went.... nuttin' too special to show or dwell on here, just some back yard shade tree sorta mods... 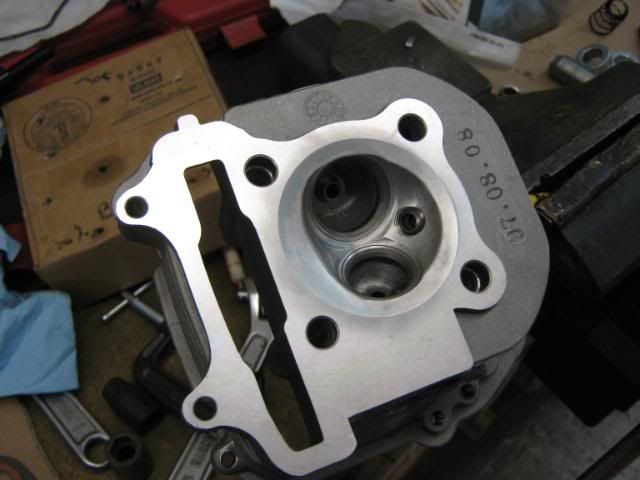 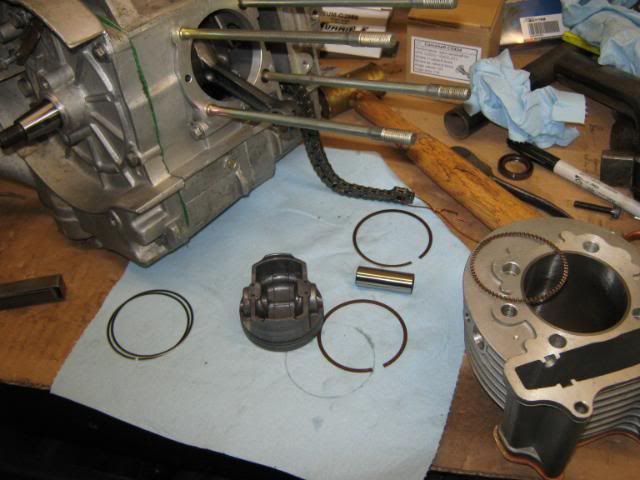  But too make a long story shore, here is where we are now... 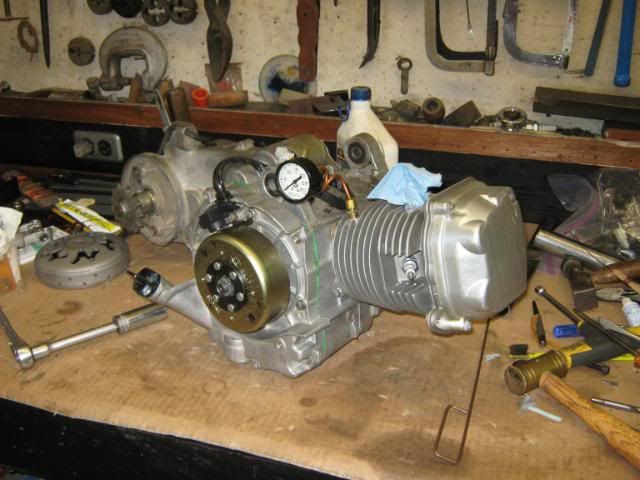
__________________
kliff
|
|
#20
07-29-2010, 06:55 PM
|
|||
|
|||
|
Is that a Prodigy on the table? Nice work as I've stated already
|
|
#21
07-29-2010, 10:16 PM
|
||||
|
||||
|
Could be Chuck. Planning on using part of a Prodigy variator, mainly the back half. The front half/fan, is just too light for me. I've seen then 'splode" on scooters, and over heat the CVT due to what I suspect was low air flow. I'll use a stock front fan half, with the "P" back, and DR.P sliders. Also gots an NCY ventilated clutch drum, and "blue" NCY clutch I'll be modifying for use.
All this stuff is left-over from my scooter days, and will just need some re-tuning for the buggies. Like the variator, most of those I was setting up with 14.3 gr sliders.... yeah, 14's with additional weight added, the balanced to an honest 14.3 Sometimes we could get down right anal on the scoots looking for that last little bit of speed. Here, I'm looking for torque, from idle to about 3/4 throttle, then pure HP for the WOT blasts(drag strip).... so I'll be starting the variator with 10.5 DR P sliders, and the clutch with 1500 rpm springs working against a 1500 torquer, new A.O., new set-up....LOL!
__________________
kliff
|
|
#22
07-29-2010, 11:24 PM
|
||||
|
||||
|
its looking good
__________________
olderthan 2008 tomberline punisher 1500 spring 12g sliders 30mm cv pumper carb uni filter no rev cdi polaris xlt snowmobile shocks for front w/550 magnum springs & blaster fronts on rear and another buggy built working on mods gk-13 white spring 17 gram sliders so far
|
|
#24
08-22-2010, 08:04 PM
|
||||
|
||||
|
So do you have any updates for the viewing public?
|
|
|
|