|
|
|
|||||||
| FrankenBuggy Tech Unconventional and Home Built Buggy Tech Forum |

 |
|
|
Thread Tools |
|
#1
 04-12-2013, 05:15 AM
|
|||
|
|||
|
I just started put a 1986 Honda TRX200SX engine that is a 5 speed automatic with reverse and chain driven into a Crossfire 150R ---------- I had been looking for a while for the right motor set up and found two of the same bikes , got one rolling and it is a fast and responsive motor , same engine they used in the Honda three wheelers , I bored the cylinder .30 over and got it running , missing a bunch of parts to complete the second bike so the motor is going to the Crossfire ---------- going to have to move the sprocket to the left side of the axle which should be easy , the Honda is a single chain link and the Crossfire a double so I will need a sprocket , thinking about the teeth count of the sprockets but really have not even counted them yet , wonder if I kept the same count as the bike on the axle of the buggy ---------thinking about the shifter , foot or hand lever ?
Last edited by rocko; 04-12-2013 at 05:16 AM. Reason: How do you post some pictures ? 
|
|
#2
04-12-2013, 06:07 AM
|
||||
|
||||
|
Hello there, I thought I might chime in as I am doing an ATC 200s swap into a spiderbox. I will be using a completely different axle in mine, as the hub is welded to the axle and can not be moved, not to mention, the stock axle sucks. For the gearing, keep in mind that you are essentially doubling, or even tripling the weight the engine would be moving around, so a lower gear ratio might better suit you to keep the clutch from slipping, my atc came with a 3.9:1 ratio stock, with a 520 chain, I will be adding a jackshaft to help with the chain/shifter interference, and lower the gear ratio without using a huge sprocket on the axle, somewhere in the range of 4.6:1 final drive. For the shifter, its all in your preference, if you like foot operated, go with that, but having 3 pedals on an off road buggy makes me nervous, I have opted to go with a hand operated shifter by way of cable and brackets, to a modified shift lever, and I will be installing it between the seats so it won't get hung on a branch or anything.
Mainly, the only difference between our engines is you have reverse and electric start, whereas mine is pull start only and no reverse, but I couldn't pass up the price for it. I will be putting a higher comp piston in and bigger clutch springs to beef it up a little, but other than that, air filter and exhaust is all I'm doing, and that should wake her up some.
__________________
ASE Master and Toyota Master Diagnostic Certified Buggy Building Trainee '04 Dazon Raider 150 'modded' Last edited by Masteryota; 04-12-2013 at 06:09 AM. Reason: spelling
|
|
#3
04-12-2013, 06:41 PM
|
|||
|
|||
|
Thanks for the reply 'yota ------ some good thoughts for me to ponder on -------------- the crossfire R already has two cable levers between the seats it may be possible to incorporate the shifter into the lever , the thing I like about the foot is the abillity to pop the clucth , I wonder how much the weight is going to cut down performance also , this 200SX is a hot motor , I got 2 Honda 4 trax TRX300's and a TRX200SX thats running , the 200SX will blow the doors off the 300 in every catogory except ground clearance , I have never GPS'ed the 200 but from what I have read and what it feels like I 'd say it does over 50mph easily , it is sacrey fast , and will wheelie you off the back if you throttle up and pop the clutch , The motor going into the cart is bored 30 over , I got a new header /muffler and I have a set of carb jets to play with the tuning , between the 5 speed transmission and getting away from the belt annd clutch I am thinking the performance should be double what I had with the Howitt 150cc if I get the ratio right with the sprockets , I might get lucky with the sprocket set up as it is bolted to a hub which is mounted to the axle that has set screws in the hub , have not taken it apart yet to see how it made yet , the Tomerlyn has a double chain where the 200 has a single , I am thinking jack shaft and then I can swop sides with the chain and leave the hub alone --I had a 1982 Honda 200 three wheeler back in 82 and it was aggod motor , the Sx has electric and pull start , a good feature --put an ad this morning for the Howitt engine and have some one that wants it , I got another Howitt 150 with reverse that runs to get rid of , which will give some some fuel for the fire
|
|
#4
04-12-2013, 06:50 PM
|
||||
|
||||
|
hey Rocko how much are you wanting for the second Howhit w/ reverse? also will the reverse kit be included with it? zman
|
|
#5
04-12-2013, 07:51 PM
|
||||
|
||||
|
The 200sx is peppy'er than the 200s engine, due to the higher compression with the electric start. Spec on mine is 13hp/11ft.lb. torque, and thinking bumping the CR from 7.6:1 to ~9.5:1 with the 200x piston kit, I'm guestimating around 15hp. I worry about the clutch a bit, because of the weight, thats why I suggested a lower gear ratio.
You are right, though, about using a jackshaft which should solve your axle sprocket location issue, and losing an entire sprocket and chain should even out any added weight from the the quad engine, I am sure the 520 stock quad chain will hold up to what you throw at it. The only issue I have seen so far is trying to find 520 sprockets for the jackshaft, but I'm sure they are out there.
__________________
ASE Master and Toyota Master Diagnostic Certified Buggy Building Trainee '04 Dazon Raider 150 'modded'
|
|
#6
04-12-2013, 09:40 PM
|
|||
|
|||
|
I think $200 for the engine complete sounds fair to me , the reverse is built all into the motor assembly , I have heard talk of a short shaft and a long shaft depending on reverse or not ------------- I just looked in the manuel and found 9.1 compression , 185 psi , 14.5 hp @ 7000rpm's , gears are 1st 3.56 thru 5th 1.042 , primary reduction is 3.087 (71/23) and final reduction is 3.50 ( 42/12) , dry weight of the sx is 353 lbs --------------- just thought of the tire size affecting the ratio , the tires of the cart are much smaller
|
|
#7
04-13-2013, 06:38 AM
|
||||
|
||||
|
metalstudman has posted quite a lot about using the honda 200s, check out some of his builds in the frankenbuggy section. He's "off the grid" for the time being, so don't expect any replies if you post questions to him. As far as 520 sprockets go, if you use straight 1" shaft material, you need to mill 50 series sprockets down to 520. if you can use another quad shaft that is splined to a matching 520 sprocket, then you're good to go.
|
|
#8
04-13-2013, 07:15 AM
|
||||
|
||||
|
@Yota. Where is a good place to get a better axle??
__________________
MXR TrailBender 160R SYC Perf head P&P,Matched intake and exhaust, A12 cam, Orange CDI & coil, Motorio pulley, 115mm Variator and lightweight drive face,11gm Sliders, UNI, modded muffler + 200 horsepower  http://www.youtube.com/watch?v=3hx-hEWl10c I'll take your insults as compliments and blame it on your lack of intelligence.
|
|
#9
04-13-2013, 07:44 AM
|
||||
|
||||
|
@slestak, if you are looking for a universal replacement axle, then I would advise using a flexproof, as they are only a few bucks more than the standard axles, below is the one I am going to use.
http://www.mfgsupply.com/gomini/gomi...az1413-40.html If replacing the stock axle, then I would also advise you to add at least 1 more axle bearing in the center of the swingarm for support, some have added up to 3 or 4, but I think it might be overkill for a flexproof axle. As far as a direct replacement, I heard mixed reviews on the HD replacement axles, some break, some bend, heck, some even were bent right out of the box. @x-bird, I read your post about shaving down the #50 sprockets to the 520 size, but I was hoping someone out there made some 520's, or at least I could find a 530 output shaft sprocket for the engine, then just use 530 chain and sprockets for the rest, but can not seem to find either one.
__________________
ASE Master and Toyota Master Diagnostic Certified Buggy Building Trainee '04 Dazon Raider 150 'modded'
|
|
#10
04-13-2013, 08:19 AM
|
||||
|
||||
|
Yota. I assume that adding another bearing requires adding some sort of support bracing for it as well correct?? I like the look of that axle. I just need to pick the one that fits my buggy.
__________________
MXR TrailBender 160R SYC Perf head P&P,Matched intake and exhaust, A12 cam, Orange CDI & coil, Motorio pulley, 115mm Variator and lightweight drive face,11gm Sliders, UNI, modded muffler + 200 horsepower http://www.youtube.com/watch?v=3hx-hEWl10c I'll take your insults as compliments and blame it on your lack of intelligence.
|
|
#11
04-13-2013, 09:28 AM
|
||||
|
||||
|
You are correct, mos times the added bearing will be in the middle of the swingarm, you can get the bearings and hangar plates from almost any go kart supply site. Depending on the design of your particular swingarm, you would have to add some square tube to box in the back, and run a piece from there to the front bar that the swingarm mount tabs are on in the middle. I have heard the universal hangars aren't as long as the factory hangars on the Yerf's, but unsure about your model, once you add the tubing in the middle, its just a matter of placing the hangar and weld it in place.
Another option, and the way I will be going, is to use pillow block bearings instead of the hangar type, but you have to be exact on the hanging measurements, and without adding more tube, washers or collars, you might not get it to line up correctly.
__________________
ASE Master and Toyota Master Diagnostic Certified Buggy Building Trainee '04 Dazon Raider 150 'modded'
|
|
#12
04-14-2013, 07:31 AM
|
|||
|
|||
|
I was looking over the axles and thinking about using the 200sx axle , didn't measure and know it's alittle narrower but , rims that I have are extremely offset to the outside , the tires I have are very wide and I already have a set of 2 inch wheel spacers I can use , that would solve the cross over jack shaft and sprocket aligment problems , and I could use the mechanical drum brake of the 200 axle instead of the fluid powered disc of the cart , the brake is a dual controlled cable lever so the emergency brake could be used on the orignal handle lever and the foot brake changed over to cable --------------- whats the best way to handle the throttle cable
|
|
#13
04-14-2013, 08:32 AM
|
||||
|
||||
|
The only issue I see with using the quad axle is the mounting of the swingarm to the buggy frame. I had a 200sx at one time, and it seemed kinda narrow to promote any kind of stability, not to mention, it was set up for the engine to be set further ahead of where you would be mounting it.
I would advise to keep the hydraulic system, although cables and drums seem simpler, they just don't stop as well as hydraulic disc. Thats why auto makers have phased them out almost completely. Increasing power and top speed, you will need the hydraulic disc to slow down, and on my 200sx(86) it had dual discs up front, which would be around 70-80% of your stopping power. Although the parking brake would be nice, its not worth the outdated and possibly ineffective drum set up. I would actually advise beefing up the existing brakes by adding another disc and caliper, or converting the existing to a motorcycle sized disc and caliper. I am weighing the options on both sides for mine. As for the throttle, you have unlimited options. You can run a cable from the pedal back to the engine, or reuse the linkage/cable set up already there, I am opting for the full cable on my swap, as I don't like the link bars under my feet, and can not secure them as they need to move, I just hope I can find a cable to interface with the slide on the carb.
__________________
ASE Master and Toyota Master Diagnostic Certified Buggy Building Trainee '04 Dazon Raider 150 'modded'
|
|
#14
04-23-2013, 05:21 AM
|
|||
|
|||
|
I actually physically started my project , got the engine off the bike and the engine out the carts frame , axle off and apart , working on the sprocket holder , and found some weld on hubs and sprockets ----------------I measured the shaft at 41mm which is 1.642 , they have a 1 5/8 hub which is 1.625 but don't list a 41mm , so I am thinking I could go 1 5/8 and broach or enlarge the bore a little to fit the shaft before welding it , there sprockets are list as 50 , is 50 the same as 520 which is the listing of the OEM chain ---------42 teeth in the rear and 12 in the front is the bikes sprockets specs , think I should stay the same or increase or decrease it a bit ----------
|
|
#15
04-23-2013, 06:02 AM
|
||||
|
||||
|
#50 chain and sprockets are the same as a 530 chain, which is bigger than your original front sprocket. I am running into the same issue right now, deciding whether to mill down some #50 sprockets, or chance using the 520 front with a 530 chain and use #50 sprockets for the jack shaft and axle. Not sure if I mentioned this before, but you really need to consider the increase in weight you are putting on the engine when you look at gear ratios. I am essentially tripling the weight the engine was designed to carry, and adding some height to the rear tires, so I will be changing my final drive ratio from the stock 3.9:1 down to 4.6:1, to keep from wasting the clutch on take off. I might add, that if you drop the gearing down without a jackshaft, you will have to run a big axle sprocket, which will limit your ground clearance.
As for the axle size issue, you got me  but I might add, if you did add a jacksaft, it would cure the chain location issue, as well as give you tons more options with gearing. I might add, you would be able to get away with only milling down one gear on the jackshaft to match the output sprocket and chain, then use the ever popular 530 for the final drive to the axle. but I might add, if you did add a jacksaft, it would cure the chain location issue, as well as give you tons more options with gearing. I might add, you would be able to get away with only milling down one gear on the jackshaft to match the output sprocket and chain, then use the ever popular 530 for the final drive to the axle.
__________________
ASE Master and Toyota Master Diagnostic Certified Buggy Building Trainee '04 Dazon Raider 150 'modded'
|
|
#17
04-23-2013, 01:49 PM
|
|||
|
|||
|
I got 520 chain not 530 , are they all the same in the 50 class , the OEM sprocket of the Crossfire is a double chain , so if I did a jack shaft then I would have to find a double chain sprocket for jack shaft as the one of the 150 engine is splined , and I would have two chain adjustments to worry about , the 200sx ran 55 mph and will sling mud and dig ruts at low end , if the extra weigh slows it down then I am ok with it as I don't really want to go 55 in that cart , the engine is a 5 speed so I am thinking it will have a lot of lower end torque -------I am going to stick with the one chain and no jack shaft , but I don't think I am going to use the two part weld together hub and sprocket , going to try and fab up a sprocket holder that the sprocket can be bolted to so that if I want to change the sprocket later it will be no problem
|
|
#18
04-23-2013, 06:15 PM
|
||||
|
||||
|
Let me break this down a bit, whats known as a 520 chain is smaller than the 530, not in the link length, but in its width of the link. what is known as a #50 chain is the exact same size and width as a 530 chain, and is normally the industry standard chain size for most anything over 500cc and is chain driven.
That being said, you can use a 530/#50 chain on a 520 sprocket, but the chain will move side to side on the narrower sprocket and cause excessive wear to the chain and gear. As a bike owner and wrench turner, this would be very bad on a street bike pushing 100+hp and speeds in excess of 90mph, on a buggy like ours, putting out 12-20hp and speeds in the 30-40mph range, it would still happen, but at a much slower pace. As for the gearing, you can do what you want, but the added weight won't slow you down, but will add a great deal of stress to the internal centrifugal clutch, and may cause it to slip and fail prematurely. Take a look at the prices for a new replacement clutch, and not the manual one for shifting, new parts are around $140 for the drum, and $70 for the three shoes, and Honda is the only one who makes the drums, plus having to partially split the case to replace it. That's why I opted to drop the ratio down, to get the engine RPM up to keep the clutch locked, and not slipping on take off, as that is the clutch that gets you moving.
__________________
ASE Master and Toyota Master Diagnostic Certified Buggy Building Trainee '04 Dazon Raider 150 'modded'
|
|
#19
04-24-2013, 06:00 AM
|
|||
|
|||
|
OK , after a lot of reading and youtube videos I think the jack shaft is the way I'll go -------------what size shaft would you suggest for the jack shaft ( my axle is 1 5/8 41mm ) , and what size sprockets ( stock bike sprockets are 12 and 42)
|
|
#20
04-24-2013, 06:36 AM
|
||||
|
||||
|
That gear set up results in a 3.5:1 gear ratio, IMHO, I would drop it to at least 3.8 like x-bird did. Below is a link for a jackshaft gearing calculator I like to use, play around with the gear numbers and find what looks good to you, but remember, the engine gear is limited by the manufacturers, so you might only have 1 or 2 options. I like using a bit bigger gears on the jackshaft to be able to use a smaller gear on the axle, thus resulting in increased ground clearance.
As for the size of the shaft, I would go no less than 1" with quality pillow block bearings, and depending on the length, I might suggest using 3 support bearings to eliminate any flex. http://www.fasttrackraceway.com/calc/
__________________
ASE Master and Toyota Master Diagnostic Certified Buggy Building Trainee '04 Dazon Raider 150 'modded'
|
|
#21
04-25-2013, 04:56 AM
|
|||
|
|||
|
the stock cart double chain sprockets are 14/33 , stock bike front sprocket is 12 so using the calculator a 18 tooth jackshaft input will give 3.54 , a 19 tooth will be 3.73 and a 20 tooth will be 3.93 ----------- so now I need to find a 19 tooth 520 sprocket and a hub to attach it to the 1" jackshaft ---------- what you think about that plan
|
|
#22
04-25-2013, 05:44 AM
|
||||
|
||||
|
Sounds like you are on the right track, only catch is, there doesn't seem to be anyone making 520 sprockets for a universal hub, or even weld on sprockets. If you look in X-birds Yerf upgrade thread, he milled down some 530 sprockets for his jackshafts down to the 520 size. Right now, that seems to be the only real option, other than finding 520 bike sprockets and cutting the middle of them out and welding them to a weld-a-hub, but then you risk making them out-of-round and having chain problems.
If have a look at surplus center's website, they have cheap weld on sprockets that attach to different sized hubs, I think that will be the way I go when I'm ready to put the axle in, which is soon, I hope. 
__________________
ASE Master and Toyota Master Diagnostic Certified Buggy Building Trainee '04 Dazon Raider 150 'modded'
|
|
#23
04-25-2013, 06:10 AM
|
||||
|
||||
|
after digging around a long time, easiest option I found was as Master noted. get a piece of 1" keyed shaft, 2 #50 keyed sprockets and some 1" pillow block bearings. www.*************.com about the cheapest route. very simple to setup, hardest part is milling down the sprocket to match the engine sprocket to 520. if tension/adjust worries are an issue, a pair of tubes welded in front of the bearing saddles with adjust bolts going thru them to the front of the saddle is an effective and simple adjustment locking device.
|
|
#24
04-25-2013, 06:17 AM
|
|||
|
|||
|
I am familar with Surplus Center , just recently my Husquvarna Zero Turn trashed a pump , it was going to cost $500 for one pump , Surplus Center sent me a travel kit right off the production line at Husquvarna , for $630 I got two pumps , two travel motors and all the hoses and fittings to plumb the entire mower ----------------------- I figure I am going to need some machine work on sprockets , I want to use the OEM drive sprocket of the cart which is splined , I am thinking of having it bored to take out the splines , it will leave a 1 1/2 hole , then have them bushing it to 1" and weld that to the shaft with a half on an inch or so sticking out each side for welding
|
|
#25
04-25-2013, 08:21 AM
|
|||
|
|||
|
went to surplus's site and found a sprocket in 50 $8.90 but no pillar bearings or shaft ----------- went to The Big Bearing Store .com and pillars are $9.50 each either in horizonal or vertical 2 , 3 or 4 bolt pattern , some thought needs to go into this selection , could work either way , they also have the 36inch long 1" keyed shaft for $30.60 ------------- would you have a pic of your jack shaft , and how do I post pics to this site ------- thanks for all the help ---- I am a heavy equipment mechanic , hydraulics is my primary line of work
|
|
#26
04-25-2013, 12:24 PM
|
||||
|
||||
|
http://www.buggymasters.com/forum/sh...?t=2243&page=6
Pictures are on post #536 ... to upload pictures, click on "Go Advanced" button below the quick reply text box. underneath the "reply to Thread" box is one headed "additional Options" click "manage attachments" in that one and it will open up a separate window that lets you browse your computer, open pics into it and upload them. jsut take note of the file size requirements.
|
|
#27
04-25-2013, 06:23 PM
|
||||
|
||||
|
I had a stroke of genius this morning while at work, tossing ideas around with the guys in the shop, and then it hit me right in the face. A brake lathe. If you have access to, or know someone with access to a brake lathe, you can machine down those #50 sprockets in no time. The size difference is 1/8" in thickness, or .125", meaning you will want to take off about .063" off each side. The thing to remember also, is the sprocket teeth have an angle on the sides, and that needs to be added after milling down the teeth, but not impossible. I wish I was at that point in my build, cause I want to try it out immediately, lol.
__________________
ASE Master and Toyota Master Diagnostic Certified Buggy Building Trainee '04 Dazon Raider 150 'modded'
|
|
#28
04-26-2013, 06:24 PM
|
|||
|
|||
|
today I was able to order 3) 1" heavy duty pillar bearings , 1) 36" shaft that is keywayed 1/4 x 1/8 ( only need 24" 's but 36 is the only way they sell it ) and a 20 toothed sprocket ( 3.93 ratio) for $80 with the freight and dropped off the OEM Crossfire 150R output double chain sprocket at the machine shop , they are going to bore the spline out and make it 1 1/2 i.d. then fab a hub 1 1/2 o.d. and 1 " id and keywayed , press in the hub then weld it with TIG , the hub will stick out both sides the sprocket 1/2 " with a set screw over the key , I found a double chain sprocket in 1" key bore but they wanted $106 and a month delivery ------------yesterday I cut, trimmed and grinded the frame into a craddle to mount the engine to and it doesn't look 1/2 bad , still not sure if this is the way I will go
|
|
#30
04-28-2013, 05:25 PM
|
||||
|
||||
|
It looks like it almost fits, lol. I have been tossing about the idea of using a portion of my frame in the swap as well, and I think I might chop'er up and see how the engine compartment fits in the swingarm. If it were me, I would notch out the quad frame where it contacts the swingarm frame, just to make sure the welds bite really well, other than that, looks like you are well on your way. I should be finishing up my front end next week, and then on to the engine on mine, and boy am I hyped about it.
__________________
ASE Master and Toyota Master Diagnostic Certified Buggy Building Trainee '04 Dazon Raider 150 'modded'
|
|
#31
04-28-2013, 06:54 PM
|
|||
|
|||
|
Hope to get the sprockets and shaft by Wenesday or Thursday , really don't want to go any farther trimming the frames till after the jack shaft is built , think of welding the frame to a 1/4 plate of steel , weld two runners across the swing arm and bolt the plate to the swing arm with slots for chain adjustment , two nuts welded to the plate on top a shim and a couple of bolts thru a hole in a piece of angle iron welded to the swing arm will adjust the chain , on the jack shaft I am thinking of using the two stock Crossfire chain adjusters and a double holed link attached to one of the two pillar block mounting bolt ------------------- hers's another view without engine
|
|
#32
05-23-2013, 06:41 PM
|
||||
|
||||
|
Update?
__________________
ASE Master and Toyota Master Diagnostic Certified Buggy Building Trainee '04 Dazon Raider 150 'modded'
|
|
#33
05-24-2013, 03:32 AM
|
|||
|
|||
|
Hey 'Yota , making some progress but it has been slow with all the other projects and work I got going on , I have all the parts to put the jackshaft together and have it mocked up , my machinist friend did a great job , he cut down the 50 input sprocket to 52 and he beveled the ends of the teeth on the side he cut down and it looks factory cut and it engauges the chain very smooth as it rotates , he did say the tips of the sprockets were very hard from some type of heat treatment , he also bored the double toothed Crossfire sprocket that was splined and and welded in a fabed collar that is 1" keywayed and put two set screws thru the coller over the key way , ----------- where I am at now is building mounts for the 3 pillar bearings to mount to and still thinking on how to adjust the two chains and come to the conclusion it would be very hard to adjust both chains with one motion , I am throwing and idea around for the rear of making a pivoting idler arm with another sprocket on it , I could pry the arm to apply tension then tighten it down , a little concerned on timing of the chains pitch on the idler sprocket and wonder if it would cause permature wear , on the front chain I am thinking of have the engine slide on a mounting plate and tighten it down after the chain is adjusted --------- I really think I am trying to over think it ,and been kinda been wiery of the next move , thinking once I get past this jack shaft mounting then things should move along better
|
|
#34
05-24-2013, 06:43 AM
|
||||
|
||||
|
I have been thinking about that as well, and I have found a simple, yet kinda crude fix, I will make the jackshaft adjustable via the pillow block bearings, and will likley add a tensioner to the final drive chain like you mentioned. I think I will use a spring on the tensioner but will still lock it down once adjusted. I have started to mock up my install, and will be modifying the swingarm to fit this weekend.
__________________
ASE Master and Toyota Master Diagnostic Certified Buggy Building Trainee '04 Dazon Raider 150 'modded'
|
|
#35
05-24-2013, 09:51 AM
|
||||
|
||||
|
as i'm finding out, definitely make some kind of locking system for the jackshaft bearings to prevent them from pulling forward. (that's if you're going out of the engine to the rear like i am.) Even with them cranked tight with locknuts they still slid forward and loosened the chain. LOCTITE the set sprocket & bearing screws when you get final position!
Rocko, go with a spring loaded idler, better off with a solid wheel vs a sprocket (less heat, drag and slight misalignment wont hurt like it would with a sprocket) Getting adjustment range for both i think is largely luck unless you can sit down and calculate out the distances. I am finding that an even and odd tooth count (11-16 and 11-11) on the two sprockets on the chain sets causes the need for an offset link in one of the chains.
|
|
#36
07-31-2013, 05:34 PM
|
|||
|
|||
|
just was thinking could you just trun the axle around to the other side
to run the 200cc
|
|
#37
07-31-2013, 06:59 PM
|
||||
|
||||
|
Quote:
__________________
ASE Master and Toyota Master Diagnostic Certified Buggy Building Trainee '04 Dazon Raider 150 'modded'
|
|
#38
07-31-2013, 08:10 PM
|
|||
|
|||
|
I still think it can be done tho but yeah the brake has to but good
|
|
#39
07-31-2013, 08:22 PM
|
|||
|
|||
|
I got a 200cc Honda clone in the shed but its a manual clutch so don't really want a third pedal
|
|
#40
08-01-2013, 05:16 AM
|
|||
|
|||
|
I have not done much to my buggy in the last few months , I been refurbing a Honda 300 down to the frame , getting close to completion on it , this weekend it may be finished and then I am going to start back on the cart -------------- the brake on the Tomberlyn Crossfire 150 is on the right and the chain of the 200 on the left , so that wasn't going to be a problem ------ I did find some very nice , brand new wheels at the flea market for $3 for two which may work out as chain tensioners , they are made out of that nylotron material which is stronger than steel and have 2 sealed roller bearings in them , I am a heavy equipment mechanic and I see a lot of cranes have the nylotron sheeves for the cables and they out last the steel one by a long shot -------- I am thinking about having no adjustment and getting the chain as close as possible , maybe even using a half link then use a wheeled tensioner to take up the remaining slack ,
|
|
#41
09-24-2013, 08:55 PM
|
||||
|
||||
|
Quote:
Any updates rocko? Haven't seen you in a bit.
__________________
ASE Master and Toyota Master Diagnostic Certified Buggy Building Trainee '04 Dazon Raider 150 'modded'
|
|
#42
09-25-2013, 05:14 AM
|
|||
|
|||
|
Kind of disappointed that there is not much progress on the cart to speak of , I got too many other projects going on , including LSU , Saints , ATV parties every weekend ( my house is at the trail head ) , but I do hear it every weekend " When are you going to finish the cart " ----------the bored out , re-pistoned 200SX engine is sitting in the modified swing arm/engine carrier , all the jack shaft parts are there and I am still thinking of how I am going to adjust both chains , I found two really nice nylotron wheels with bearings in them brand new at the Flea Market and thinking about making some kind of chain tensioner , thinking I could get the chain as tight as possible by removing links then use the tensioner -------------------------------how do I post pics to this thread so that maybe I can gets some input on chain adjustment and catch a second wind and get this project finished
|
|
#43
09-25-2013, 05:24 PM
|
||||
|
||||
|
When you are posting, go down the page where it says manage attachments. Click on the button and it will give you the option to upload pictures from your computer. When you are done uploading pictures, select close window. The pictures will then be thumbnails on you post and when someone clicks on the thumbnail, it will expand full size.
__________________
2005 Hammerhead 150 170cc BBK, PnP Big valve Head, A12 Cam, Uni Filter, Custom Exhaust, 10G rollers, 1500 Contra Spring, 2000 Clutch Springs Just added - 2007 Joyner 250 SV - Let the fun begin 4-Dirt Bikes, Baja Bug and enough toys to keep me in the garage and out of trouble.
|
|
#44
11-03-2013, 05:25 AM
|
|||
|
|||
|
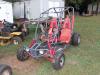
Well still never got back to the cart build and got further off track and started on another Honda 300 Fourtrax build -----but I figured out how to post pics , so here are a few ------------ the jack shaft is on the top and out side the swing arm/motor carrier in the pic , I plan on having inside but it sure would be easier to build on the outside ------------ jack shaft mounting and adjustability of the chains independently is the issue right now
|
|
#45
11-03-2013, 06:06 AM
|
||||
|
||||
|
I had thought about doing something similar to what you have mocked up, but I am concerned about the engine cradle tubes being strong enough in stock form to keep from flexing. I too have been brainstorming about adjustability of the chains, and I think the easiest method will be adjustable tensioners on both chains. I like the length of the chains on your build, I have heard hat the shorter the chain is, the more heat is built up and it can not be radiated properly, and results in cooked chain and sprockets.
__________________
ASE Master and Toyota Master Diagnostic Certified Buggy Building Trainee '04 Dazon Raider 150 'modded'
|
|
#46
11-03-2013, 10:42 AM
|
|||
|
|||
|
My original thoughts were to have that jack shaft under and inside the swing arm pipes mostly for cosmetics as I think it would look better and to run more pipes down to act as a leg on the pipe that is cut on side the engine with a plate of steel for the pillow blocks to mount to which would give it more strength---------- but I was think if I did that then the chains would be pulling on the bolts which hold the pillows down , where if I keep it like it looks the force would be pulling the pillows down on to the plate , the sprockets calculate to 4:56 , with 5 gears and 1st being SL (super low) I think this should be a fun cart , ----------------- 'yota I told a guy about you last week on the Honda site , he was talking about 300 engines in a cart and I mentioned to him that you did the shaft to sprocket conversion in detail with pics --------------- I am actually thinking ahead on another cart project , I have 2 EZGO Workhorse 350ST's one is running and the other a part cart with engine problems , it is a 350cc Kawasaki 2 cylinder 4 stroke , belt driven with a centrifugal clutch , I have a 300 Fourtrax shaft drive motor sitting idle and was thinking it would cool if I could get that engine in that cart and do away with the belt as I ride it in some deep water and the belt will slip
|
|
#47
11-03-2013, 10:48 AM
|
|||
|
|||
|
My original thoughts were to have that jack shaft under and inside the swing arm pipes mostly for cosmetics as I think it would look better and to run more pipes down to act as a leg on the pipe that is cut on side the engine with a plate of steel for the pillow blocks to mount to which would give it more strength---------- but I was think if I did that then the chains would be pulling on the bolts which hold the pillows down , where if I keep it like it looks the force would be pulling the pillows down on to the plate , the sprockets calculate to 4:56 , with 5 gears and 1st being SL (super low) I think this should be a fun cart , ----------------- 'yota I told a guy about you last week on the Honda site , he was talking about 300 engines in a cart and I mentioned to him that you did the shaft to sprocket conversion in detail with pics --------------- I am actually thinking ahead on another cart project , I have 2 EZGO Workhorse 350ST's one is running and the other a part cart with engine problems , it is a 350cc Kawasaki 2 cylinder 4 stroke , belt driven with a centrifugal clutch , I have a 300 Fourtrax shaft drive motor sitting idle and was thinking it would cool if I could get that engine in that cart and do away with the belt as I ride it in some deep water and the belt will slip
|
|
#48
11-03-2013, 10:57 AM
|
|||
|
|||
|
Heres a pic of the type of EZGO I was think of doing the engine swop in , this one runs very well , lots of fun and it does a lot of work around the place for me , does really well offroad except for water causing belt slippage -----this one pictured is from the rental company I use to work for , got it cheap and it was pretty rough , did a restore on it about 3 years ago and it still is fair to midland
|
|
#49
11-03-2013, 12:29 PM
|
||||
|
||||
|
Quote:
The way I imagine my jackshaft, the bearings will be mounted plate side toward the engine/axle, with either angle or square tube making the frame, and running a diagonal brace back toward the engine. I was thinking having them level, but I agree with you about putting the pull stress on the pillow block and mounting plate instead of the bolts.
__________________
ASE Master and Toyota Master Diagnostic Certified Buggy Building Trainee '04 Dazon Raider 150 'modded'
|
|
#50
11-04-2013, 04:01 AM
|
|||
|
|||
|
You are right , it was the Metal Stud Guy who does the conversion , well you must have impressed me with something else as I gave you credit for that ---------- what are you plans for the throttle cable , and what gear ratio and rear tire size are you go to use , I want to jump up on the rear tire size height and width
|
|
#51
11-04-2013, 05:40 AM
|
||||
|
||||
|
I found some 23x10x10 on craigslist I couldn't pass up, I was planning on 22-24" rear tires, with 21" up front. I dropped my gear ratio way down to 6.2:1, but I may change the engine sprocket plan which would make it 5.6:1. I may also have a chain fit issue with one sprocket on the jackshaft, but I won't know for sure till I install it.
I actually saved the old cable for matching up later. My plan is to run the cable all the way up to the pedal, which I actually measured out yesterday, and it comes out to 6.5 feet of cable. I could run the stock cable if I went back with the original Yerf rod set up that I hated. I think a pedal bike shop should be able to get the cable I need.
__________________
ASE Master and Toyota Master Diagnostic Certified Buggy Building Trainee '04 Dazon Raider 150 'modded'
|
|
#52
11-04-2013, 11:06 AM
|
||||
|
||||
|
You might explore the rear brake cable from a tandem bicycle. Those are fairly long.
__________________
2005 Hammerhead 150 170cc BBK, PnP Big valve Head, A12 Cam, Uni Filter, Custom Exhaust, 10G rollers, 1500 Contra Spring, 2000 Clutch Springs Just added - 2007 Joyner 250 SV - Let the fun begin 4-Dirt Bikes, Baja Bug and enough toys to keep me in the garage and out of trouble.
|
|
#53
11-04-2013, 01:47 PM
|
|||
|
|||
|
my cart has 22-10-10 on the back and 19-7-8 on the front , I was think on using some 25 x 10 I got for the back , and for the front I have a set of 21's or 23's , which ever fits the steering the best , thinking wheel spacers on the front , all ready have them on the rear , the Honda rims don't fit so I would have to come up with some rims , which may limit my choices --------- got to find out what interchanges with Tomberlyn -----my throttle cable isn't long enough to do much with
|
|
|
|