|
|
|
#1
 11-17-2010, 11:24 PM
|
||||
|
||||
|
Here's something for everyone to comment on - I'd welcome all opinions and advise.
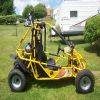
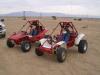
Got laid off in June for the first time in my life. Knowing I'd have to live on 1/3 of my normal income for several months my hobby wouldn't have any funding. I have tons of time now! with no FUN money. So in desperation to keep my sanity I started last Friday attempting to build an entire buggy from scrap out of my BONEYARD. Since I have a limited assortment of material and components to work with this is what I've come up with so far. 
|
|
#2
11-18-2010, 09:37 AM
|
||||
|
||||
|
Metalstud, sorry to hear about your employment situation, but man, you're a mad scientist when it come to this stuff.
|
|
#3
11-18-2010, 10:05 AM
|
||||
|
||||
|
its looking good
__________________
olderthan 2008 tomberline punisher 1500 spring 12g sliders 30mm cv pumper carb uni filter no rev cdi polaris xlt snowmobile shocks for front w/550 magnum springs & blaster fronts on rear and another buggy built working on mods gk-13 white spring 17 gram sliders so far
|
|
#4
11-18-2010, 12:42 PM
|
||||
|
||||
|
Looks good. Sorry to hear about the layoff.
__________________
09 Joyner Sand Viper 250 08 Joyner Sand Viper 250 2009 Joylaris 400 Screamer http://www.youtube.com/watch?v=eeulR4W1_PU
|
|
#5
11-18-2010, 05:13 PM
|
||||
|
||||
 wow wow
__________________
-JoshMy Ride: ASW Carbide Mods: Dr. Pulley Hit Clutch FMF Slip-On Exhaust No Rev. CDI Uni Air Filter 130 Main jet 1500 RPM main clutch spring 11g sliders 75w Halogen Headlights CARBIDE!
|
|
#6
11-18-2010, 09:03 PM
|
||||
|
||||
|
I think it's pretty cool! Might as well make use of your free time. Sucks about the layoff.
|
|
#8
11-19-2010, 08:49 PM
|
||||
|
||||
|
good start.do you have more pic?
__________________
http://www.youtube.com/watch?v=IUgir...ature=g-t=2668 FABRICATION ITS HARDER THAN YOU THINK
|
|
#9
11-19-2010, 08:52 PM
|
||||
|
||||
|
cool swing arm and irs
__________________
http://www.youtube.com/watch?v=IUgir...ature=g-t=2668 FABRICATION ITS HARDER THAN YOU THINK
|
|
#10
11-20-2010, 01:05 AM
|
||||
|
||||
|
Thanx roysheepdog- early testing says that the swingarm/IRS set is going to work,time will tell!!! I'll post somemore pic's this wekend- as I just spent all day experimenting with the rack-n-pinion set-up. Fabricating is SOOOO fun! The fact that I'm using struts and not dual A-arms is totally different on the tie-rod angles and rack location to eliminate the effects of bumpsteer.
|
|
#11
11-20-2010, 08:34 AM
|
||||
|
||||
|
it looks like if you make the steer arms the same length as the aarms it should be good.
what the irs arms,do you think the wheels will go into toe when you gas on it?
__________________
http://www.youtube.com/watch?v=IUgir...ature=g-t=2668 FABRICATION ITS HARDER THAN YOU THINK
|
|
#12
11-20-2010, 12:49 PM
|
||||
|
||||
|
I thought the same thing-I started out with the rack and tie-rods at parallel angles. That didn't work- so I continually had to shorten the tie-rods and lower the rack till I found the "sweet spot" with an end result of no change for toe-in/toe-out thru the turning radius.Totally un-expected from builds in the past and known geometry.
|
|
#13
11-20-2010, 12:58 PM
|
||||
|
||||
|
thats good to know.how long did it need to be?
__________________
http://www.youtube.com/watch?v=IUgir...ature=g-t=2668 FABRICATION ITS HARDER THAN YOU THINK
|
|
#14
11-20-2010, 03:14 PM
|
||||
|
||||
|
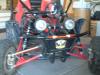
Here's some pic's of how the steering ended up.Right now it turns very well- but with power it may change.I may still have to make a plate that changes the angle of the connection at the tie-rod to the strut to achieve true ackerman turning radius. I've been trying different set-ups to eliminate the rear tire torque effect on the front tires causing them to raise the frontend up and losing maximum bite in a turn. I got the final location for the mono shock adjustment plate set-2" of pre-load height available if needed ,then fine tune with the shock adjustment for comfort. With the main components in place I can focus on the smaller things,shifter,pedals,radiator,gas tank, ect...
|
|
#15
11-20-2010, 03:27 PM
|
||||
|
||||
|
looks good,that thing will be fast.
__________________
http://www.youtube.com/watch?v=IUgir...ature=g-t=2668 FABRICATION ITS HARDER THAN YOU THINK
|
|
#16
11-20-2010, 03:56 PM
|
||||
|
||||
|
It might be fast-The final weight of the buggy will dictate that.The torque rating on this engine isn't that good (40ish foot lbs)so it may never see 5th gear unless I truck it to some place with some long straight-aways! I'm just hoping the trans in this engine is durable enough for my abuse.
|
|
#17
11-21-2010, 03:32 PM
|
||||
|
||||
|
Well the strut supports from the ATV didn't standup to the drop test!! So here's the revised frontend configuration. I'm not satisfied with the turning radius so I'm going to use one of my other rack units.The ATV was set-up with front steer and this was the only front steer rack unit I had (3-1/2" lock to lock) and it's just doesn't have enough travel.So demo it again till I get it right!
|
|
#18
11-22-2010, 11:37 PM
|
||||
|
||||
|
Up-date: After trying another rack unit I found a way to make the one I was using (which is in great shape) to have more travel. Spend the bulk of the day modding it and making a tough decision- It's a right hand drive now!!I moved the rack to a rear steer position and swapped sides on the strut asembly. I needed the space for my radiator where the rack was in the last pic's. Sorry about no pic's- my shop is so full I can't back-up enough to get a shot so I have to roll it out the doors. I did get the radiator brackets done and the radiator in it's location so I can start tubing the floor board for the hoses to go from front to rear concealed.
|
|
#19
11-23-2010, 05:04 AM
|
||||
|
||||
|
Awesome job, even better is the design testing as built, you know HP (Hewlitt-Packard) started a multi-million dollar company was started with just two guys in a garage, and with most most buggies coming from China....just sayin!
|
|
#20
11-23-2010, 06:23 AM
|
||||
|
||||
|
I'll take that as a compliment!!!!I think there's a few of us on this forum that have the passion for such a venture but with liability issues it's just becomes a passing thought and stays a hobby. I'll try and get some pic's up later.
|
|
#21
11-23-2010, 10:13 PM
|
||||
|
||||
|
Update: here's pic's of the radiator location w/ hoses run in box tube down the center of the floor board,swapped rack-n-pinion unit and the right hand steering.
|
|
#22
11-23-2010, 10:38 PM
|
||||
|
||||
|
great job on that thing. Going to be kinda freaky with the right hand steering.
|
|
#23
11-24-2010, 12:18 PM
|
||||
|
||||
|
I might have missed it, but what kinda engine is that exactly?
|
|
#24
11-25-2010, 12:38 AM
|
||||
|
||||
|
'89 Yamaha fzr600 (also have a spare engine which is a '90) listed 91 hp @10,000rpm (redline is 13,500) and 47 ft lbs of torque- In my experience with engines on a dyno the listed hp ratings are always way high. I'm using 70 hp and 43 ft lbs for my calculations. If everything goes as planned my buggy will weigh around 350 lbs- the bikes weight was 459 llbs. so I'm going to be a little lighter and hopefully that will eaze the load on the tranny. Hope that wasn't TOO much info!!
|
|
#26
11-25-2010, 10:31 AM
|
||||
|
||||
|
Not at all man, sounds like a good plan to underestimate a little. Still gonna be fast!
|
|
#27
11-25-2010, 08:32 PM
|
||||
|
||||
|
so hows it going?
__________________
http://www.youtube.com/watch?v=IUgir...ature=g-t=2668 FABRICATION ITS HARDER THAN YOU THINK
|
|
#28
11-25-2010, 09:23 PM
|
||||
|
||||
|
Hope everyone had a great Thanksgiving- after stuffing our faces and visitation I did get a chance to put the seat and steering wheel back in just to make sure it was still going to work!! The pic's are to show yesterdays progress on the side & back bracing, a couple more short pieces and It'll be time to flip it over and weld up the bottom side. When the rain stops I'll get some pic's where you can the whole buggy.
|
|
#29
11-28-2010, 12:24 AM
|
||||
|
||||
|
After 2 weeks of building-here's some shots of the chassis so far.I got to have a full day on the buggy today (slow moving though as it was cold!!), I tackled the exhaust and coolant distrubution. These 2 items became priority since routing the shifter,gas and brake cables/linkage to the engine need adequate space.The headers that come on the motor were 4 into 1 which is fine except that it was down swept and ended up under my swingarm (something that may snag on rough terrain) so I butchered the pipes and re-routed them above the swingarm and created dual exhaust for the stock Harley pipes I have.(it may not sound pretty but it's what I have) The coolant system was located on the top of the engine which isn't where I need it. When I decided to put the radiator up front for maximum air flow and so I could SEE if there's an overheating issue instead of feeling or smelling it when it's mounted behind you and above the motor.I fabricated the water inlets to enter from the bottom. NOTE- I will spend hours brainstorming how I can service it easily. The shape and size of the rearend roll cage was derived for engine removal since it weighs 100lbs (it will lift straight up and out). With these 2 items incomplete there won't be much to see- unless some of you would like pic's of that work. Since this build has "NO" budget I have to figure out how to use the existing parts in a different configuration in lieu of running to the supply/auto parts store.
|
|
#31
11-28-2010, 06:20 PM
|
||||
|
||||
|
that's looking really nice. Appears it's going to have a very nice ride/feel to it. This may be a stupid question but I gotta ask.... why did you decide on a right side drivers position? I ask this based on the position of the steerig wheel in your pics
|
|
#32
11-28-2010, 11:03 PM
|
||||
|
||||
|
"QUOTE" ckau - why did you decide on a right side drivers position?The explaination is on post#18. I'm making everything from one side to the other the same so at a later date when I can afford it I'll switch it over without too much trouble.
Here's some pic's of the header mod's & coolant line mod.I had to beat a piece of 2" tubing into submission to make the collectors! Tip: when cutting headers try to do the mod near the end so you can detail the inside of the pipe for good flow-also don't cool the pipe with water as that will make the pipe very brittle,let the pipe cool off on it's own.
|
|
#33
11-29-2010, 07:22 AM
|
||||
|
||||
|
looks good.hows the ride and power?what teeth sprockets do you have?
ive seen some mc powered buggys geared to high and its hard to get them moiving.but when its geared right just let out on cluch slow with no gas and it goes.
__________________
http://www.youtube.com/watch?v=IUgir...ature=g-t=2668 FABRICATION ITS HARDER THAN YOU THINK
|
|
#34
11-29-2010, 07:37 AM
|
||||
|
||||
|
Don't know how the ride or power is yet!!!Couple of weeks away from that! I'm planning to start with a 45 tooth sprocket since the bike had a 38 tooth and the tire diameter was 1-1/2" smaller than the ones I'm using. I have quick-change sprockets from 47 tooth thru 31 tooth to work with.
|
|
#35
11-29-2010, 07:58 AM
|
||||
|
||||
|
ive seen one with a gsxr 750 and he has a 13 60 set up with 22'' tires.he said that he toped out around 90mph and it was geard low enought that he could ride in the yeard in 2nd.
imo the 47 is to small or to high.i would say a 13 60 for 22''tires or 13 64 for 25'.
__________________
http://www.youtube.com/watch?v=IUgir...ature=g-t=2668 FABRICATION ITS HARDER THAN YOU THINK
|
|
#36
11-29-2010, 01:00 PM
|
||||
|
||||
|
Thanks roysheepdog that's good info-My front sprocket is 16 tooth (also have a 15 tooth spare) and I called the guy I sold the frames to double check- he measured the rear tire and counted the rear sprockets again for me (1 had a 38 tooth & the other had a 45 tooth), the actual stock rear tire height was 24". I'm still in the ballpark with the ratio I'm trying first (16 45=2.82 or 15 45=3.00)for good torque and PLENTY of top end (70-80mph+)
It's amazing how the ratio's work on different machines - my "different type of buggy" has 13 40 and the trx200sx motor only turns about 6,000rpm's and it'll boil the tires in 1st- I just leave it in 3rd gear for general driving and only rarely get into 2nd if I'm climbing long hills (22" tires) We'll see how it plays out when I make the maiden test run!!!!
|
|
#37
01-22-2011, 05:48 PM
|
||||
|
||||
|
Up-date after a month and a half. It's been so cold and my man-cave isn't heated so progress has been very SLOW! Also if I'd leave well-enough-alone I might make more progress.I've re-visited/re-fabbed the front-end 5 times,I think I got it the way I want it now.It's back to left hand drive too!Got all the pedals and shifters complete.Still have the brake lines and rear caliper bracket to fab/install.I was going to use a starter with a flywheel to get reverse but couldn't scrounge enough parts so I just used the Polaris 325 tranny.I don't have any machine tooling so converting the driven unit to gear drive took some time to get it right.I cut the driven pulleys off the shaft and cut the center out of a GY6 13t drive gear-then welded together.The tranny install made me scratch my head trying to figure out how to make the chains adjustable for the engine sprocket and the axle sprocket(up/down &forward/backwards)and be well supported/servicable.I made 4 different brackets before I got what I THINK is going to be durable.Now I've got to figure out what axle sprocket gearing to use now that it's 8:1 ratio with the 2nd tranny-I'm not smart enough to figure it out with all the variables involved now.I can provide all the info if anyone wants or knows how to calculate it.
|
|
#40
05-03-2011, 08:42 PM
|
||||
|
||||
|
Thanx- This buggy may get a pacemaker! I just scored a nearly new extremely low mile1000cc Yamaha engine last weekend. Since I have 2- 600cc engines I might just sell them cheap and clear out my man cave a little. Time is my biggest enemy- Too many projects and NO spare time!!!
|
|
#42
05-03-2011, 09:56 PM
|
||||
|
||||
|
Funny you say that as that's a joke at my house between my wife and I- if anything goes wrong with my 2001 Dyna I'm putting the motor in a buggy!!! Not only will you have the coolest and the best sounding buggy- it'll out pull anything else out there!!!
|
|
#43
05-04-2011, 12:19 AM
|
||||
|
||||
|
I've been talking about this since I guess 2005 but just cannot find an engine. I have found several wrecked framed but everyone wants to keep the engine. I have some more leads looking for me though. I may have to buy the whole bike.
TOM
|
|
#44
05-04-2011, 12:03 PM
|
||||
|
||||
|
looking good
__________________
http://www.youtube.com/watch?v=IUgir...ature=g-t=2668 FABRICATION ITS HARDER THAN YOU THINK
|
|
#45
10-24-2011, 11:35 PM
|
||||
|
||||
|
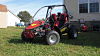
I'm waking up this thread again!!! Waiting on parts for the Black Yerfdog. I'm going to disappoint most of you though. I pulled the 600cc out and dropped a "FREE" '78 Honda CB400A in it to see if it fits. By the way the "A" means automatic (2 speed). A neighbor had this since it was new and only rode it for a year (2,512 miles), put it under a tarp and forgot about it. While helping him clean up his property he mentioned it to me and when we uncovered it
 - completely rusted and oxidized- - completely rusted and oxidized- - too far gone to restore so he donated it to me since he's well aware of my addicition!!!! I'll get some pics tomorrow after I fab a few mounts. It's a great solution for me as the Polaris tranny (rated for 50hp) was always going to worry me. This engine is air-cooled & only 25-27hp. I'm back to almost $0. dollars for this project again. - too far gone to restore so he donated it to me since he's well aware of my addicition!!!! I'll get some pics tomorrow after I fab a few mounts. It's a great solution for me as the Polaris tranny (rated for 50hp) was always going to worry me. This engine is air-cooled & only 25-27hp. I'm back to almost $0. dollars for this project again.
|
|
#47
10-25-2011, 09:45 AM
|
||||
|
||||
|
Great project! You have cool neighbors, mine just come over to tell me to turn things off.
Like, "Man do you really have to tune an open exhaust race car?" Or "Do you really have to land that helicopter here?" The school was ok the first time I picked up my kids from school in a helicopter, after that they were annoyed. Don't worry the economy has ended this bit of fun.
__________________
2012 Polaris RZR570 stock!
|
|
#48
10-25-2011, 11:24 AM
|
||||
|
||||
|
300cpilot- That's funny stuff!!! My neighbors just come over to get me to fix everything!!!! Many of my neighbors are aging and not able to do the simple tasks we take for granted - so since I'm still healthy and active I end up working a lot harder than I would choose too on their stuff. They never complain about my buggies/Loud ass Harley but sent their kid's over to play even when my kid's aren't home!!!!
x-bird- what do think of the swing arm/IRS I made for this?
|
|
#49
10-25-2011, 07:44 PM
|
||||
|
||||
|
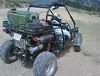
Got to work on the installation pretty much all day today!!!! Here's what the swingarm/IRS looks like now with the new engine plates.Like a tank!!!! Typical 4 bolt adjustment-Carriage bolts so only one hand tightening/loosening. I'll add my push/pull adjuster when everythig critical is in place to verify it's easy to access. The engine ended up flush with the bottom of the swingarm so no need for a skid pan!!! The technology for an automatic back in '78 wasn't light,this engine is a heavy!!! @182lbs. for a 400cc the horsepower to weight ratio is very low. Had plenty of room- no pipes in the cockpit and every nut and bolt is accessible. I have to lower my transmission bracket to allow for possible sprocket changes in the future.When I put the chain on the engine -to-tranny it's very close to the casing on the engine- I like lot's of clearance for a loose chain situation.
|
|
#51
10-25-2011, 09:22 PM
|
||||
|
||||
|
Quote:
As far as this buggy goes, way beyond my abilities with what equipment I have, and everything looks well thought out enough. I'd need to find a place to run a beast like this. the engine trans configuration with the sprocket up high and the mass still relatively low is what I like. for me, i'm trying to stick with simplicity as much as possibly. just landing the brackets in the correct place and square relative to the arc of travel is difficult enough for me on a simple hinge setup, going two plane like you have, i'd be a mess.  I think you'll have a harder time figuring out damping and rebound rate setups for the mono and two rear shock than you have putting it all together. that's the fun part though, gotta thrash it to figure out what's going on and which way to adjust I think you'll have a harder time figuring out damping and rebound rate setups for the mono and two rear shock than you have putting it all together. that's the fun part though, gotta thrash it to figure out what's going on and which way to adjust  BTW, what type of halfshafts/ spline count are those? BTW, what type of halfshafts/ spline count are those?
|
|
#52
10-25-2011, 10:16 PM
|
||||
|
||||
|
I agree with the complications of adjusting shocks after test runs for body roll,torque load and comfort.The IRS portion of my monstrosity is out of a Baja65 go kart (Baja Motorsports), just re-configured. I never counted the splines (around 20-24). The Baja 65 frame was built to last (excluding the front A-arms)LEAD SLED-HEAVY DUTY doesn't describe it!!! It was our first go kart & what started my addiction almost 4 years ago and lasted a year or so till I got tired of repairing the frontend and I'd bought/built up several other karts/buggies that seemed to function better for the kid's. I'm always on the look out for a cheap trashed one to snag another rearend as a spare.
Last edited by metalstudman1; 10-25-2011 at 10:37 PM.
|
|
#53
10-27-2011, 11:14 PM
|
||||
|
||||
|
Got to work on it some this afternoon lowering the tranny mount and adding the balance of the supports and chain adjuster. Okay it's official "I'm a REAL redneck"
 Too cheap to go to a machinist!!." Disclaimer- I don't recommend this", I used my drill press as a lathe to cut a sprocket off and reduce the diameter of the tranny shaft so the other sprocket carrier would fit. Made a simple mandrel, chucked it up and put my 4" grinder against it!!!!It worked - took about an hour and no bill when I was done!!Tomorrow I should get the chain from the engine to the tranny finished- this time the gearing is much easier than with the 600cc, I put a 45tooth on the axle and I'm using a 16tooth on the tranny input that matches the 400cc engine- so that's 1:1 in 2nd gear(final drive), the Polaris tranny has a 2.38+/- to 1 gear reduction.Should have good climbing ability. Too cheap to go to a machinist!!." Disclaimer- I don't recommend this", I used my drill press as a lathe to cut a sprocket off and reduce the diameter of the tranny shaft so the other sprocket carrier would fit. Made a simple mandrel, chucked it up and put my 4" grinder against it!!!!It worked - took about an hour and no bill when I was done!!Tomorrow I should get the chain from the engine to the tranny finished- this time the gearing is much easier than with the 600cc, I put a 45tooth on the axle and I'm using a 16tooth on the tranny input that matches the 400cc engine- so that's 1:1 in 2nd gear(final drive), the Polaris tranny has a 2.38+/- to 1 gear reduction.Should have good climbing ability.
|
|
#56
10-28-2011, 11:06 AM
|
||||
|
||||
|
I'll second that. Inspirational teachings from three people I greatly cared for: My late Father; if you can improvise you can do anything, my late best Friend; being afraid to make mistakes is like being afraid to learn, my late Fatherinlaw; a good craftsman is not someone who makes no mistakes but someone who knows how to correctly cover & correct them.
TOM
|
|
#57
10-28-2011, 12:30 PM
|
||||
|
||||
|
Thanks for the vote of confidence gentlemen!! Tom-I absolutely agree with all the wise men, But the one I have and use is the philosophy of your late Father-in-law. I don't think it's a talent -it's a means of neccessity right now with only 1/3rd of my normal income!!!!
|
|
#58
10-28-2011, 09:49 PM
|
||||
|
||||
|
I posted the actual Redneck lathe assembly since I had to clean up my welded sprocket holder.The only precision tool I own is a dial guage- I could see with my eyes that the shaft wasn't perfectly true-.003 out of round from the Redneck lathe
 (I checked the chuck and guess what .003 worth of slop!) If I'd wanted to spend another 15 mins. on the shaft I could have had a polished piece!!!This is what it looks like with it all "CHAINED" up- This is the most important phase of the assembly,everything else just needs to be "close" not exact!!! If I get lucky I may get to fire it up this weekend and listen to the drive-train in action. Since I won't be having a clutch I'm removing that pedal and spacing the brake over a bit, remove all the linkage and carriers I made to free up some room down the center floor board for an emergency brake handle.So there's still quite of bit of fabbing to do. (I checked the chuck and guess what .003 worth of slop!) If I'd wanted to spend another 15 mins. on the shaft I could have had a polished piece!!!This is what it looks like with it all "CHAINED" up- This is the most important phase of the assembly,everything else just needs to be "close" not exact!!! If I get lucky I may get to fire it up this weekend and listen to the drive-train in action. Since I won't be having a clutch I'm removing that pedal and spacing the brake over a bit, remove all the linkage and carriers I made to free up some room down the center floor board for an emergency brake handle.So there's still quite of bit of fabbing to do.
|
|
#59
10-28-2011, 09:58 PM
|
||||
|
||||
|
FYI- want to know how I didn't get any weld in the holes for the sprocket carrier? If you'll notice the dark area around the screw holes,I made one weld around the shaft but at the holes I appllied a dab of wheel grease. When your done the weld basicly falls off!!!Since I turned it to clean it up it really turned out nice. Grease is what you use when you don't want weld spatter or the edge of a weld to bond near threads. Sorry if this was already a well known tip-
Redneck lathe: Yes that is a Heim holding the tail shaft of my mandrel!!!!
|
|
#60
10-28-2011, 10:05 PM
|
||||
|
||||
|
sorry, but i'm gonna DQ you on the redneck status, no teeth marks in the piece ;~) Nice work, been seriously considering a drill press. have a nice vise for one, but no press. good tip with the grease, will have to give it a try.
|
|
#61
10-28-2011, 10:21 PM
|
||||
|
||||
|
I polished them off!!!!
Last edited by metalstudman1; 10-29-2011 at 02:45 PM.
|
|
#62
10-29-2011, 03:20 PM
|
||||
|
||||
|
Here's a vid of the first start and tranny test. I zip tied the motorcycle harness to the frame to be able to see if she'd still run after 33 years of rotting under a tarp.
 I just cleaned the worst looking carbs I've ever seen!!Goo an 1" thick in the bowl & floats and couldn't even see the bottom of the jets. Amazingly- It fired right up,but something is still nasty in the carbs(an overnight soak needed).The tranny works as planned,I still have the upper mounts to install on the tranny & engine yet to fab using the top of the swingarm for support. The tranny has a slight movement due to the mount not being there. The sound of the chains is very good-no binding and smooth. After watching the tire rotation I'm going to be dropping down a few teeth!!!Since I needed the choke to be 1/2 open for it to run and no mufflers you're hearing about 1/2 throttle speed. Now comes the part I dislike the most- locating all the electrical components and thinning out the wiring harness. It's making progress I just cleaned the worst looking carbs I've ever seen!!Goo an 1" thick in the bowl & floats and couldn't even see the bottom of the jets. Amazingly- It fired right up,but something is still nasty in the carbs(an overnight soak needed).The tranny works as planned,I still have the upper mounts to install on the tranny & engine yet to fab using the top of the swingarm for support. The tranny has a slight movement due to the mount not being there. The sound of the chains is very good-no binding and smooth. After watching the tire rotation I'm going to be dropping down a few teeth!!!Since I needed the choke to be 1/2 open for it to run and no mufflers you're hearing about 1/2 throttle speed. Now comes the part I dislike the most- locating all the electrical components and thinning out the wiring harness. It's making progress http://www.youtube.com/watch?v=a9KOnOX4b7w
|
|
#64
11-01-2011, 10:42 PM
|
||||
|
||||
|
Thanx CKAU- It really sounds good now!!
 After re-cleaning the carbs again it still ran poorly. So I've spent the last couple of days trying to figure out why.The gunk in the bowls was so thick I had to pull the bowls out off the floats and didn't realize how sensitive the float level is on these carbs. After readjusting them about a 100 times I finally got it to run right!!! either it closed off the main or it overflowed with the slightest adjustment (crazy) Got my shifter cables in and getting the pedals re-located and a shifter base made is the next chore. I still have some more electrical work to do when I verify the thing is worth spending more time on. Bleeding all the brake lines now that I have all of them run is another time consuming chore before testing!!!I really want to test this thing to see if I built a pile of junk from a pile of scrap or something to get my blooding flowing!!!!! After re-cleaning the carbs again it still ran poorly. So I've spent the last couple of days trying to figure out why.The gunk in the bowls was so thick I had to pull the bowls out off the floats and didn't realize how sensitive the float level is on these carbs. After readjusting them about a 100 times I finally got it to run right!!! either it closed off the main or it overflowed with the slightest adjustment (crazy) Got my shifter cables in and getting the pedals re-located and a shifter base made is the next chore. I still have some more electrical work to do when I verify the thing is worth spending more time on. Bleeding all the brake lines now that I have all of them run is another time consuming chore before testing!!!I really want to test this thing to see if I built a pile of junk from a pile of scrap or something to get my blooding flowing!!!!!
|
|
#66
11-05-2011, 05:41 PM
|
||||
|
||||
|
Well it stopped raining- and finally got to drive it
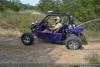
http://www.youtube.com/watch?v=nOf-z_cNgGo not all bad test drive though- With weight in the seat it changed the float level, so it starves for fuel (wouldn't throttle up)- same issue I had with the wife's engine change. Items to change/fix: #1 Engine posture-rear end has to be raised to get float levels right. #2 Rear shocks at the wrong angle letting the rear tires lean too much #3 Shifter arms too short- too hard to shift when under a load #4 Check bearing in drivers rear axle -sounds weird #5 Geared WAY TOO low Successful items: #1 Turning radius is great #2 Very smooth ride #3 No body roll- (at low speed!) #4 Front A-arms/struts are working very well and steering is very easy So after almost a year since it's conception it's proven to be worth building  So far I have: $53.00 in shifter cables + $12.00 electrical connectors + $40. 4-black alum. rims + $35. brake pads & fluid + $16. shifter = $156. total out of pocket expense-
|
|
#68
11-05-2011, 07:06 PM
|
||||
|
||||
|
Speedway motors had this in the garage sale items several months ago for $12. and it came with 4 Heims too!!
http://www.speedwaymotors.com/AFCO-S...ter,40372.html Sorry but the emergency brake handle is in the way to get a good photo. The shifting arm on the tranny is too short and shifting is very hard so I'm making a longer aluminum arm.
|
|
#69
11-05-2011, 07:22 PM
|
||||
|
||||
|
Quote:
|
|
#70
11-06-2011, 02:35 PM
|
||||
|
||||
|
Quote:
|
|
#71
11-06-2011, 03:44 PM
|
||||
|
||||
|
That's funny!!!But YES we need them!!! You can make one pretty easily.
|
|
#73
11-07-2011, 12:07 AM
|
||||
|
||||
|
These are in there garage sale right now, not in my size of course (((
http://www.speedwaymotors.com/Garage...ngs,45790.html
|
|
#74
11-07-2011, 10:26 PM
|
||||
|
||||
|
Well I changed a few of the needed items and took it out for some abuse. It survived very well!!!! Nothing broke or loose. So I offer to let the wife take it out because her buggy is down right now (she very reluctant),She blasts away & she's gone for an hour in our trails (I'm thinking she's broke down) and of course when she returns it's muddy as hell
 Then she grabs one of the kid's and off she goes again for another hour or so- both her and the kid are covered from head to toe in mud . I tried to explain that I still have to work on it and it's all raw metal . Hosed it off and back into the shop for the exhaust install. I ordered some carb parts as it still won't run smooth past 1/2 throttle. With the current gearing it'll only go about 35-40, but the climbing ability is excellent in 2nd gear. It climbs all our hills with no problem even at 1/2 throttle and it's SMOOTH riding.It has the best turning radius of any of our toys.The wore out Polaris struts and springs make the frontend droop in the hard turns but it cuts a good corner!!!(struts & springs as soon as I get some money!!)Total success in my opinion for a bunch of scrap parts- it's a keeper. I'll try and get some vid for your entertainment very soon. Then she grabs one of the kid's and off she goes again for another hour or so- both her and the kid are covered from head to toe in mud . I tried to explain that I still have to work on it and it's all raw metal . Hosed it off and back into the shop for the exhaust install. I ordered some carb parts as it still won't run smooth past 1/2 throttle. With the current gearing it'll only go about 35-40, but the climbing ability is excellent in 2nd gear. It climbs all our hills with no problem even at 1/2 throttle and it's SMOOTH riding.It has the best turning radius of any of our toys.The wore out Polaris struts and springs make the frontend droop in the hard turns but it cuts a good corner!!!(struts & springs as soon as I get some money!!)Total success in my opinion for a bunch of scrap parts- it's a keeper. I'll try and get some vid for your entertainment very soon.
|
|
#75
11-08-2011, 10:00 PM
|
||||
|
||||
|
Well No vid's anytime soon
I go to move it out of the Man Cave to work on the wife's Yerfdog and won't start-no spark except when I turn the key off, I ran through all the obvious things to check. Now I've got to check all the electrical components.
|
|
#76
11-09-2011, 10:47 PM
|
|||
|
|||
|
holy friggin' mcgyver, batman.
that thing is the sh!t! adapt, improvise, overcome. nice job. i love creative home machining.
|
|
#78
11-10-2011, 08:25 PM
|
||||
|
||||
|
Quote:
Last edited by metalstudman1; 11-10-2011 at 08:32 PM.
|
|
#80
11-16-2011, 04:44 PM
|
||||
|
||||
|
Okay so I got my new/used stator & flywheel today from an '81 Honda 400 (not a free motor anymore=$170.)- I couldn't afford the up-graded CDI that matches the flywheel/stator set that CDImagican makes this week. I had to try to see if it would start and it did
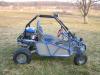
The up-graded CDI will make the system last and have a stronger spark when I get it. It's been raining so I bribed the wife into video-ing a quick run up the street since going on the track would be TOO NASTY! of course if I broke down it would have to sit there till it dried up a bit to tow it back. After installing the carb kits I still have one dripping from the over flow Has to be a bad seat, So some research on different carbs is next after a CDI.My guess is that it does about 40mph right now, that isn't unacceptable since the kid's can drive this too. I don't have another #520 sprocket any higher than the 38t that's on it- I need to verify that it climbs well with this gear. Bummer the swingarm/IRS combo doesn't allow for much of a donut!!! Testing to continue and up-grades as money allows!http://www.youtube.com/watch?v=NPHUu...&feature=feedu Last edited by metalstudman1; 11-22-2011 at 11:35 AM.
|
|
#84
11-16-2011, 09:44 PM
|
||||
|
||||
|
Thanx gentlemen- the signs just got tagged this weekend -That's an elementary school with a well visited playground.
My lay-off did turn out to be worth something- I have another "CHEAP" fun machine!!! Can't wait for some drier weather to be able to give it a true shake down (WOT) in the trails where it counts and climb our big hill.
|
|
#86
11-17-2011, 10:35 AM
|
||||
|
||||
|
Great job. Where did ya source the shift cables from?
__________________
09 Joyner Sand Viper 250 08 Joyner Sand Viper 250 2009 Joylaris 400 Screamer http://www.youtube.com/watch?v=eeulR4W1_PU
|
|
#87
11-17-2011, 12:20 PM
|
||||
|
||||
|
Internet sales only!! They're located 15 mins away and I talked them into letting me pick them up without shipping charges
http://atlanticspeed.com/productcart...-FjL8Q#details
|
|
#88
11-20-2011, 07:36 PM
|
||||
|
||||
|
Had the wife run it around the track for me to see what the backend was doing. Didn't realize the rear got so light in a hard turn that it extended the shocks all the way out. So I put some straps/shock restraints on to see if it would help after viewing this- it did!! The New CDI will get here this week so I can see if it improves the throttle response. After somemore tweeking I'll start designing the body and fenders.
Nothing exciting : http://youtu.be/VXzz3EFn3jY This motor is gutless-thank goodness it was free other than the electrical parts, had a drag race with the wife in her Black Yerfdog-Both even thru 2nd gear on the Yerfdog (about 40mph) then the Yerf just walked away!!! it's pretty sad when a 200cc spanked a 400cc like that!!! Last edited by metalstudman1; 11-20-2011 at 07:48 PM.
|
|
#89
11-21-2011, 07:15 PM
|
||||
|
||||
|
My 7 yr. old daughter was dying to drive it
 http://www.youtube.com/watch?v=hfrVTw8NC7k http://www.youtube.com/watch?v=TYvq76zzEj4 She gave me a ride thru our trails (I won't have to give her any driver's ed ) I let her run for 30+ mins. before I realized I needed to get some video -and then she got it good and HOT rolling around the track!! She didn't have any issues even though she could barely see over the steering wheel. Of course the wife wouldn't watch her drive!!!
Last edited by metalstudman1; 11-21-2011 at 08:03 PM.
|
|
#90
11-21-2011, 08:02 PM
|
||||
|
||||
|
Quote:
|
|
#91
11-21-2011, 08:18 PM
|
|||
|
|||
|
those hondamatics were all major slugs; they were seconds slower in the 1/4 then 5 speed bikes.
this could be yet another total senior moment, but i seem to recall they didn't have real torque converters but just fluid couplings like an old dynaflow & other 1st-generation domestic car transmissions used? regardless, i agree w/ ckau; it sounds like it's up on "converter stall speed" but not getting past that point. you got a tach hooked up yet?
|
|
#92
11-21-2011, 08:20 PM
|
||||
|
||||
|
The gearing is off- I'm trying to find a source for a 30-32 tooth #520 pitch axle sprocket that I can modify for my sprocket carrier- right now it's 38t that's the smallest one I have. I already changed the Polaris tranny drive sprocket from a 16t to 13t, that helped but that's as small of a sprocket as I can go on the shaft. If they made one I could move up 1 tooth on the out side of the Polaris tranny without the chain hitting the case. No room to increase the Honda 16t drive sprocket.
|
|
#93
11-21-2011, 08:36 PM
|
||||
|
||||
|
No tach yet!!!The motorcycle didn't come with one! I do believe you're correct about the torque converter- the speed is all even with the engine rpm's, which I like for going down hills, there's no coasting or free rolling. Getting this engine for free carried a lot of compromises with it-I love HORSEPOWER but not to a point where I'm worried about breaking other components.
Last edited by metalstudman1; 11-24-2011 at 09:20 PM.
|
|
#94
11-21-2011, 08:49 PM
|
|||
|
|||
|
free stuff rocks; it is what it is, i'm not criticizing, i promise!
i think this is a real clever buggy and i love reusing junk as much as the next grungy dude who spends time pickin' parts my wife wants to use to kill me with.
|
|
#95
11-21-2011, 09:12 PM
|
||||
|
||||
|
Quote:
|
|
#96
11-21-2011, 09:23 PM
|
||||
|
||||
|
I'm all about recycle innovation(I'm no tree hugger). It would be really hard to pick on me!!! old fart, 9 kid's later- I'm insult proof!!!!! I have friends that just bring me stuff because they know I'll have a use for it. I have the luxury of being able to have JUNK!!!
You're lucky if you can use stuff your wife was wanting to kill you with  - My "X" just robbed me without a weapon!!!! - My "X" just robbed me without a weapon!!!!
Last edited by metalstudman1; 11-21-2011 at 09:29 PM.
|
|
#97
11-21-2011, 09:28 PM
|
||||
|
||||
|
Quote:
|
|
#99
11-21-2011, 10:47 PM
|
||||
|
||||
|
good to see you have it going!if you still need a sprocket this place may have one you need.
http://www.*************.com/sort.as...EN=20&PageNo=2
__________________
http://www.youtube.com/watch?v=IUgir...ature=g-t=2668 FABRICATION ITS HARDER THAN YOU THINK
|
|
#100
11-24-2011, 09:42 PM
|
||||
|
||||
|
Happy Thanksgiving everyone! Hope you all ended up full and lazy!!!
The wife & I had the great fortune to be home alone (never happens) and after some inside fun we headed out to the still muddy trails for some hubby/wife competition  The Frankenbuggy out runs her in the trails The Frankenbuggy out runs her in the trails  , she doesn't drive like me so taking advantage when it counts put's me in front slinging mud on her!!! , she doesn't drive like me so taking advantage when it counts put's me in front slinging mud on her!!!Spent 5 hrs. out playing with no failures had to top off her gas tank but mine (5 gal.) is still 1/2 full. I won't be changing the axle sprocket very much : from a 38t to a 36t. After running hard I found on one of our 1,000' hill runs I need to drop down into 1st to make the last 40' ft. with any real speed (same as the Black Yerfdog). This motor (though gutless) comes alive at about 5,000-8,000 rpm where the Yerfdog has it's best torque @ 2,500-5,000, so I have to keep it rev-ed to pass the Yerfdog. Tomorrow is going to be dry again so more play is scheduled  We paced a friends Harley at 42-44mph so it's going to only have a top speed after the sprocket change of about 48mph- oh-well!
|
 |
|
|