|
|
|
#201
 07-06-2013, 06:48 AM
|
||||
|
||||
|
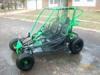
Well, She’s built and ready for a shake down run. Except for one set back! No Motor!
I purchased a motor from BMI. It arrived with a bad starter clutch. Starter motor runs but doesn’t engage the crank So much for their claim of testing these motors. One would think a faulty starter clutch would have been blatantly apparent had they truly given it a pre-sale test. I guess their idea of a pre test is a walk around. It appears their disclaimer of warranty over rides the statements intended to make a buyer believe these are solid motors. So it is what it is. No big deal really but at this point a major frustration. I intend to use this motor in a bone stock form to get a baseline while testing the rest of the chassis. I hate having to do this right off from the get-go. It will be next week before I can bust into this motor! Sitting in the seat and making put-put sounds just isn’t working for me anymore! 
|
|
#202
07-06-2013, 12:06 PM
|
||||
|
||||
|
That really sucks, hopefully it's only a clutch since those engines they sell are the warranty returns sent back to Yerf Dog. I remember when Stu put in a bid after Yerf liquidated and was turned down. I had gone to the factory to look at their stock for him and the warehouse as far as buggies and engines were all returns from customers and Sam's club. All the new buggies and engines were already sold. BMI an investment company got the bid to liquidate everything else so as to pay back the creditors.
Your buggy should go great with the stock engine since the Yerf in its original form was I believe almost 70 pounds lighter then my almost 400 pound single seat Blade. If or when you build that GY6, if stroked and with a ported and polished head or better yet a 4 valve head, it will be a beast. Good luck and don't forger to post some video's when you get it running.
|
|
#204
07-06-2013, 07:35 PM
|
||||
|
||||
|
I didn't know Stu had put a bid in. Too bad he didn't get it. That would have been sweet. I haven't spoken to Stu in a while. What's he up to these days?
Thanks for the offer, X .I appreciate that. Parts I got, Time I don't! It still has to be painted and I want to be able to run it a while before stripping it back down. I figure I got 3 months maybe 4 left at most before it gets too cold to paint. That's sounds like plenty of time but I only get weekend hours to mess with it so that time will go by quick.
|
|
#205
07-06-2013, 08:22 PM
|
||||
|
||||
|
I love how clean your buggy is, everything has its place, and everything in its place.
__________________
ASE Master and Toyota Master Diagnostic Certified Buggy Building Trainee '04 Dazon Raider 150 'modded'
|
|
#206
07-06-2013, 11:59 PM
|
||||
|
||||
|
[QUOTE=ckau;34661]I didn't know Stu had put a bid in. Too bad he didn't get it. That would have been sweet. I haven't spoken to Stu in a while. What's he up to these days?
I haven't talked to him in years. The e-mail I have for him at Blade no longer works. I've called him several times but he never calls back. He is on Facebook and from what I can tell he runs a boat club.
|
|
#208
07-14-2013, 02:59 PM
|
||||
|
||||
|
Wow it looks great... I think you should take mine and mod it for me! lol
__________________
T.J. Yerfdog Spiderbox, Uni Type air filter with 6" intake, 130 jet, Orange no-rev limit cdi, Red coil, iridium plug, 1500rpm clutch springs, 1500rpm contra spring, 13g sliders, 22" rears, 21" fronts, aftermarket reverse installed, and Trailtech Vapor.
|
|
#210
07-14-2013, 06:16 PM
|
||||
|
||||
|
That thing looks great.
__________________
ASE Master and Toyota Master Diagnostic Certified Buggy Building Trainee '04 Dazon Raider 150 'modded'
|
|
#211
07-14-2013, 11:23 PM
|
||||
|
||||
|
That's one for the production lines! Since you've started on it i've always liked the way the tubing diameter looked with the narrowness of the overall cage. Despite being yerf based, it definitely has a much more rugged look. This one and Rarerat's sxs odessey are probably the two best turned out mods i've seen. Now don't spend a year on the engine!
 BTW--got my fingers crossed for you (and me LOL) on the brakes ... BTW--got my fingers crossed for you (and me LOL) on the brakes ...PS .. free photo feature shooting tip .. turn the wheels to "rim out" when shooting your front and rear 3/4 angles  ... and always make sure the steering wheel is correctly centered on your interior shots ... ... and always make sure the steering wheel is correctly centered on your interior shots ...
Last edited by x-bird; 07-14-2013 at 11:28 PM.
|
|
#212
07-15-2013, 02:12 PM
|
||||
|
||||
|
Looks good ,the engine weighs roughly 63 pounds with everything on it I believe
|
|
#213
09-08-2013, 05:18 PM
|
||||
|
||||
|
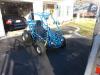
Took the maiden voyage today! Rode around the yard for a while getting a feel for this thing The pics are of a long time friend and buggy partner who had to try it! I think he got more seat time than I did!
I had my fingers crossed that the wiring system was correct. This was the first one I built totally from scratch. I wasn’t sure if it would even start! It didn’t! Turned out to be just a faulty coil. Switched out for another and she fired right up -The motor started to load up and run rough and was hard to start after it warmed up. I suspect the Fuel enrichener isn’t working properly. -The jury is still out on the shocks. Rode like a Cadillac through the grass but I am pretty sure they won’t cut it on the trails. It’s gonna take some fiddling to get them right. -Gas peddle wants to stick and won’t let the motor idle down when letting up easy. Letting the peddle snap back closes the throttle. Got a sticky spot some where in the linkage. -Got a bad spade connector on the coil. Won’t hold tight. Tach reads intermittent due to a poor connection. I’ll have to change out that connector. -Cylinder head temp not registering on trail tech. may be another bad connection. Or I didn’t program the trail-tech correctly. -Brakes? Way- way too soft! Pedal will firm up when pumped. Another bleed session or two or three. Going to take a while to get all the air out. I think! Shut the buggy off out in the yard and it wouldn’t start again . Nothing! Totally dead , no power, Acted like a totally dead battery. I insured the charging system was functioning correctly at initial start but absolutely nothing had power! Pushed it back to the shop, rolled up on the lift, gave it another try and it cranked and fired perfectly. Got a loose connection someplace. All and all I am very pleased. . A few snafu’s but not nearly what I had anticipated. I’m sure more will popup as I get to ride but for a first time out.. Not bad at all. It will take some getting used to this chassis. The weight bios and center of gravity is totally different from what I am used to. Mental note to self…. Wear all my safety equipment! I got a feeling I’m going to flip this ride during the learning curve!!!
|
|
#215
09-08-2013, 06:49 PM
|
||||
|
||||
  Congrats, you know you've got to get some video posted asap, dont you? ))))) Sounds like a lot of normal minor kinks to work out, but overall sounds liek a pretty smooth first run. on your throttle, check your cable run, sometimes all it takes is too tight of a radius somewhere to make them act up. same issue, i freed up one zip tie on the top curve/loop and problem solved. aside from a soft pedal/more bleeding fun, sounds like your brakes are working for the setup? Really happy to hear that if so. I think the yerf calipers have a lot less fluid volume behind the piston than the one's i have. -- now i won't feel guilty if i just dump the 5/8ths bore master in and don't try the mixed 1/2.
|
|
#216
09-11-2013, 01:24 PM
|
||||
|
||||
|
Looks awesome ckau
|
|
#217
09-12-2013, 02:53 PM
|
||||
|
||||
|
Let us know how the heims out back fare. I am close to pulling the trigger on a set of 3/4" chromo heims and extending the mounts off the frame for an interference issue. I am not concerned with the joint itself, but the stud attaching it to the swing arm bung. I figure with 3/4", even at grade 5, it should be pretty stout.
__________________
ASE Master and Toyota Master Diagnostic Certified Buggy Building Trainee '04 Dazon Raider 150 'modded'
|
|
#218
09-12-2013, 04:20 PM
|
||||
|
||||
|
Quote:
What I DIDN'T do is use bungs! The bungs are the weak link. The heims are threaded into solid steel blocks, same dimension as the inner size as the frame rails. The ends of the frame rails were opened up as so these pieces would slide in and then welded in place. my intent was to keep the wheelbase and pivot point original. The key is to keep the heim completely threaded in for maximum support.
|
|
#220
09-12-2013, 06:17 PM
|
||||
|
||||
|
That last pic looks ridiculously clean. I like the lock washer as the jamb nut, too. What would be a good alternative to using a bung if using 2x2 1/4" tube?
__________________
ASE Master and Toyota Master Diagnostic Certified Buggy Building Trainee '04 Dazon Raider 150 'modded'
|
|
#221
09-12-2013, 07:22 PM
|
||||
|
||||
|
Quote:
I had my buddy make me these --no drill press at the time and me and a hand drill equal some not so straight holes .... pretty monster chunk of steel. 2-3 pounds each. basically a round plug the id of the 2x2, you may have to grind or file the seam ridge inside 2x2. if you're going the other direction through the tube, i'd stay 1/8th to 1/4 inside of the corner radius (makes for a slightly narrower, lighter plug) and run fully side to side with 1/8th or more stickout to run a weld bead onto. Last edited by x-bird; 09-12-2013 at 07:26 PM.
|
|
#222
09-12-2013, 07:56 PM
|
||||
|
||||
|
do you mean 2 x 2-1/4 rectangular? if so, use a length of solid stock that can be slipped inside the tube, Most all solid stock is dimensionally the same as rectangular or round tube outside diminsions so the solid has to be machined down to fit the inside dims. The end of the solid can be bored / tapped to accept the heim.
I drilled holes in the rails,(pic 2) that are welded full to bond the solid to the rail, Like really large spot welds, then the welds are ground smooth for a clean appearance. The lock washer/jamb nuts are actually a low profile stainless steel shurlock. These can be had through Fastenal.
|
|
#223
09-12-2013, 07:56 PM
|
||||
|
||||
|
Quote:
Quote:
__________________
ASE Master and Toyota Master Diagnostic Certified Buggy Building Trainee '04 Dazon Raider 150 'modded' Last edited by Masteryota; 09-12-2013 at 08:20 PM.
|
|
#224
09-13-2013, 06:20 AM
|
||||
|
||||
|
Quote:
I think the real issue with the bungs isn't that the bung itself is weak. Rather, the thinwall swingarm tubing is more the cause for concern. If you're building wall thickness whith teh square tube over top of the original tubing, then your idea would likely work fine with a bung. The only spot you'd have to pay attention to would be the point where your added tubing ends on the old tubing. If its in a stressed/loaded position, that weld juncture would be your likely failure point. that's the one "game" we all play with modding/beefing these things up--all you're doing a lot of the times is moving the stressed/failure point to another area.
|
|
#225
09-13-2013, 09:34 AM
|
||||
|
||||
|
I added the square tube as a trial and error experiment, and once done, I will likely brace the top and bottom of the joint with plate steel. Even if I went with the solid slug, I would want it to go into the original metal either way, just to tie it all together and spread the load.
__________________
ASE Master and Toyota Master Diagnostic Certified Buggy Building Trainee '04 Dazon Raider 150 'modded'
|
|
#226
09-13-2013, 07:20 PM
|
|||
|
|||
|
Quote:
 Just sayin Just sayin
__________________
Dazon 150 single Mods ...Uni-Filter, 30 mm Kiehin pumper carb, FMF power pipe, 30 mm Intake pipe, Hi Rev CDI, Orange HV coil, 10,000 rpm Tiny Tach,Works Performace Shocks 12" F Blaster 14" R . Pearl Perf Ceramic 13.5 rollers, Gates Power Belt,Kenda Claws F&R Last edited by rich1; 09-13-2013 at 09:23 PM.
|
|
#227
09-22-2013, 06:16 PM
|
||||
|
||||
|
Took a good shakedown ride today! Had a few nuts and bolts work loose. Seems like there's always a few that get by. A little locktite and a tightening session and all is good. I did loose a brake rotor locking collar some where along the way. Another Item I obviously failed to tighten. :
 Added a stiffer return spring on the gas pedal. That cured the sticky pedal issue. Bled the brakes again I got brakes!!!!!  The system works good, Locks all four corners in dirt but still not quite where I want them. These masters and calipers are so finicky a BB size air bubble can kill the whole system.I still got a small amount of air somewhere. I use a pressure type bleeder , forcing in at the master reservoir supply tube. just the miniscule amount of air getting into the system from connecting the pressure hose can soften the system. The up side is the system does indeed work! The yerf masters are supplying plenty of pressure and volume. The brake bios valve is gonna be a blast to play with! The system works good, Locks all four corners in dirt but still not quite where I want them. These masters and calipers are so finicky a BB size air bubble can kill the whole system.I still got a small amount of air somewhere. I use a pressure type bleeder , forcing in at the master reservoir supply tube. just the miniscule amount of air getting into the system from connecting the pressure hose can soften the system. The up side is the system does indeed work! The yerf masters are supplying plenty of pressure and volume. The brake bios valve is gonna be a blast to play with! It's working like I had anticipated. It's working like I had anticipated. The front shocks...I thought were going to be too soft but as I ride I'm growing to like them. The rear shocks got to go!!!!!!!!!!! way too stiff! The rear end gets almost out of control at times. I hit some rough stuff and it feels like the only dampening I get is from tire pressure! The tires bounce and there's no telling which way the rear is pointed when touching down. I'm all over the trail! I got to get my shock worksheet done so I can order some decent shocks. These are killing me! One brightside, those rear shocks ain't too shabby for the oval track. The tight rear gets a good bite in the turns and improves acceleration going into the straights. I got a strong harmonic vibration that runs through the buggy just as the clutch engages but goes away as the clutch gets fully engaged. Happens between the 3 to 4,000 rpm range. I'll pull that clutch next time around and see what's up with that.
|
|
#229
09-23-2013, 08:11 AM
|
||||
|
||||
|
Make sure you don't have a bearing going in the final drive. I had a similar problem which turned out to be a bearing. I had a vibration as you but it also made noise which was hard to hear from the drivers seat.
|
|
#230
09-23-2013, 03:47 PM
|
||||
|
||||
|
Quote:
A couple of things I got to consider.. with the heim pivots on the swing arm ,the rubber isolating bushings are gone so I can expect a increase in swing arm and motor vibration to be transmitted through the whole chassis. I expected some but this seems excessive. May need to investigate the possibility's of isolators at the heim connection. Second.. I installed a torque limiter to stop excessive motor twist which allowed chain slack which in turn caused gear skip. This too may be transmitting vibration not normally felt up to the drivers seat. Easy enough to disconnect and see. I'm hoping I caught nothing more than a bad case of clutch chatter!  torque limiter at rear top
|
|
#232
09-23-2013, 04:29 PM
|
||||
|
||||
|
I should have read all the way to the bottom. What might be happening is normally the chain will have 3/8 to 1/2" play when properly adjusted. When you goose it the chain will loosen a bit more. I do know if you tighten these chains without any play the rear axle will wreak havoc with a good shimmy until the slack comes back to the chain. When the chain is tightened to 3/8-1/2" play and you nail the throttle the chain will get a bit more slack in it. If the chain is too loose then you get slippage upon full throttle especially when torqueing the motor when climbing a hill. The fact that you have that torque limiter you may not be letting the chain get the needed slack under the heavy throttle and it might be acting as if the chain is too tight. So you might find it solves your problem when disconnected. Yerfs were bad about breaking the rear of the housing where the adjustor bolts from excessive torque over time. Kinroad and Hammerhead solved that problem by adding a 2 piece stiffener to the back of the case to distribute the stress over a larger case area thus solving the cracking of the case. If you went this route you would have to modify the adjuster to fit around a wider rear case.
|
|
#235
11-14-2013, 07:54 PM
|
||||
|
||||
|
any updates??
|
|
#236
11-16-2013, 06:30 AM
|
||||
|
||||
|
Naw, J-man not of lately, Between the purchase and moving to a new house and major overtime at work there has been no buggy time. Everyone wants their truck orders completed before the holidays and years end so there's a big push on right now.
The buggy is basically done. I need seat time to get the crabs out! Next step is to get it weighed and some shocks ordered!
|
|
#238
11-16-2013, 10:39 AM
|
||||
|
||||
|
House comes first and homes take up basically all ur free time I know how it is.
|
|
#240
11-17-2013, 08:16 PM
|
||||
|
||||
|
ckau,
Which direction are you looking for shocks, Works, Fox, or ? That is a major issue that plagues us all. Congrats on the new home. Did you get any acreage or a shop?
__________________
2005 Hammerhead 150 170cc BBK, PnP Big valve Head, A12 Cam, Uni Filter, Custom Exhaust, 10G rollers, 1500 Contra Spring, 2000 Clutch Springs Just added - 2007 Joyner 250 SV - Let the fun begin 4-Dirt Bikes, Baja Bug and enough toys to keep me in the garage and out of trouble.
|
|
#241
11-18-2013, 07:44 PM
|
||||
|
||||
|
Quote:
Didn't get any real acreage with the house, 2.3 acre lot. The location and commute distance to our jobs was a primary intent., plus it's prime investment property. Some time down the road I'll probably build a shop
|
|
#242
02-11-2014, 06:43 PM
|
||||
|
||||
|
Can't wait to see your buggy in action.
__________________
Growing old is mandatory  Growing up is optional  https://www.youtube.com/watch?v=NEXoa-8d7qE
|
|
#243
08-02-2015, 01:31 PM
|
||||
|
||||
|
Quote:
http://www.delcity.net/store/ATC-&-A...ng-Pad/p_11262
__________________
Hammer head Single seater know as herbie under construction Aluminum fuel tank, aluminum wheels, custom fuel/cargo rack, entire rewire, trail tech vapor, ported big valve head, a12camshaft, 12 gram sliders, straight intake, kirkey wide seat, front end extension. 4 point harness, welded cage. Hammerhead exhaust. Blade Single Seater Restore welded cage, engine build, new wiring harness/electric box, spun aluminum fuel tank.
|
|
#244
08-02-2015, 01:42 PM
|
||||
|
||||
|
__________________
Hammer head Single seater know as herbie under construction Aluminum fuel tank, aluminum wheels, custom fuel/cargo rack, entire rewire, trail tech vapor, ported big valve head, a12camshaft, 12 gram sliders, straight intake, kirkey wide seat, front end extension. 4 point harness, welded cage. Hammerhead exhaust. Blade Single Seater Restore welded cage, engine build, new wiring harness/electric box, spun aluminum fuel tank.
|
|
#246
08-02-2015, 08:34 PM
|
||||
|
||||
|
Quote:
__________________
Hammer head Single seater know as herbie under construction Aluminum fuel tank, aluminum wheels, custom fuel/cargo rack, entire rewire, trail tech vapor, ported big valve head, a12camshaft, 12 gram sliders, straight intake, kirkey wide seat, front end extension. 4 point harness, welded cage. Hammerhead exhaust. Blade Single Seater Restore welded cage, engine build, new wiring harness/electric box, spun aluminum fuel tank.
|
|
#247
08-03-2015, 09:26 AM
|
|||
|
|||
|
I would suggest getting a fuse block with a few more spots than you need in case you ever want to add something in the future, you'll already have somewhere to terminate them.
|
 |
|
|