|
|
|
#601
 08-07-2013, 04:39 PM
|
||||
|
||||
|
I'll beg to differ with the genius comment only because if i was one, i'd've built it the right way in the first place.
 But thanks, i've always had to improvise and use things in ways they were never meant to be. goes back to my days in the family bowling alleys. But thanks, i've always had to improvise and use things in ways they were never meant to be. goes back to my days in the family bowling alleys. And seeing the genesis of your build, i'll tell you that you'll soon be seeing the shapes in the metal.  Do yourself a favor though, buy some flat/plate stock and whatever tubing diameter you''re going to work with for the frame/cage. it's cheaper, cleaner and easier than cutting pieces out of quads, buggies etc. Do yourself a favor though, buy some flat/plate stock and whatever tubing diameter you''re going to work with for the frame/cage. it's cheaper, cleaner and easier than cutting pieces out of quads, buggies etc.  C; only hitch to overcome with your idea is that the cap on the rack end bolts in place and locks the whole mess from either side. If you ran a high-grade/quality bolt with the head cut off out of the rack end (i have a pile of chopped off shock shafts that would be ideal for that--think they even have the proper thread) and had a bushing about 1/4 to 3/8s away from the rack end where i have the bolt-in caps it would give the assembly that much travel side-to-side. Linking the lower portion together with a shock type cylinder that has both push and pull directional damping would seal the deal. it'd need to be firm enough to absorb the hits and not deflect/travel under normal cornering loads. Believe me, i've thought about the same thing-- a lot. Here's a different route. air shock tie rods. nothing else between the arm and rack but that. 
|
|
#602
08-07-2013, 05:00 PM
|
||||
|
||||
|
Quote:
I'll have you know, I have not chopped anything from a quad, buggy, bedframe, etc.., although I do have some bed frames that could be donated to the cause. I have about 5 different diameters of 'tube' both for the frame size, and the 'slugs' needed for any frame extensions put in place. I also started out with a 6'x6" of 1/4" plate, which is far smaller now, and several sections of angle iron and flat stock in 1/8" and 3/16". The only things donated from other vehicles is the engine, and some parts and pieces of tow hitches from used vehicle take offs. I assume it was not directed at me, cause I take a bit of offense to that, if it were.  @CKAU, have you looked into sport bike steering dampers? The SV came with a air bladder type and I know there are several other models that come with better ones from the factory. I would say mine has about 6" of travel, and the steering is pretty smooth, even over rough road at 100+.
__________________
ASE Master and Toyota Master Diagnostic Certified Buggy Building Trainee '04 Dazon Raider 150 'modded' Last edited by Masteryota; 08-07-2013 at 05:04 PM.
|
|
#603
08-07-2013, 10:32 PM
|
||||
|
||||
|
Quote:
 (i keep that and a Sunl rear rack if anyone ever claims i can't race in the UTV class and tries to have me kicked up to the full size buggy ranks) (i keep that and a Sunl rear rack if anyone ever claims i can't race in the UTV class and tries to have me kicked up to the full size buggy ranks)
|
|
#604
08-08-2013, 05:58 AM
|
||||
|
||||
|
There, I changed my avatar, maybe that will set us apart, lol. Not really offended, but you did make me go out and look at the frame again, just to make sure I wasn't forgetting something I added Whats funny about all this, is I actually chopped up the ATC frame yesterday to see if it would graft into the swingarm so I had more/better engine mounting locations, but it would take up too much room and severely limit where I could run the chains, so it was added to the scrap iron pile.
__________________
ASE Master and Toyota Master Diagnostic Certified Buggy Building Trainee '04 Dazon Raider 150 'modded'
|
|
#605
08-10-2013, 07:47 PM
|
||||
|
||||
|
Well, with the steering waiting on parts, i dove into the back end. After searching high and low for a set of cheap spring to replace the ones on the podiums and not having any luck the mad modder went at it again.
After experimenting with the purple (polaris sled) and red (original quadrunner) springs i have in my pile i found the purple's too light and the reds a possibility. However, they were both too short. After a lot of digging and trial and error, I stacked in the base of the adjuster from the sled shocks to test how they handled the buggies weight against one of the podiums in original form. The results were encouraging, the red didn't settle in too much mroe than the stock podium, but responded with a lower spring rate-- the purple's--fuggedaboutit! I stood centered above the engine on the frame and rocked the buggy hard side to side --nice test method, eh? lol Not wanting to use the adjuster bases since i'm rebuilding those for my daughter's ride (more on that at the tend of this) i got to thinking about a helper spring. The podium springs have a closely spaced soft portion, then a very widely spaced stiff portion. After agonizing for all of a minute or to, the first original podium spring was in the vise with me eyeballing a cut line and grinder in hand. When in the buggy, the soft portion of the spring was pretty much all used up in preload and very little beyond that so i figured why not use them that way. To get them to level after the cut i'd normally torch 3/4 back on the last coil and sag it down to the previous coil. no oxygen in my tank co i went with some clamping and welding, followed by a session on the disc sander to get it flat. That was the easy job. Coming up with a double-ended keeper took a lot of digging. the helper spring has a slightly larger ID than the quadrunner spring and both ends have to fit into the spring and around the shock body without contacting it. i checked out old junk shocks, exhaust tubing, you name it. Finally found the old trailboss 250 struts buried deep in the pile. these were the type with steel spindles and the strut bolted to them turns out the keeper welded on it's strut tube was a match--for a one sided so i chopped them off, then cut out the welds and punched out the remaining pieces of strut tube (was double walled). With nothing else to match, i ended up cutting 3/8th wide slices off exhaust tubing, then chopping a 1/4" chunk out, welding it shut again then welding that to the other side of the strut's keeper. tested the first one last night and it seems to maybe be what i want, so i did number two today. if they're not up to the task rate wise, finding 2.0 OD short springs shouldn't be an issue like it was with the ones on the podiums. still have jetting work, tie rods and brakes--on that subject, bit the bullet and ordered the 5/8ths master for the two-caliper setup the golf cart guys are using. if i have the time, i try my modded yerf one first since it's already in place but not bled. So those lovely pink/purple and white shocks that i used to have on the rear of this with the swingarm? well, they're IFP's with separate gas/oil chambers off a '95 Polaris xcr600 (i think that's the model letter) sled. I'm using them on the mini dogshark as a test for the nitrogen needle valve to schrader conversion. I picked up some threaded schrader's off e-bay, did some digging and found some fittings to get them in place. If any of you frequent MBN, then you may have read my thread "shock go Boom!" Weirdest thing happened rebuilding these first went no problem. On the second one, I dumped out the nitrogen through the rubber block fitting, removed the fitting and had the base open to atmosphere. for whatever reason, trying to remove the bearing on these resulted in the base unthreaded first. so i started teardown at that end with the bearing cap in the vise. two threads left to unwind and the SOB went off like a mortar. big pop boom, blew the shock out of the vise, sent my wrench flying, shatter the bulb in my work light above it and left me standing there dripping with oil and coated with bits of florescent tube. Didn't find the base cap til the next day. somehow the gas got past the IFP into the oil and had it basically working as a pressurized emulsion shock. No physical harm except a nasty tinnitis run. word of warning with shocks--always remember to keep all body parts out of the area above the shock when taking them apart! (a practice i've always followed--thankfully!! )
|
|
#606
08-27-2013, 03:48 PM
|
||||
|
||||
|
Still waiting on parts ... so, weight weenie in me went at the lower a arms and tackled a couple other items.
Made my new shock mount plates to force more droop. this in turn is increasing my caster by bumping up the ride height--need to be able to plow into and over the rocks better. whole lotta fun making the spacers and grinding the plates down so everything fits nice and snug. mic and file ... over and over. Trimmed about 1.5 pounds out of the arm ends with the drill press and grinder. Made and installed the first bash guard. Decided that the 3/4 diameter through bolts and bronze bushings are going to be history. too much slop has worked into them. weld in bungs and heims are on order. going to be a bit of a pain installing the mounts for them, but i have a plan  removed my 2 inch wheel spacers. that'll help tuck the arm ends in closer to the tire as i'd bashed them into some rocks already. going with the heims and bungs will catch some of the lost track width back, it'll be about 1.5 inches narrower overall--increased droop is causing most of it, but it's also better to be narrower for the course. last pic shows unloaded ride height (without me) with the frame base now having an upward angle adding to the caster. I have a slightly taller 4-lug 12" rim/trailer tire that i considered using, but i'm not sure it'll survive with it's shorter sidewall. They're also 5 pounds heavier each. weighed out both sides at full droop without the shocks in place and pre-mod is 15.3 pounds, post-mod, even with the bash guards and some extra bushings i added to my spindles is 11.9. swapping the bolts for heims is going to save about 3 pounds, the "snout" gone is another 3 pounds off, the new tie rods are about half the weight of the old ones, but that's offset by the drop link. Now if i can find a cheap enough pair of Floats from a sled, i'd cut another 10 pounds off. That's a funding issue though LOL.
|
|
#608
08-29-2013, 06:03 AM
|
||||
|
||||
|
Quote:
Instead of that, you could put a rubber or urethane spacer on the rack end and another on the outside of it between the bolt head and link end. this would allow the link to move enough for the spacers to compress under impact. narrow, high-rate springs would also do the trick. of course it has a couple drawbacks--the opposite tire would still deflect as much as the spacer compresses and you would need to make longer flat spots on the rack and be able to get the inner spacers seated past the cup's "Ds" To overcome the first, you could still link in the center damper. again, another "simple" replacement instead of a damper as you're thinking, would be to use a double-studded rubber bushing like those used to mount radiators etc.
|
|
#609
09-05-2013, 05:26 PM
|
||||
|
||||
|
Getting into crunch time again.
rather than take the next logical step of building new steering arms onto the spindles and finishing, i decided convert from through-bolt mounts to heims on the a-arms. Broke out the ultra fancy band saw for that delicate job. for some reason it still always needs a file/square-check/file job done after every cut it makes!   getting the heim to clear the inner structure meant bumping out the mount point. Had to hog out the old hole to make room to get the bolt and socket in.  Overall, the arms are longer with the heims, but I got rid of my 2-inch wheel spacers ( the type that threads onto each lug individually) so track width is within 1/2 inch of the original and the a-arm end is tucked in much tighter to the wheel. At full sag (which can go to 43 degrees if i want), without the shocks, i've dropped nearly 4 pounds of unsprung weight off each side. So far only 1 upper is finished, lower still needs mount plates, but i figured my approach to those out today. replicating the other side will go a lot quicker. got a lot to cut out for the lowers. In addition to the a-arms i've probably chopped another 10 pounds of sprung weight off the front end Then it's off to the steering arms and tie rods. ever hear the phrase .. "I'm just gonna ...."?
|
|
#610
09-05-2013, 06:54 PM
|
||||
|
||||
|
I like it, like it alot. This is what I had planned for mine, but got side tracked with time limits. Still might do it if the build goes into the colder months. What are you using for the tabs?
__________________
ASE Master and Toyota Master Diagnostic Certified Buggy Building Trainee '04 Dazon Raider 150 'modded'
|
|
#612
09-06-2013, 08:11 PM
|
||||
|
||||
|
Quote:
I like the heim fix for the pivot point. After installing zerks in the pivots, I stopped getting excessive slop and bushing wear. Getting grease to the bushings dramatically increase service life. On occasion I'll tighten the through bolt a touch but haven't had any real issues since . but I do like the heims for their durability and the ability for adjustment. The heims will allow to add or subtract castor. Also you can now move the front wheels forwards or back to square/true up the wheelbase. A little fine tuning can reduce rolling resistance by getting the buggy to track straight. It's like finding a little free horsepower.Shedding all that weight is a real plus! it will feel like a whole new ride! I anticipate you'll see some reduced lap times at Line mtn. Looking forwards to hear your opinion once you get rolling again.
|
|
#613
09-06-2013, 09:42 PM
|
||||
|
||||
|
Most of the wear came from the through bolts i made--too much thread length--3/4 diameter bolts + sharp coarse threads on bronze bushings = some pretty chewed through bushings.
Tightening up the through bolts hard enough (magilla gorilla tight) to get rid of the slop locked them up, and the rear mount plate had an "issue" with being out of square and bound up the lower arms a little at full droop. Heims will take care of all of that, a big part of the reason i decided to finally do it after nearly 2 years on the wish list. as to master's question, uppers are 3/16ths plate, the angle iron they go into is the type with a fat inside radius, outside is 90 degrees, inside is a different angle, which made them a whole lotta fun to template out, basically had to rough cut then file fit each one. Lower setup is 1/4 inch plate. easier tabs to make since they're sitting into a 90-degree corner, but the original build presented some "fun" to work around. made the mount tabs for both sides today. of course i drilled them out--lightened out the equivalent of a 1" x 3/4 dia and 1" x 1/2 dia rod out of each side.  I'll have to pre-assemble them before welding the assembly to the front end--just a lot easier to square them this way. Base plate also needs a hole and slot to get the bottom of the heim to clear.  Basically cut the old front and rear mount plate off along with the back gusset and bottom plate. When i changed my heim position on the spindle to vertical I added (no choice) another 3/8ths of height to it, which gave me some camber change i didn't want. to remedy that i'm moving the lower mount down the same amount and out to match the move i just made with the upper. pretty much hanging the heim out in the middle of nowhere. It's forcing me to rely on the old thin wall rectangular crush box i built into the front end as an attachment point for the tab. To make it strong enough, i'm running the mount tab all the way up to the underside of the top plate and am adding the 1/8th plate underneath, which will tie into the original underplate. I also plan on popping triangular gussets into the corners of the "notch" and have them canted to the front and rear mount tabs.  Putting it all together is the easy part, making all the little bits is the time killer.
|
|
#614
09-09-2013, 06:37 PM
|
||||
|
||||
|
coming along ...
assembled the lower hangers on the bench and put the lower on for a test fit session. final fit came down to putting the upper and lower bolts in place by them selves and using a mic between them to get the front and rear bolts dead nuts --well within .002 ---  Tacked in place with the arms on. check out the length difference between teh old and new! really smooth action through the travel.  obviously won't be running this much droop. present shocks have 4" stroke and yield 7 inches of travel (to the bump stop) on the old arm setup. haven't run the new side yet. keep eyeballing used fox evol's from arctic cat sleds --got plenty of spots for additional shock length i can take advantage of. obviously won't be running this much droop. present shocks have 4" stroke and yield 7 inches of travel (to the bump stop) on the old arm setup. haven't run the new side yet. keep eyeballing used fox evol's from arctic cat sleds --got plenty of spots for additional shock length i can take advantage of.  Burned it all together. I will be putting a gusset back behind the "box" where i cut out the old one. was too hot last night after welding it to reassemble to test the travel with the shock in place, will probably mess with that tonight. 
|
|
#615
09-16-2013, 07:06 AM
|
||||
|
||||
|
Got both sides installed and aligned. Took a bit of finessing, but got my tolerances at all points within .001-.003.
Having fun with steering arm setup and tie rod mounts. going to have the heims run vertically on the arm. Just a bit tricky to avoid the steering arm end interfering with the lower arm at full lock and droop. had an issue with that before, and having your steering locked up in the arms in a corner is no fun to say the least!  9.5" travel to the bump stops from 14.5 long, 4" stroke shocks. There's room and positions set for Fox float 18 inchers in the future Those will allow all the travel the arms provide to be used. O degree camber change through the travel. front ride height pre-sag is 15", shooting for about 13" loaded Caster is going to end up somewhere between 9-11 degrees, up from the 6-8 degrees it was going to with the front to rear rake. Most of the change in attitude came from softening the rear up with a little from a slight increase in droop angle. Four days and counting!
|
|
#616
09-20-2013, 01:03 PM
|
||||
|
||||
|
trailer and roll out day. marathon garage sessions til the wee hours of the am after 10-12 hour workdays and i'm still not finished! But she'll make it.
took it off the jackstands at about 1 am last night. a last minute change (call it a screw up) in steering arm design made me have to put my 2" wheel spacers back on. the extra length/ cost me ride height/arm leverage on the shocks, which has me a little bummed. not enough to throw in the towel, but 10-20 percent off what i wanted. new brake master went in, and promptly came back out with the dread realization that it had fine thread and my banjo bolts were coarse thread ... cue 1 10mm coarse pitch tap and thankfully, problem resolved. Installed, bled and due to be tested within an hour. Worse was midnight discovery of both wheel hubs having their inner bearings seized. Thankfully, i had another golf cart front end in the scrap heap with good hubs so i just regreased them and swapped them in. brakes and jets ...fingers crossed. laterz all!
|
|
#617
09-20-2013, 02:01 PM
|
||||
|
||||
|
Great job as always X-bird. Keeping the fingers crossed for the brakes.
__________________
2005 Hammerhead 150 170cc BBK, PnP Big valve Head, A12 Cam, Uni Filter, Custom Exhaust, 10G rollers, 1500 Contra Spring, 2000 Clutch Springs Just added - 2007 Joyner 250 SV - Let the fun begin 4-Dirt Bikes, Baja Bug and enough toys to keep me in the garage and out of trouble.
|
|
#618
09-22-2013, 07:35 PM
|
||||
|
||||
|
Well, maybe the Third time will be the charm ...
Managed to get it all together, skipped my sprocket swap and did a short jetting session that got me close, but not right on, then loaded up and rolled. Saturday morning saw me still putting on the panels, extra "windshields" swapping out a couple bolts that i didn't have anything decent for (a trip to Ace on the way up). Gave the crazy loose chains a shot of lube and it was race time LOL. At the start, i don't know if the clutches needed some heat or what, (cold night up in the mtns) but the first couple little bumps had it bogged. after that, no problem. well, at least not of that sort. While i got off the line quick, of course the razors etc. smoked me down the straight, which i expect  the first up 180 loop area where i stall is so washed out compared to last year, it isn't funny. DEEP, rain channels through there could swallow a tire, so everyone had to really pick their way through it. after that, the normal rough stuff and i manage to make my first pass of someone in my class. (stock razor xp) the first up 180 loop area where i stall is so washed out compared to last year, it isn't funny. DEEP, rain channels through there could swallow a tire, so everyone had to really pick their way through it. after that, the normal rough stuff and i manage to make my first pass of someone in my class. (stock razor xp)but of course moments later a downed tree branch sprung me into a little trap that ended up with my weak reverse cable mangled and useless, meaning i had to get out and manually change if i needed it. both fade outs are of spots where i lost tons of time screwing with the reverse. Since my race as far as moving up from last in class was done, i decided to just hammer it pretty hard. got through all the rough stuff and had some fun with the faster sections (about 12 minutes into the video) before the trans started acting up and finally left me stuck with no gears about 5 miles into the 7.5. Despite that  she came through pretty much unscathed but for some pretty big hits on the a-arm bashguards, which did their job. without the stops to screw with reverse, pace was pretty much where it needs to be to be competitive. Brakes, got new pads, but there was a little seepage where the bolt goes in the master. however, they worked well enough for the race. I still have to make sure the seepage wasn't spill from the master coming down the hose. she came through pretty much unscathed but for some pretty big hits on the a-arm bashguards, which did their job. without the stops to screw with reverse, pace was pretty much where it needs to be to be competitive. Brakes, got new pads, but there was a little seepage where the bolt goes in the master. however, they worked well enough for the race. I still have to make sure the seepage wasn't spill from the master coming down the hose.24 minutes long, new mount location --- better in some ways, but i really wanted a good view of the front suspension at work. that's the one bad thing about GPs, can't really preview your frame view. Enjoy some bobble head X at it again! http://youtu.be/_d1jQKOqLVM Some pics of the front end work ... set it up so i can fit 18" floats in the front. May go with the same in the rear, as i can get up to 24" ones back there. Last edited by x-bird; 09-23-2013 at 06:35 AM.
|
|
#619
09-22-2013, 09:25 PM
|
||||
|
||||
|
Wow, that trail looks rough on the spinal cord. I can not imagine trying to run through there with out IRS and purpose built shocks.
That stinks about the trans, do you think it is more than the clutch giving up? That makes me a little nervous about mine, but at least used parts are kinda plentiful if needed, and new parts are still available. How does that new front feel on the trail? I would imagine it is far more responsive than the old bushing design, but only real world testing reveals their true value. Final question, I promise. We saw what Ckau found with his brakes, what is your final thought after this run?
__________________
ASE Master and Toyota Master Diagnostic Certified Buggy Building Trainee '04 Dazon Raider 150 'modded'
|
|
#620
09-23-2013, 05:47 AM
|
||||
|
||||
|
I don't mind questions---i welcome lots of them ..they help me focus and think about things i may not normally.
anywho ... brakes--5/8ths master definitely helped --as did new pads. I found out from Bige that the particular calipers i have are a 150 type that roketa used on some years of GK 13s or 29s, likely only for a short while --they were probably designed as a single rear caliper for the back axle of the 150s and carried over and i think have a larger chamber behind the piston. putting two together with a 1/2 master isn't really a good idea. the yerf twin pot calipers may be a better match to a 1/2 master. even with a probable seepage issue at the one bolt, i still have brakes. I also made and installed a dead pedal to keep me from riding them accidentally like i was doing last race. Front feels fine on the trails, adding the wheel spacers back into the mix to get the steering arm to clear the tires though pushed my kingpin offset up to and over 5 inches per side. through sharp/steep rock hits it really didn't cause problems, but when going fast and the front end compressed down more slowly it would wander as the track widened out by nearly a foot. Next weak area and where i have some play is the double u-joint steering link. As far as the trans goes, i was feeling more and more "play" length on the shift throws after the rough stuff and a few times i'm pretty sure it missed upshifts. i think the main shift shaft, which has a little spring/lever doohicky above the fork is the issue. If either clutch had gone, mechanically it should still move the gears. It also could be the reverse lever is stuck between forward and reverse. It doesn't seem to want to fully return down to the Forward position. i spent a lot of time jammed behind that tree branch with the back end up against another tree and literally had to beat on the lever with a rock to get it back in forward. stupid me forgot to move the branch the first time and i repeated "the trap" and had to get out and do it all over again! Then i dropped the SOB on my foot when i did move it! At the main lever, i have a totally dead loose stick though the internal return-to-center spring portion of it still works. and "rough" isn't the word for it anymore. the course used to deteriorate much more slowly. the past couple years have seen a lot of the west coast's biggest/top level KOH and moab type rock crawlers racing there with dual dana 60s, center pivot front & rear trailing arm suspension, bypass shocks and 40 in+ tires, 6-figure pure race rigs that are amazing to watch but utterly devastate the course. the ruts in all areas but the two "interstates" are anywhere from 2 to 4+ foot deep. Add in heavy rain/water courses coming down the mountainside and it creates massive change year to year. we're seeing car size boulders on the trail sides getting knocked loose. my camera angle doesn't show much of it at all, but straddling then crossing over the ruts is interesting to say the least. Addictive as hell too! Last edited by x-bird; 09-23-2013 at 06:14 AM.
|
|
#622
09-24-2013, 09:35 AM
|
||||
|
||||
|
Master; Pulled the clutch cover last night to start figuring out what went. Clutches are in perfect shape (well as perfect as a near 30 year old piece can be) Oil was nice and clean, no heat glazing or discoloration on the centrifugal.
I don't think you have to worry about clutching if you gear it down in the 5s and don't mind a little high rev, low speed Low gears. The actuator arm (for want of a better term) on the gear shift shaft broke in 4 place around the "box" that moves the arm on the "star" cam to shift the gears. It may have been caused by the length of my shifter and the fact that i don't have any stops on it. I may have been putting a lot of leverage on the actuator, which is stamped, possibly hardened steel. The roller was stuck near the peak of going into gear and the arm was kind of jammed. I got it unstuck and it's now in Neutral. The F/R shifter seems a little "hesitant" to full seat. I'm going to weld up the arm and fit it to test if that's the only issue. If it doesn't fix it, i likely have a bent shift fork and will have to crack the case open  And oh yeah ... the greased gasket trick came through-- both the adjustment and main cover came off without a single tear or stick to the gasket. Finally, something went right! Murphy must have vacated these parts since race season is over for me. Welded the arm back together, installed and it shifts correctly now.  For now, it's going back together. I got good weld penetration from all sides, but it's definitely hardened steel and I don't trust it long term. There is a used shifter arm on ebay i'm going to have to snap up. For now, it's going back together. I got good weld penetration from all sides, but it's definitely hardened steel and I don't trust it long term. There is a used shifter arm on ebay i'm going to have to snap up. Cause was definitely my shifter setup. I found witness marks up past the star cam where the arm end that engages the cam was hitting a nub on the case. Normally it can't reach that point, i think the "overshots" happened as the lever began breaking apart. Watching my video, I can see my shift throws going farther forward on the upshifts throughout the race. Already made a bump stop for the lever. Time reassemble, add oil, weld and ride! (still have a couple jets to try--pulled the plug and i'm still lean) Last edited by x-bird; 09-24-2013 at 11:20 AM.
|
|
#623
09-24-2013, 11:41 AM
|
||||
|
||||
|
X-bird
I would lead more to thinking of old age, rather then it being your fault. From the pictures it looked like it broke right at the contact point. Who knows how many times, that engine has been shifted and each time that it was, it put a little stress at that point. I would think that if it was caused by too much shifter movement, that it would not only be broken, but it would also have been bent or sprung. P.S. I sure wish that we had that type of racing around here. I'd be all over it in a hearts beat. Maybe when I retire, I'll get out of this Damn state.
__________________
2005 Hammerhead 150 170cc BBK, PnP Big valve Head, A12 Cam, Uni Filter, Custom Exhaust, 10G rollers, 1500 Contra Spring, 2000 Clutch Springs Just added - 2007 Joyner 250 SV - Let the fun begin 4-Dirt Bikes, Baja Bug and enough toys to keep me in the garage and out of trouble.
|
|
#624
09-24-2013, 12:50 PM
|
||||
|
||||
|
Quote:
Spoke too soon though when i said everything came through unscathed.  ---lower right a-arm took a pretty huge hit near the end when i centered over a big rock and didn't clear it. both arm tubes are swept up and back pretty significantly. a couple pieces of tube, 2 bungs and some chopping will resolve that without needing to build a completely new arm. ---lower right a-arm took a pretty huge hit near the end when i centered over a big rock and didn't clear it. both arm tubes are swept up and back pretty significantly. a couple pieces of tube, 2 bungs and some chopping will resolve that without needing to build a completely new arm.
|
|
#625
09-24-2013, 03:32 PM
|
||||
|
||||
|
Any type of failure / mishap is a PITA, but better to tweak the arm then the chassis. Some people like to build in a shear point, but I'm not a big fan of that concept. Bad things can happen when part of the buggy comes off or loose.
__________________
2005 Hammerhead 150 170cc BBK, PnP Big valve Head, A12 Cam, Uni Filter, Custom Exhaust, 10G rollers, 1500 Contra Spring, 2000 Clutch Springs Just added - 2007 Joyner 250 SV - Let the fun begin 4-Dirt Bikes, Baja Bug and enough toys to keep me in the garage and out of trouble.
|
|
#626
09-24-2013, 06:53 PM
|
||||
|
||||
|
You know X, I was thinking before you edited your post, that you were in a false neutral with the F/R lever not seating correctly, but I am glad you found the issue without several other part failures. I have to say this, that shifter mechanism is really complicated compared the the honda set up, too much linkage for my likings. I am glad to hear the clutch came away unscathed, I decided to drop my final gear ratio to 6.2:1, mainly due to wanting low speed/high torque gears, something like the old school 'granny' gears. If it turns out too low, I can change the engine sprocket for less than $10 and bump to 5.6:1.
I tend to agree with toymanytoys on the broken linkage, it has been stressed for how many years, and it looks pretty thin on all sides. If memory serves, the honda is a little thicker around that portion, but it is directly connected to the shift drum star, near the bottom of the case. I messed with it for about an hour before putting it back together, since I had not seen one work personally. If you do grab that other shaft, I would find a away to bulk up your old one just in case it breaks again, that will be the only real test for its durability. I intend to build my shift mechanism as a short throw, and still knocking around the idea of putting paddles on the steering column, using cables of course and a BMX gyro/detangler to keep the cables from binding.
__________________
ASE Master and Toyota Master Diagnostic Certified Buggy Building Trainee '04 Dazon Raider 150 'modded'
|
|
#627
09-24-2013, 07:55 PM
|
||||
|
||||
|
Check out how deep that 2nd rut i stop at the start is LOL dude rolled and ended back on all 4!
https://www.facebook.com/photo.php?f...type=3&theater So today should have been thursday or friday. put in a 125 jet and woke the old dog up! mounted the go pro to shoot the suspension front and rear. been meaning to do this a long time. never go the time til today. i haven't watched it yet, gotta get up to work for a bit. http://youtu.be/KlcIbx_onQ4
|
|
#628
09-24-2013, 10:26 PM
|
||||
|
||||
|
X-bird,
Now you just have to shoot a video when you are going forward and not in reverse  . The camera sure does some funny things when the frames per second sync with the knobbys on your front tire. It looks like you got some good suspension action going on there. Definitely not the bobble head ride from your race. . The camera sure does some funny things when the frames per second sync with the knobbys on your front tire. It looks like you got some good suspension action going on there. Definitely not the bobble head ride from your race.
__________________
2005 Hammerhead 150 170cc BBK, PnP Big valve Head, A12 Cam, Uni Filter, Custom Exhaust, 10G rollers, 1500 Contra Spring, 2000 Clutch Springs Just added - 2007 Joyner 250 SV - Let the fun begin 4-Dirt Bikes, Baja Bug and enough toys to keep me in the garage and out of trouble.
|
|
#629
10-14-2013, 07:30 AM
|
||||
|
||||
|
Quote:
anyway, damage and completed repairs to the a-arms. tubing cracked leading off the cross brace and the cross brace welds someone ground down too thin and were split almost the whole length. I think it would have made it to the finish, but not much more before the shock mount and crossbrace punched out. Other side will get the brace replaced in the same manner.the mower cable reverse setup has let me down twice now. the cable just isn't strong enough to live through a shift attempt if the rpm is a little high and it won't engage. created a solid rod setup, had to route through at different heights. I had though about doing a pivoting link where my the thumb throttle is mounted, but scrapped it and went K.I.S.S. Bendable fuel line, threaded rod, a support rod for the "S" bend and a rod end from the plane on the engine side, homemade clevis at the shifter. Working out the Trail Tech speedo mounts. (BTW, box had a couple scuffs onthe bottom, everything perfect and untouched inside--not bad for 1/2 price!  ) Speedo cable is only long enough to run to the front wheel. going to weld a piece of tube with a nut inside to the back of a lug for the bolt magnet, the pickup will mount to the steering arm. ) Speedo cable is only long enough to run to the front wheel. going to weld a piece of tube with a nut inside to the back of a lug for the bolt magnet, the pickup will mount to the steering arm. For head temps, i need to get a sparkplug pickup that's the right diameter. that one isn't a major concern. It'll be nice info to have, but there's no published spec, so a general ball park aircooled bike # will do and i'll also be able to see if/how much my fan drops the temp.
|
|
#630
10-14-2013, 04:11 PM
|
||||
|
||||
|
gotta the new toy installed. started following the directions mounting the wheel sensor
 mounting on the left side and kept staring at it and the motorcycle picture trying to figure out why it wasn't mentally adding up. bike = pickup outside, magnet inside. my setup is just the opposite Since I'd already welded the magnet tube to the stud, I just swapped hubs side to side and used a piece of angle for the pickup. mounting on the left side and kept staring at it and the motorcycle picture trying to figure out why it wasn't mentally adding up. bike = pickup outside, magnet inside. my setup is just the opposite Since I'd already welded the magnet tube to the stud, I just swapped hubs side to side and used a piece of angle for the pickup. used the kit's bar mount for the main unit for now. will be making a housing to set it above my horn button and closer to me. verified my wheel circumference both by height and rolling diameter. a tiny bit of lag, but way better than the tiny tach knock off. Figured out one thing--I can't get over 29 mph around my yard unless i overcome some major cornering pucker factor   I was able to discover that the engine revs way more than i thought and that First runs to about 12 mph, Second to about 21 and 3rd to about 29 4th and 5th will have to wait til i have somewhere to run it out ....
|
|
#631
10-24-2013, 08:07 PM
|
||||
|
||||
|
Been a little too quiet in the garage the past couple weeks, so i decided to fab up a mount for the TT. Did it as a two layer with the unit recessed below the diamond plate for protection from flying knuckles. machine screws and star washer nuts hold the base layer to the diamond plate and 5/16ths nuts and bolts hold it to the original dash panel. the outside has a piece of bendable 3/8ths fuel line welded to the underside of the base layer witha tab on the other end that bolts to the dash panel.
All in all, i'm really happy with the unit, i need to lengthen the temp lead so i can at least have a baseline temp to watch. Only issue is that sometimes the tach seems to read too high, may have to play with the windings on the plug wire or even try the direct run to the coil feed off the cdi. Something tells me the latter is more reliable. Also trying to figure out the carb setup. Couple minute vid. Forgive the lack of a skid lid, been painting for 2 weeks and my neck is to fried to put the weight on it. If i keep the revs high, it runs pretty good, if i'm mid throttle, it just seems to have no grunt to accelerate well, even on the flats. (engine sound is much "lower/throatier" when that's happening) This pertains to 3rd and up, gear-wise. 1-2 wind out so quick it isn't funny. Plug has decent color on it. There are 4 or 5 spots to move the needle, trying to figure out if I might be lean or rich in the mid to top end. Right now iirc, i have it in the 2nd from the top. I also think the valves need gone over again, sounds a little loud back there. http://youtu.be/O7ZKC7z4QzQ
|
|
#632
11-03-2013, 05:13 PM
|
||||
|
||||
|
Finally getting to the bottom of the carb/fuel issues. Came to the realization that basically all my testing has been on full tanks, and pretty much on flat ground. The 250 was originally vacuum pump fed, I went with gravity fed and during testing, didn't really encounter any major problems with it.
During some low-tank running, it really didn't run well, just like the tail end of the races that it went all or most of the distance and ran the tank down. Getting the jetting right has helped, but didn't eliminate the problem. I kept chalking it up to jetting, gearing/weight and fuel level in relation to the tank's pickup tube. Installed a 14gph mikuni vacuum pump the other day and an initial 10 minute ride shows it has really come to life. for the first time, 3rd and 4th have the low speed "pull" that i've always felt they should. Ironically, I tested with less than half a gallon in it, and am pretty sure it ended up sucking air on a steep little hill. totally died out until i backed out of it. Without the vacuum pump, i think it was losing feed volume once the tank hit a certain level. Plug is showing rich now, a first, and i'm hoping that's down to having the needle at the second richest spot. Next couple of days i'll get some gas in it and fiddle with that as well as run the little hill again to be sure. Sudco's mikuni tech says to replace the needle and seat, but it's unavailable in the stock size of 1.2 For $25 + shipping to try a 1.5, i'm more inclined to leave it be and get myself a new flat slide over the winter. The flat slide was his recommendation to go with, would give me a little more and crisper bottom end response and available parts. If that proves out, it may let me push the gearing a little more so i can up the top speed on it.
|
|
#633
11-03-2013, 05:52 PM
|
||||
|
||||
|
I knew that pump would get you moving again. You might have been starving for fuel when you changed the jets the first go around. Some fiddling with the needle and main might prove to get even more power out of it.
On the flip side, I am glad you pointed out your gravity vs pump issues, now I am making sure my pickup/shut off valve is at the correct height in the tank so I don't run into the same on uneven terrain. Mine came with gravity fed carb, and I shouldn't have any issues, as I already picked up a chinese keihn knock off carb, and it has gin-u-wine keihn jets in it, and has a larger slide than the original  . I can't say about the throat diameter, as I tossed the original some time ago, I just kept the cable and needle/slide for reference. . I can't say about the throat diameter, as I tossed the original some time ago, I just kept the cable and needle/slide for reference.
__________________
ASE Master and Toyota Master Diagnostic Certified Buggy Building Trainee '04 Dazon Raider 150 'modded'
|
|
#634
01-04-2014, 07:40 AM
|
||||
|
||||
|
Latest Goody ...
http://www.ebay.com/itm/380803100578...84.m1439.l2649 Blew the spark arrestor out of the HH muffler, and it leaks a bit around the case halves, so i figured why not throw something tunable at it.
|
|
#635
01-04-2014, 01:19 PM
|
||||
|
||||
|
Looks good. Throw in some new packing, then tune to your hearts content. Sure beats guessing and cutting up a muffler. Should also give you a nice throaty tone.
__________________
2005 Hammerhead 150 170cc BBK, PnP Big valve Head, A12 Cam, Uni Filter, Custom Exhaust, 10G rollers, 1500 Contra Spring, 2000 Clutch Springs Just added - 2007 Joyner 250 SV - Let the fun begin 4-Dirt Bikes, Baja Bug and enough toys to keep me in the garage and out of trouble.
|
|
#636
01-05-2014, 08:45 AM
|
||||
|
||||
|
Quote:
|
|
#637
01-05-2014, 02:40 PM
|
||||
|
||||
|
Quote:
|
|
#638
01-05-2014, 07:44 PM
|
||||
|
||||
|
Each disc allows a specific amount of flow through the muffler. adding discs increases flow for high end Hp. Fewer discs decreases flow contributing to low end torque. Super tramp recommends 4 disc on a stock motor in the 150 cc range for good pull. My kit came with 12 discs so some number between would be the magic number for my setup.
|
|
#639
01-07-2014, 06:48 PM
|
||||
|
||||
|
Looks like i have another rust-o-ration project. Inner core is fighting me, seems to be pretty well stuck in place. Unlike newer models, you can't knock the core out from the inlet side. There's no metal step inside. I'm hoping it's removable, may have to call supertrapp to verify. Otherwise, cutting her down the seam may be in order.Tried heat, penetrating lube, home made puller, gentle "persuasion" (aka leather hammer), prying the pipe open around the core etc ....
|
|
#640
01-07-2014, 07:46 PM
|
||||
|
||||
|
Quote:
deletion. the core consists of a length of perforated pipe with packing wrapped around it. The pipe and packing should slip out after the end cap and discs are removed. Go to SuperTrapp.com site. You can get some good insight there . Comparing yours to some of the different models might show the process for yours. Supertrapp does a pretty good job of keeping up with customer. feedback. They have a tuning chart for numerous motors based on user feedback. Your particular motor may be listed there.
|
|
#641
01-07-2014, 11:35 PM
|
||||
|
||||
|
i had checked their site before i started in on it; couldn't find any model numbers on it except to figure out that it is the standard universal type--could date back to the late 70s/early 80s. I watched their vids on removal, nothing like a brand new one to demo with. LOL
Tried tapping on the rear cap, but didn't want to beat the heck out of it. took that off (it has all 12 discs) and made a puller, but broke two of the little nuts for the cap bolts free from the core and nearly pulled them through the ring. Ended up splitting it down the seam then cutting the main body all the way around where the inlet pipe is welded into the body. It was as i thought--a slip-on pipe on the core goes around the inlet pipe, for about 2-3 inches. That junction is rusted together. looks like the original fiberglass packing, it was "sealed" with a solid rust scale layer on the outside wrap. The perforated core looks to be about 20% thinner after knocking the scale off. If i can separate the slip on joint, i can save the core. Have it soaking with PB overnight. Knew this was going to take some work when i got it, but i enjoy resurrecting things. Cant' believe the prices on parts for these! took pics only to discover no SD card in my camera????
|
|
#642
01-08-2014, 04:37 PM
|
||||
|
||||
|
Don't have the "before" pics.
Took several heat, PB and hammer on the muffler clap sessions, but the core/inlet pipes finally separated . the packing will give you an idea of how crusty this was inside. everything's pretty well cleaned up, slip fit is good. still have some final hammer an dolly work to do on the tail end, i have to make sure this is truly round and the core doesn't lock in too tight when it's inserted to the correct depth. I have it pretty close at the moment. Core is going to get the remaining press nuts removed, washers welded in at all the holes, then stainless nuts tacked to those. That way if i have to knock the core loose through the pipe, it won't tear the nuts through. core's ring is pretty thinned out and pitted. Disc installation time will see a second stainless nut used to lock it up good and keep the discs from getting loose. (common with these I'm told)
|
|
#643
01-20-2014, 10:13 AM
|
||||
|
||||
|
Finished up the supertrapp refurb.
Used the worst-condition disc as a new backing plate for the disc stack and welded stainless nuts to it. Had to grind down the outer diameter by about 1/8th and use the dremel to trim about 1/16th off the ID. That done, it drops right past the inlet pipe and seats nice and flat against the backside of the core end. Only 2 of the original press-in nuts were left after taking it apart, used a punch and they popped right out. Notches are for getting it to clear the core retainer bolts during install. Took a lot of phone calls to find the only shop with 1 bag of packing in a 25 mile radius. It's actually a FMF brand packing, but a little trimming and it worked. Going to try it with an outer wrap of heat-rated metal duct tape. first attempt proved too fat, i still need to grind down my weld line inside the pipe body and re-wrap it. original exhaust pipe was rigid mounted to the frame with metal tabs on both, I went with basic automotive universal hangars. got rid of the heat and vibration transfer. I just hope the crusty old headpipes don't crack from flexing. Quick test ride this morning. Set it with 4 discs to start. previous muffler pretty much a gutted can with a smaller outlet and i want to push the muffler in the direction of a leaner setup. (30 degrees ) Fired right up, took a bit of idle adjustment which proved i moved in the right direction with the stack. 10 minutes of running and i don't need a degree in rocket science to know the main is now lean. like that tip color? got plenty of jets to move up through. Ran through the gears real quick and responsive, 4th and 5th felt like 2nd and 3rd.
|
|
#644
01-20-2014, 06:17 PM
|
||||
|
||||
|
Looks good, I was eyeballing the super trapp universal muffler for a bit for my old yerf. The adjustability is enough of a selling point for me to pull the trigger if this two brothers doesn't work out.
__________________
ASE Master and Toyota Master Diagnostic Certified Buggy Building Trainee '04 Dazon Raider 150 'modded'
|
|
#645
01-20-2014, 06:30 PM
|
||||
|
||||
|
Hope you have a lead on something, they are some spendy pieces that's for sure! No way i'd go for a new one for this engine.
Put it up to 9 discs and it went to the other side of the scale--really rich. 4th-5th got dull and boggy. Going to shoot for 6 discs then jet the carb again. Can still go down 2 sizes on the pilot--after that, nothing exists, got plenty of "up" to go there. can go a long way either way with the main and still have the needle to tweak with if need be. quick vid, idle, revving and 1 3rd gear loop. slippy stuff again today. http://youtu.be/0hZ6LYvXdqo first "malfunction" with this thing-- 3 disc bolts drew in and locked up with fiberglass bits during the change session. Screwed their threads up. Replaced them and fold-over wrapped the last inch of the packing on the tail end with the duct tape so that hassle doesn't occur again. had to cut the bolts and chase the nuts.
|
|
#647
01-22-2014, 09:06 AM
|
||||
|
||||
|
"poached" a bit of riding in the old rock outcrop to check out the "final" (for this weather) carb and exhaust setup.
http://youtu.be/ch4eXJzCFTA Lost a lot of top speed, (upwards of 15 mph--topping out around 32 mph now) but it winds through the gears real quick and pulls good in all of them. I am going to re-gear it by 1/4 to 1/2 a point to get a bit of it back. Set-up for and tried a 1st gear tire-spin launch in the snow pile, taped it with my regular video camera and discovered what i had feared--a lot of clutch slip and no tire spin. All along, it has been hard to tell just what's going on in that regard. Pretty sure the centrifugal's bell is shot. Though i haven't inspected it lately, i don't think the basket clutch is the issue. Last edited by x-bird; 01-22-2014 at 09:09 AM.
|
|
#648
01-22-2014, 08:09 PM
|
||||
|
||||
|
Quote:
__________________
ASE Master and Toyota Master Diagnostic Certified Buggy Building Trainee '04 Dazon Raider 150 'modded'
|
|
#649
01-22-2014, 11:01 PM
|
||||
|
||||
|
i'd have to double-check the manual, but i'm pretty sure full lock-up engagement should occur around 32-3500. I may be getting 500-1000+ rpm of slippage past that (depends on the gear and speed) and try to remember to fully lift during the shift and before i drop the handle back. they give the front brake/clutch test procedure in the manual, but i never bothered trying it given its condition. Figured it'd be a good way to kill it once and for all, plus i'd have to tree or wall it since i don't have front brake. One race season ahead is all I hopefully going to ask of it. Trying to figure out what it's doing without anyone else watching has been just about impossible, especially with how fast it runs through the gears.
FWIW, the flip side ... All of the cold weather run vids i've put up have been on very slick top surface conditions. the grass is 3-5 inches long, frost line right now is only about 6 inches deep. warm days it peels the top inch off real easy, colder days it's hard with slick matted down grass. both = slippy slippy. The bear claws are just about impossible to bust loose in a straight line on anything, but have a definite tendency to slide easily in the corners on their long "cross" lugs (which is what i like about them) some of what sounds like it could be clutch slippage may in fact be tire spin/rev increases if it's in the corners. I've been looking at the amount of debris thrown in the turns and the actual tread/track patterns to get a better idea of what's going on. When i have opposite lock going sideways and am to the floor with it, i know there' gotta be some tire spin back there or it'd hook and kick back. Bet my new neighbors have some thoughts as to just what the ___ the idiot over yonder is doing! ))) Last edited by x-bird; 01-22-2014 at 11:16 PM.
|
|
#650
01-23-2014, 07:40 AM
|
||||
|
||||
|
Or they are working up the courage to approach the coolest guy in the neighborhood. At thats what I am dealing with here with everything I have going on.
Hoping for the best in your race, hate to see you ditch something you have so much time and work into.
__________________
ASE Master and Toyota Master Diagnostic Certified Buggy Building Trainee '04 Dazon Raider 150 'modded'
|
|
#651
01-23-2014, 07:02 PM
|
||||
|
||||
|
Quote:
I found your findings on the Supertrapp very interesting. Sort of gave me mixed feelings. I was surprised how much that muffler alone alters your power band. On one hand, it means now you'll have to go through the tuning /jetting process all over again. but on the other hand it emphasizes the function and importance of a correct muffler for the application. It also lets me know they indeed are effective.
|
|
#652
01-24-2014, 06:22 AM
|
||||
|
||||
|
I wasn't at final carb tune on it, (for this weather anyway LOL) but it's the small carb and not the muffler that put the power where it's at--which is right on target with what i was after. I think you'll be pretty happy with it. I was surprised with how much difference a small change in the disc stack makes. Plug wise, I went one more up with the main (175) and down to the 12.5 with the pilot. good color on the ceramic, a bit sooty on the base ring. I think if i drop the needle in a little more it'd be on the money. I have 6 discs in the stack, could also pull 1 to see what happens.
|
|
#653
03-05-2014, 04:42 PM
|
||||
|
||||
|
Finally completed my tail-end rebuild. New bearings in the rear hubs--a task and a half!, chains cleaned and lubed, jackshaft bearings cleaned and lubed, gear ratio reduced, supertrapp restored and installed.
Took it for a little test run today, sadly the temps popped over freezing enough to begin melting the snow and the hard crust broke down so i had about 14" of wet slushy junk to plow through. Was having some fun with my plow piles when i paused just a bit too much after cresting and high sided it. Got some good looks from passing traffic
|
|
#654
03-05-2014, 05:10 PM
|
||||
|
||||
|
Glad the Rock Hound is back up and running again.
Just smile and wave at traffic.
__________________
Growing old is mandatory  Growing up is optional https://www.youtube.com/watch?v=NEXoa-8d7qE
|
|
#655
03-05-2014, 06:38 PM
|
||||
|
||||
|
Quote:
So that's on the bench for a weld and strengthening session and also am in the midst of fabbing up new spindles for the front (thicker wall tube with a different axle angle on them.) also pig rich, time to start working the main jets down. still shooting for new shocks up front and a possible rim/tire change up there as well. after that, some lightening work here and there and it should be race ready.
|
|
#656
03-06-2014, 01:54 PM
|
||||
|
||||
|
On the pipe cracking, been there, done that. There is a lot of weight that is swinging around. Have you considered a MC type mount like pictured below.
http://www.ebay.com/itm/NEW-OEM-01-0...2b65c6&vxp=mtr http://www.ebay.com/itm/Suzuki-RM100...13ef5c&vxp=mtr You still get a little bit of movement (that is needed), but not much swing, that we don't want. How are you going to weld the crack? I guess, that I am old school when it comes to thin exhaust tubing. I always use oxy/acet, so I can get good penetration without blowing out chunks of the thin rusted material. Of course when I learned how to weld, there was no such thing as a wire welder. First you learned on oxy/acet, then you went to stick
__________________
2005 Hammerhead 150 170cc BBK, PnP Big valve Head, A12 Cam, Uni Filter, Custom Exhaust, 10G rollers, 1500 Contra Spring, 2000 Clutch Springs Just added - 2007 Joyner 250 SV - Let the fun begin 4-Dirt Bikes, Baja Bug and enough toys to keep me in the garage and out of trouble.
|
|
#657
03-06-2014, 04:19 PM
|
||||
|
||||
|
Working in exotic car resto on true-to-life basket cases "and what kind of car that you want to spend 6-figures on is in all those boxes of rust????!" and on my own crusty rust buckets got me pretty good with migging on thin, rust pitted sheetmetal. I welded it up last night. It's never pretty, but a little patience got her done.
The one pipe (the cracked one) has a full 180* bend coming straight off the head and was taking all the stress, the other pipe runs out longer and uses 3 angles to meet up with it at the collector and get around the quad frame's main downtube. I used some 3/8ths steel fuel line as a stiffener between the start of the pipes just before the flange down to the other side where they complete the 180 at the collector. I initially had the 5-hole rubber strap hangar (pic a couple posts above) on the tail of the pipe and it had a lot of sway. I added an angle tab to my frame to bolt to the last hole just above where it clamps to the pipe. That pretty much did the deal for it. biggest hassle was unwrapping the pipe, itchy! Had plenty of extra wrap leftover, so it got a heat paint session and fresh wrap. Last edited by x-bird; 03-06-2014 at 04:23 PM.
|
|
#658
03-06-2014, 06:14 PM
|
||||
|
||||
|
Quote:
I will be going the same direction with my head pipe, some VHT flame paint, followed by header wrap, or if I'm feeling froggy, I might have my powder coat buddy ceramic coat it.
__________________
ASE Master and Toyota Master Diagnostic Certified Buggy Building Trainee '04 Dazon Raider 150 'modded'
|
|
#659
03-06-2014, 10:19 PM
|
||||
|
||||
|
DEI wrap from autozone with hose clamps--don't bother with the junk bands that come with the wrap kits. Definite difference in seat temps. Main reason i wrapped though is that the pipe runs right next to the base of the jug and close enough to the carb for it add a lot of heat to areas that need it the least. I also have an aluminum shield with a ford truck fan mounted to it on the back of the seat that blows right on the head.
If you go with heat paint, run the pipe to heat set the paint before wrapping it. (I "cooked" mine in the woodstove last night). I'd have your friend cerma chrome it if you can though.
|
|
#660
03-06-2014, 11:07 PM
|
||||
|
||||
|
He does a fair price, but takes forever to do anything. I was looking at the heat cycle process for the vht, wonder how fast it would ruin an oven? LOL
__________________
ASE Master and Toyota Master Diagnostic Certified Buggy Building Trainee '04 Dazon Raider 150 'modded'
|
|
#662
03-07-2014, 02:10 AM
|
||||
|
||||
|
I run the same heat wrap on my road only VW bug with a 2110 engine. That stuff is amazing in lowering the heat radiated by the exhaust. I use it because the oil lines to my external cooler are in close proximity to the exhaust. It dropped my in town oil temps by 30 degrees and you can actually touch the pipes when the engine is hot (but not for long).
__________________
2005 Hammerhead 150 170cc BBK, PnP Big valve Head, A12 Cam, Uni Filter, Custom Exhaust, 10G rollers, 1500 Contra Spring, 2000 Clutch Springs Just added - 2007 Joyner 250 SV - Let the fun begin 4-Dirt Bikes, Baja Bug and enough toys to keep me in the garage and out of trouble.
|
|
#663
03-08-2014, 07:12 AM
|
||||
|
||||
|
I've been using the wrap for some time now. It's ability to reduced radiant heat and keep temps down are undisputable. I also like the sound deadening quality. It removes harmonic pings, rattles and vibration noise transmitted through the pipe. If it gives a slight HP boost as claimed then it's a added bonus.
There's a few drawbacks to the stuff. I's not very weather resistant. it will hold water and mud. and there's no effective way to clean it. Because the wrap retains moisture, the pipe has to be well painted before application or the pipe will rust terribly. The wrap after going through enough heat and cool cycles becomes brittle and break off if stuck by something on a trail. unfortunately, in a off road environment, the wrap has to be replaced on a regular basis. I started using the wrap a couple of years ago and average replacing approx. 3 times a year.
|
|
#664
03-08-2014, 09:05 AM
|
||||
|
||||
|
That is why I was going with the VHT coating, to at least slow down the corrosion on the pipe. I have seen guys run the wrap on ceramic coated header and see the coating peeling off less than a year later. The way my engine sits, I don't think much will pop up and hit the wrap like the GY6 style engines. We shall see, and depending on the cost of coating it, I may experiment with it both ways.
As for the performance benefit, I understand the concept and theory, but I really doubt it makes THAT much difference.
__________________
ASE Master and Toyota Master Diagnostic Certified Buggy Building Trainee '04 Dazon Raider 150 'modded'
|
|
#665
03-08-2014, 10:56 AM
|
||||
|
||||
|
There are both pro's and cons to exhaust wrap. I use it on some aftermarket exhausts where clearance is an issue to keep from melting or burning the surroundings. Although there are claims of performance gains I see it as if there were truly gains then NASCAR, NHRA and others would be using wrap.
|
|
#666
03-08-2014, 11:14 AM
|
||||
|
||||
|
Quote:
|
|
#667
03-11-2014, 08:53 AM
|
||||
|
||||
|
^^^ Also think on the flip side of that statement, while it isn't drag racing, older engines need all the help they can get. find enough tiny incremental improvements and you can realize some meaningful gains. As with most things though, you face the law of diminishing returns, cost/effort gets bigger while the gain gets smaller.
Now, back on topic, front end work is underway. revising front spindles to improve the geometry for my needs and to get rid of the the 2-inch lug extensions. the old tubes were getting sloppy, thicker wall mild steel replacement underneath the old one with new axle position.
|
|
#668
05-02-2014, 07:56 AM
|
||||
|
||||
|
Been awhile yet again!
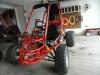
Finally found a way to make and hang an output shaft extension off the engine to eliminate the rear jackshaft and it's weight and parasitic drag. The suzuki sprocket has 3 retainer holes that just happen to align nearly all the way to the inside of the ID of a 1" tube. After a year and a half the light bulb finally lit. Took the old 3203 sprocket, chopped the hub off and using a 5/8ths flanged nut, used that and a bolt and washers to hold the sprocket centered on the hub. Scribed a "grind" line on the sprocket, cut the teeth off and ground and disc-sanded it to match the hub yet remain concentric. Welded that together, slid in the 1" jackshaft and voila! The old Sunl swingarm--- a really nice piece actually --- got chopped for a bearing hangar and tubing to attach it to the removable rear engine cradle. Shift lever and actuating rod took more time and work to modify to clear everything than did the output shaft and hangar ...go figure. Had to ditch the pull start and make a crankcase cover, added an idler sprocket since there's no adjustibility to the engine or front jackshaft and my chain length would force me into an offset link--been there done that and don't want to go back to it. end result was a net loss of 12 pounds of overhang weight and one less jackshaft/chain run for the engine to cope with. changed the gearing to 14-19, 11-32 for a 3.93 final. Seems right on the money for my needs. Feels much better. Took care of a lot of little other odds and ends including the temp sensor on the TT. Temps? Hot idle pre-run, engine goes to about 220, my fan takes it back down to 180 very quickly. Moderate running pushes 240-250 with the fan on, hard running it got to 272. Parked post run, i leave it idle with fan on and it draws it down to the 240 range, then cut it and leave the fan on to about 220. Shut fan off then and it naturally climbs and soaks another 10-20 then begins to drop back down. Sensor is mounted on a head bolt, it is too small for my sparkplug. From what i've been told, while it sounded high to me, for an air cooled engine like mine, those temps are good to go. Also a pic of the new spindle's orientation. gives a couple degrees of camber at bump, another 3/4 inch ride height, allowed elimination of the wheel spacers, cut a couple pounds of unsprung wieght and did a good job of getting the lower a-arm in closer to the tire and less exposed to rock hits -- have tagged them a bunch of times in the past.
|
|
#669
05-02-2014, 08:20 AM
|
|||
|
|||
|
Are you using the gy6? I didn't read through your super long thread. With my gy6 with all my mods my temps seem to run higher. I usually climb around 280 after the engine is warmed up and just idling. I have burned through a couple pistons since the build. When I am running all out WOT my temps easily reach 350 or more. I am trying to figure out if there is a reason my temps seem so high at times. I do not want to have to put another piston in this thing. If I have failure again I am ripping the engine out and sending it to Tom for full lookover.
__________________
Trailmaster XRX 150 TK Variator and 1500 Spring  SYC Performance Ported & Polished & Shaved 2 Valve Head, A-10 Camshaft, R2C Filter, and Hammerhead Exhaust  Hammerhead 250GTS White Torque and Clutch Springs, 18g Rollers, R2C Filter, Ported Polished and Shaved Head, Hammerhead Exhaust
|
|
#670
05-02-2014, 08:41 AM
|
||||
|
||||
|
Air cooled engines run much hotter than water cooled engines do. My buggy runs up to 375 deg. This is the main reason you do not want to run these buggies lean. Buy any new buggy which run lean to comply with EPA and in the owners manual it says to let engine rest after every 30 minutes of driving.
|
|
#671
05-02-2014, 08:44 AM
|
|||
|
|||
|
But rest is no fun Tom. Will the 250 fair better and be able to be driven longer?
__________________
Trailmaster XRX 150 TK Variator and 1500 Spring SYC Performance Ported & Polished & Shaved 2 Valve Head, A-10 Camshaft, R2C Filter, and Hammerhead Exhaust Hammerhead 250GTS White Torque and Clutch Springs, 18g Rollers, R2C Filter, Ported Polished and Shaved Head, Hammerhead Exhaust Last edited by mb1134; 05-02-2014 at 10:52 AM.
|
|
#672
05-02-2014, 12:27 PM
|
||||
|
||||
|
Quote:
engine is a 1985 Suzuki LT250E out of an old quadrunner. 5-speed auto clutch. just hoping to get to the end of this season with it and find the $s for a raptor 700r fuel injected. probably goign to buy a dang nice quad and chop it in order to get it as far as your heat goes, are you running the shrouds on the engine? gotta have them to make the fan pull the air across the fins for cooling. if something's blocking the airflow to the engine side, you may want to create a big duct for it to get better air.
|
|
#674
05-02-2014, 09:42 PM
|
||||
|
||||
|
yet another short little backyard vid. first time using the go pro and editing with my new computer. more of a test vid to see how the computer worked. on the old one, this would have taken about 4 hours. took all of 20 minutes.
was running rich on my test run the other day, 40 degree difference since i last jetted. dropped from 155 down to 140 and it's on the lean side now. http://youtu.be/AGTXxQGZ_HE
|
|
#675
05-12-2014, 10:31 PM
|
||||
|
||||
|
Went on the weight weenie attack over the last week or so since the buggy piggy bank has gone bone dry. Stared at it long enough to mentally list all the items that could be lightened or eliminated (unneeded braces, brackets etc. from past build configurations).
My original body panels were made from 16 gauge steel, had a sheet of 20 or 22 gauge rusting away under the firebird. Made and weighed a panel to compare to the old an original and found about a 40 percent difference, so it got new panels and a new look. I figure if i can't outrun the razors on the open flats, maybe i can blind them when they look in their mirrors and get them to run off course Knocked 7 1/2 pounds off with the panels, even after adding in two at the rear sides that I didn't get to when i went with the IRS, and about 11 pounds off with the excess remnants of past builds etc. Combined with the 12 or so i cut with the elimination of the rear jackshaft, and she's seen a 30-pound drop. I still have the rear platform and am mulling over getting rid of the front fenders. That'd be another 10+ pounds. Did a couple carb tweaks (dropped the needle, bigger main) and it's running about as good or better than it ever has. was pulling 30 about halfway through third gear before running out of room in the backyard. Plug is showing rich, but i had a long idle period with it and can't tell if that contaminated it or not.
|
|
#678
05-13-2014, 11:17 AM
|
||||
|
||||
|
Thanks, dropping that extra jackshaft at the back really seems to have helped the engine power-wise. Been playing with the carb a bit this morning and it's finally back to the point where i can get scare myself a bit going into the turns. Pulls 3rd gear strong from lower rpms, which is really a first.
Blew the master link apart 2 times, it was catching a bit of weld on the front jackshaft bearing hangar (about 1/2 mm clearance on the wider master link) and the idler sprocket was a bit off, had my spacer on the wrong side. Just redid my net fasteners (replaced the clips with springs) to get rid of the rattles ... and shaved another 3/4 pound. If you ever have the thought that taking the time to cut or grind off excess isn't worth the effort, stare at it long enough to see just home much extra metal you're really carrying! On these mods and homebuilts, it ends up being a lot as they get developed.
|
|
#679
05-13-2014, 04:28 PM
|
||||
|
||||
|
hey, x, when you started this (back in 2011) did you think that the 3203 would go this far? When I look at this I wonder why you didn't just build from scratch? Though I do love me a good project in progress
__________________
Yerf-Dog Spiderbox  Reverse Gearbox Heavy Duty Ball Joints Heavy Duty Chain Tensioner Canvas Roof/Netting Key Start LED Brake Lights Headlights SOLD!
|
|
#680
05-13-2014, 06:26 PM
|
||||
|
||||
|
Quote:
It really started as a way just to make the 03 stronger for the rocks and woods behind my house. Broke it just about daily. Got it to strong enough for my little loop, then needed parts to create a ride for my daughter so i chopped it up and found a 150 for it. At the same time I also got to thinking about racing at Line, which i've gone to since the early 80s. Figured the floorpan would make a light, nimble single seater for up there and off i went. Didn't expect to put as much weight on it as i did. Knocked my front end box section off the stands and onto my arm one night and did some pretty healthy muscle damage! Really, only thing that's left of the 03 is the floor, front short hoop and lower frame surround. I'd do it the same again except to maybe go 1.25 or 1.5 dia on the cage section. I have a plan to do that in the back of my mind that will take minimal cutting to do. If i had that kawa engine, it could handle it no problem. Now I'm really wanting an injected raptor 700R engine, if i go to that level, it has to have a better cage. No worries about anything else strength wise on it. Why no scratch build? Lack of $s, time, space, tools and the challenge of taking a yerf dog kart-based buggy to Line and finishing the race. A few guys up there spotted the "DNA" of it and couldn't believe anyone was crazy enough to attempt such a thing. Also, the feeling of passing a factory SXS in this--even though i didn't finish ahead of them because of the trans breaking is .... priceless.
Last edited by x-bird; 05-13-2014 at 06:28 PM.
|
|
#681
05-13-2014, 07:08 PM
|
||||
|
||||
|
Interesting! Well keep up the excellent work! And give us more pictures.... (says in a zombified manner) PIIIICCCCTTTUUURRREEESSS

__________________
Yerf-Dog Spiderbox Reverse Gearbox Heavy Duty Ball Joints Heavy Duty Chain Tensioner Canvas Roof/Netting Key Start LED Brake Lights Headlights SOLD!
|
|
#682
06-03-2014, 06:54 PM
|
||||
|
||||
|
Pre Race home stretch report. June 7th Coal bucket race, 6 laps of about 5 miles each.
Actually gotta have it on the trailer and roll out around midnight friday night LOL  Still playing with the carb, had to make a super tiny pilot. busted through a set of micro drill bits (working around a #92) soldered and drilled 1/2 doz til i got something that will idle at correct rpm--had to close off most of the air bleed holes. Still rich at idle and part throttle. Adding air to lean it out brings revs up too high at idle. Had an amazon gift card kicking about so i ordered 6 supertrapp discs to lean it out at the muffler then adjust the main accordingly. Hopefully that will do the trick. Main jet's up to a 175 and finally showing decent color on the plug. Thing is a fuel flippin' hog when i'm on it! Overall, it's running much better and if i have to, i have no worries about racing with the carb as-is. Aside from running otu of fuel,. will probably have a fuel can at the start/finish/pit area just in case. Replaced the suzuki neutral start relay that just happened to crap out this week (had to tap on it to get it to fire off the starter) with the one from my old carter talon 150 harness. seems to work. Wouldn't really be an issue, but we have to have engines off at starting line. takes care of jump starts. Dodged a bullet there. So far i've been the first to fire and roll off in every race. I'm like a vw bug, fastest in the first 6-foot Made a visor for my helmet, which had a narrow anti-glare shield. Used a replacement grinding face shield. Worked out pretty well. had to grind it thinner in some places to fit into the visor slot. Lost way to much time to muddy, dusty prescription glasses. Going to hang a box of tissues upside down from the roof for handy-grab visor wipes. Improved my rear view mirror situation. ditched the cheap, floppy euro door mount for a metal motorcycle mirror i got from a local shop for $10. Used the rod end clamp from a scag mower control rod as a mount for it. Again, lost too much time per lap monkeying with the mirror to see if i had traffic on my tail that needed let through. Went through the shocks, revalved both front and rear. Front's got faster compression and rebound shim stacks, rears got slower rebound and a bit faster compression. one front shock shaft is bent, got through it binding my adjusting the shims until the response rates matched the other side. Also made new, stiffer tender springs for the rear. "Dog-ear" front upper shock mounts got flipped and relocated to put the shocks more upright, increased both the ride height and spring rate. Still have to deal with the driven sprocket on the jackshaft working loose. think it just needs flushed and loctited at the set screws. Since i'm hoping this is the last season for the 250, plan is to just beat the hell out of it from the get go and try to win more money this time. 
|
|
#684
06-11-2014, 07:50 AM
|
||||
|
||||
|
Post race report ...
TIP .... Don't try to race after working from 6 am to 1 am then driving 3 hours, sleeping for 1 and then racing ..... takes too long to recover! So, just a bit bag-eyed my day began with a warm up drive that resulted in the steering column coming apart 1/2 hour before start time. Thankfully it happened next to a jeep racer's camp who had the 1 allen wrench size i didn't bring with me.  Apparently when i had the front end apart during the winter, i didn't slide the coupler up the splines far enough to align the through bolt with the detent in the shaft. instead, it has been clamped onto the edge of the shaft for more than a couple test rides. Apparently when i had the front end apart during the winter, i didn't slide the coupler up the splines far enough to align the through bolt with the detent in the shaft. instead, it has been clamped onto the edge of the shaft for more than a couple test rides.Lined up with a total of 81 Bikes/ATV/UTVs. 11 UTVs including 2 XP1000s-- a stocker and a pretty heavily modified one, those things are huuuuuge! Finished all 6 laps, 60th out of the 81 and 10th in class (1 can am broke on lap 1) Best mod was my helmet visor, but a clump of mud and rock roosted me on the 2nd lap and my eyelid's still swollen. (through the net, under the visor and under the glasses!) worst mod -- 3.93 gear ratio. I thought the carb tuning had it covered, but after lap 2 it wouldn't pull the hill. Struggling to get up that, then having to take the bypass route killed any chance of hanging with the class. Four of the class lapped me by the 4th-5th lap. Lap 3 -- Left tire pegged a big square rock dead on that sticking out of the side of a gully run like a bridge abutment. Sent the front end a couple feet in the air, and bent the left steering arm. Resulted in 3 and a half inches of toe-out to deal with for the rest of the race. Not too nimble with that alignment to say the least. Lap 4-5 shifter started acting up ... turns out someone forgot to weld the base plates of the shift handle pivot to the floor. It's been held in with 3 little tack welds for nearly two years now! Yes, the whole works came undone making things a bit interesting! Best lap was an 11:59, worst a 15:23. Without the gearing issues it should have been upper 10s. Taking the hill bypass cost almost 2 minutes each lap, and to get up the first two laps took several attempts. The modded 1000 runs in the 8s  he needs his own class he needs his own class FWIW, max. engine temp was 369 degrees, (had the fan on the entire race) hit 40 mph top speed on the run down to the open fields. Good brutal fun no matter what! Got some fixes to do, going to jump right up to 5.50 on the gear ratio (swap my 14T drive sprocket for a 10T) and not worry about shifting a half billion times per lap. Results pix has my name butchered, so .... Interestingly, based on lap times even with all the problems, I can hang with the top runners in the stock VW buggy, 4cyl 4x4 and 6 cyl 4x4 classes. Put together a continual lap from various clips from different laps when the gopro lens was clean. http://www.youtube.com/watch?v=Wr9eieK9yZo Last edited by x-bird; 06-11-2014 at 08:07 AM.
|
|
#687
07-15-2014, 06:46 AM
|
||||
|
||||
|
Spent the past month getting ready for round 2. 2 laps, longer course and a lot more rock coming my way this weekend.
CKAU's comments a long time back about my steering rack drop link and adding a stabilizer got the brain ticking along those lines, as did the hit it took during the race. The length of my steering arms (about 7 inches) makes them susceptible to bending, so I came up with a set of what I call damper rods to replace the tie rods. so far they've worked very well. Fixed and beefed up the arms. Greg (GMANLV) sent me out several sets of 18-inch shocks After a bit of mix n match, a pair of arctic cat (Fox/ACT) had the most action. Found that interesting, as they had the shortest body. I'd initially not even bothered to look at them too much vs the other goodies he sent until he mentioned it. Revalved/rebuilt and installed those along with springs from either a banshee or blaster and the front end picked up another inch of clearance and nearly 3 inches of upward travel. Also lost about 5 pounds total. And of course, while messing around testing out the 5.50 gearing and front end changes. I made a bit of a mess out of a chain Fixed that and decided that it will sit all this week until race time! http://www.youtube.com/watch?v=BbDFl...ature=youtu.be
|
|
#688
07-21-2014, 07:11 AM
|
||||
|
||||
|
Race weekend.
Finished lap 1, second lap the right chain jumped and got between the bearing mount and sprocket tooth tip. Blew the bearing apart and split the tooth down the middle. Limped back to the pits with 1 wheel drive. 9th out of 10. Good news, after nearly 3 years of development, front end is really working well. Time for new and better chains, these were pretty badly stretched Power-wise, still have to gear deeper, 5.50 still wasnt' enough to make good speed on the inclines. It's really time for a lot more power. http://www.youtube.com/watch?v=Tltne...8JijjfI73BjM2A http://www.youtube.com/watch?v=zRbNP...8JijjfI73BjM2A http://www.youtube.com/watch?v=x35K8...8JijjfI73BjM2A Last edited by x-bird; 07-21-2014 at 07:14 AM.
|
|
#689
07-21-2014, 11:34 AM
|
||||
|
||||
|
I take it, when you stopped that was when the chain come off? Just a suggestion. It seems if the motor had more power you could power up those hills, probably a good cam and some head work leaving the gearing alone for the wide open straits. Tough coarse though for the suspension. Reminds me of St. Joes except 90% of St Joe is rocky like the worst parts of your coarse and much narrower. But you done great getting a buggy through the whole coarse. You have come a long way from the first race. Great vids too.
 TOM
|
|
#690
07-21-2014, 02:39 PM
|
||||
|
||||
|
The stop was actually to try and clean my visor and glasses. (pretty much unsuccessful) Right before the race I cut a beach towel up into wipes and put them in a plastic baby wipes container that i attach to the roof. Forgot to bring them to the start! I was nearly blind and driving one handed while holding my helmet up with the other from the first splash through the next 2 check points. Cost me a lot of time and speed. Chain went about 2 miles in on the next lap (2-lap race). Heard it start skipping then it just locked up the rear end going uphill. All my chains are china Tractor Supply Co. cheapos and are pretty badly stretched. Going to by some non-o-ring HD 530 bike chain before the next race.
Cam-wise there's nothing aftermarket for the engine. Pretty much have given up thoughts of working more power out of it. Spoke with an ATV/bike cam grinder and they want the entire engine and a lot of $s to make something for it. I have one sprocket option left where all I need to do is buy 1 replacement for the one with the bad tooth, should bump me up to about a 6.0 final ratio. next race is even longer with the same fast sections and another 2 miles of rock per lap. Hoping to save up the coin over the winter and put an injected 700 raptor engine in. About 2500-3500 for a running quad -- recoup some money from parting it out. Also in the wish list for next season are steel trailer 5-lug hubs to add front brakes and 15-inch rims so i can run tall up front. I can weld rotor mounts on the steel hubs and swap the low speed bearings for better ones. have plenty of rotors and calipers for the brakes.
|
|
#691
08-25-2014, 07:58 PM
|
||||
|
||||
|
Back to race countdown time!
Scored some nice 530 atv/motorcycle chain on e-bay Great price, guy did 4 for $52. including shipping. well worth it! He has more, way better than tractor supply 50 series chain. http://www.ebay.com/itm/160597347214...84.m1423.l2649 Replaced the blown out bearing with a spare, put in a new jackshaft from BMI and put new 10 T sprockets on in place of the 11s. Replaced the 13T idler with a 15 and a larger dia. bearing to cool it down. Also working on a tensioner for the top side of the chain run. Engine side I tested a few drive sprockets and went with a 14T giving me 4.34 final ratio. I tried a 6.08 ratio and it was just too painful winging it up to 8500 at 5 mph in First--top speed was under 30 in 5th Some carb modding and tuning later and it seems to pull that gear pretty well. Intake adapter tube length was killing it, i finally chopped the old mikuni spigot off (really hated to cut up that roundslide, it was still in excellent shape) and fitted it over the TM's spigot so i could put the carb directly in the boot. Really woke her up! http://www.youtube.com/watch?v=KwUsG...8JijjfI73BjM2A Hoping to get to a buddy's property with some hills to test whether it can pull any gear uphill before the race in 3 weeks. IUf it c an't, then it's either a 5.50 or 6.08 ratio--which is why i'm adding a tensioner ...
|
|
#692
08-28-2014, 09:28 PM
|
||||
|
||||
|
Lookin good X
__________________
Growing old is mandatory Growing up is optional https://www.youtube.com/watch?v=NEXoa-8d7qE
|
|
#694
08-29-2014, 07:51 AM
|
||||
|
||||
|
Thanks guys, I appreciate the support. Gets kind of daunting and lonely on the starting line in my little creation when I'm lined up against a bunch of XP1ks, 850s/900s and Can Ams. The UTV class keeps getting bigger each race. The 1ks are BIG!
Got a nice surprise, Season points standing just posted, I'm sitting in 6th place out of 14 in the class by virtue of making the first two races, finishing all the laps in the 1 race and the first of two laps in the second--finish a lap and it puts you into the scoring system. If i can finish both laps in this next one and pick off a couple competitors I may jump up the ranks even more.
|
|
#696
03-13-2015, 05:37 PM
|
||||
|
||||
|
didn't realize how long it has been!
Result of the last race was a DNS --- 1 blown jackshaft bearing while heading to the starting line. Harness latches don't fit between chain and sprockets very well .... Working on getting the new shocks in for the season's races. At the rear i've pushed the droop about another inch lower. At full bump the chain/sprocket on the hub will be within 1/2" of hitting the end of the output shaft on the engine. Undecided on the fronts as to whether i'll keep the 10-inch travel 2.0 Airs or the AC/Fox coilovers I ran last year. dK if the airs will fit up there, 27 1/2 long is a lotta shock length to fit in. Chopped the old mounts off and cleaned up a mess of old tube and tab stubs from other rear suspension versions. Totaled over 15 pounds cut off and it should be a net loss of around 10 pounds after the new parts are welded in--that includes the shocks. the Airs are only 4 ounces heavier than the podiums! would be much further along but the control board in my mig is toast. Couldn't even put down a tack weld. new one is on the way. I've also decided to ditch the doors in favor of a tubing run and panels and may remove the roof rails and go corner to corner with just a helmet area bump up. I have nearly a foot of lid clearance as it is now. Last edited by x-bird; 03-13-2015 at 05:43 PM.
|
|
#697
03-25-2015, 07:11 AM
|
||||
|
||||
|
Rear shocks are installed. went with thicker mount plate and will be adding some support bits.
Visited my buddy at 1/2 scale dragsters yesterday and got hooked up with about 15-foot of cro-mo tubing in various lengths including four 90 corner sections. I've already cleaned off my old door mounts. going to put in another side tube and panel it in. Top of the cage is getting removed and re-tubed with a lower front hoop and overall lower cage height. Front shock mounts have also been cut and cleaned off. Going with a flat plate parallel to my caster angle and 1 1/4 x 1/8th wall box tube for the new upper mounts. Same basic style as before, but the towers will be taller and the plate mount will let me mitre them on a 90* angle so there's no fussy BS guesswork trying to fit them onto downward angled tubes.
|
|
#700
04-15-2015, 08:38 PM
|
||||
|
||||
|
Fronts are nearly done. need to fab and tack in mounts for the right lower a-arm and verify both sides are hanging level and the shocks are in line with the caster angle and each other. I got the last shock mounts a bit crooked in that regard, so i was glad to see them gone. These will get back and side braced with tubing.
As to travel #s front and rear, not quite sure yet, getting into the stoopid range. And finally, i have my donor LTZ. 440, cammed and hmf ballance pipe. has a bad starter and is missing the starter gears. took care of both of those items and had my grounds helper drag me behind hsi truck to bump start it. Let's just say i might want some depends if i were to keep and ride this quad Should make for a fairly competitive race season, i might just chop the front end of the quad frame behind the a-arms ad weld the whole works in place in one shot. will make life a lot easier, though there is still plenty to do to make it all work (controls, rad, sump)
|
 |
|
|